

Projects
The Projects chapter of the Listings module is where you would view and create Project listings. Previously known as Estates and New Developments.
Projects Overview
A Project is the combined name for Estates and New Developments which are either still under construction (New Development) or completed (Estate).
The module allows you to create an Estate or Development (commercial and residential), list the various Property Types, provide a description and the key features as well allowing you to add show days, a logo and the estate/development images. A great feature of this module is it allows you to link your individual residential and commercial listings to the relevant estate. Should you have an agreement with Property24, we can push the development to the portal (the portals' rules, regulations and fees should be communicated by the portal to you).
How to add a new project
To create a new project, simply click on + New Listing on the top left of your Projects summary page.

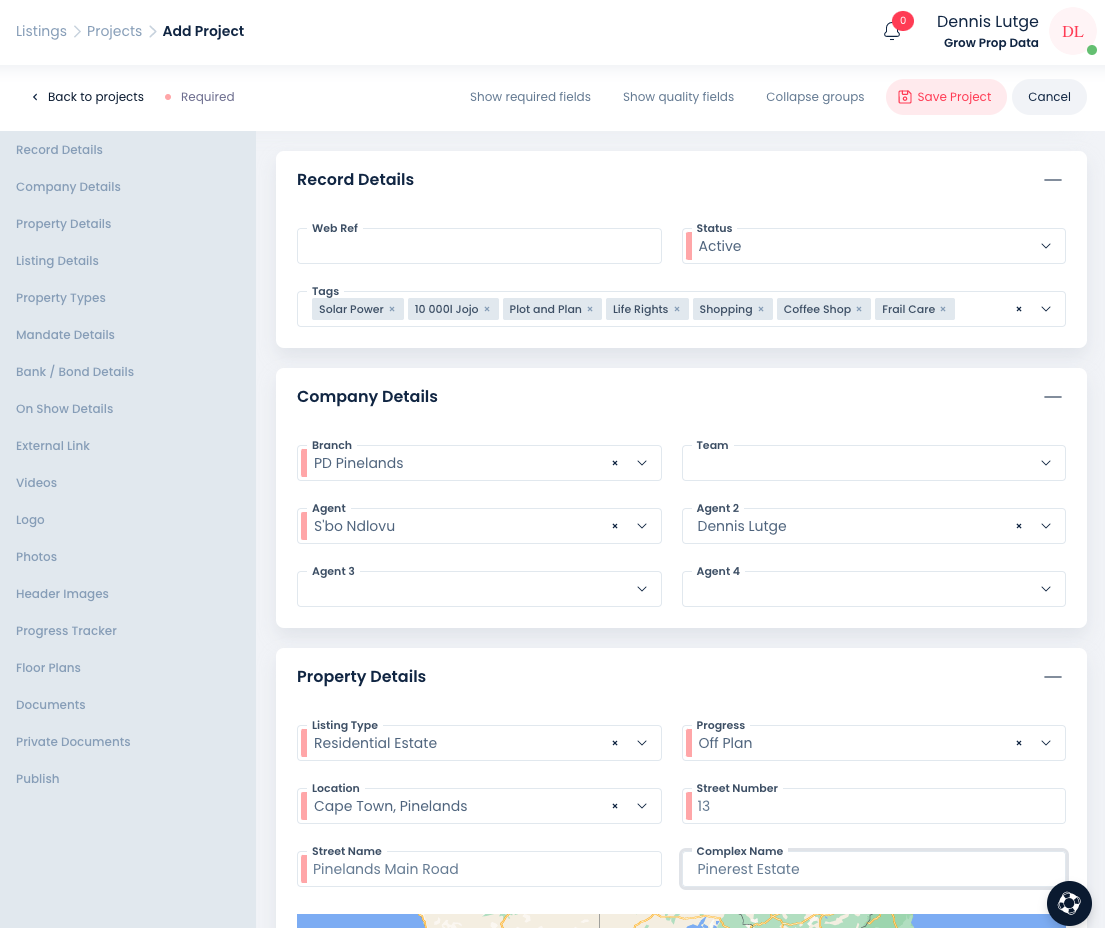
Once you have clicked on + New Listing, a new Project form will be opened, shown below. This form contains all the fields required to set up a new Project listing. See below for an explanation of each field.

Record Details
Status (Required)
The listing status affects how your listing will display on your website and Property24, below we discuss each status relevant to your new listing:
Active: This status is used to specify that you want to actively market your new listing. You can add a listing in this status but exclude the checks to Display on Website and Feed to Portals if you are still working on the listing.
An Active listing that has Display on Website checked will only display on your Prop Data website, the addition checkbox Feed to Portals must be checked in order for your listing to syndicate to P24.
Company Details
Branch
Select the branch that this project will be listed under.
Property Details
Listing type: select the type of project this will fall under - Residential Development, Commercial Development, Residential Estate and Commercial Estate.
A note on Prop Data's terminology: A development is any project (res and Comm) that is still in the process of being constructed. Initially, you will add the project as a Development and once construction has been completed and you are now selling/leasing units within the project, you will list the project as being an Estate. Or if the Estate has been completed and you are now selling "plot and plan" properties, add the listing as an Estate and make use of the Progress field described in more detail below.
Progress: Off plan, In Progress or Completed. Select the relevant progress status of your Development or Estate listing. While your Development is still being constructed, use option "In Progress" or "Off Plan", Selecting status "Completed" if the Listing Type is a Res or Comm Development, will remove the Development from view on your website, in other words, the Development will be seen as a Past Development.
Location: Start by typing in the location of your project. Note that some Estates have already been added as suburbs by P24.
Street number: Enter street number of the Development or Estate.
Street name: Enter the street name of the Development or Estate.
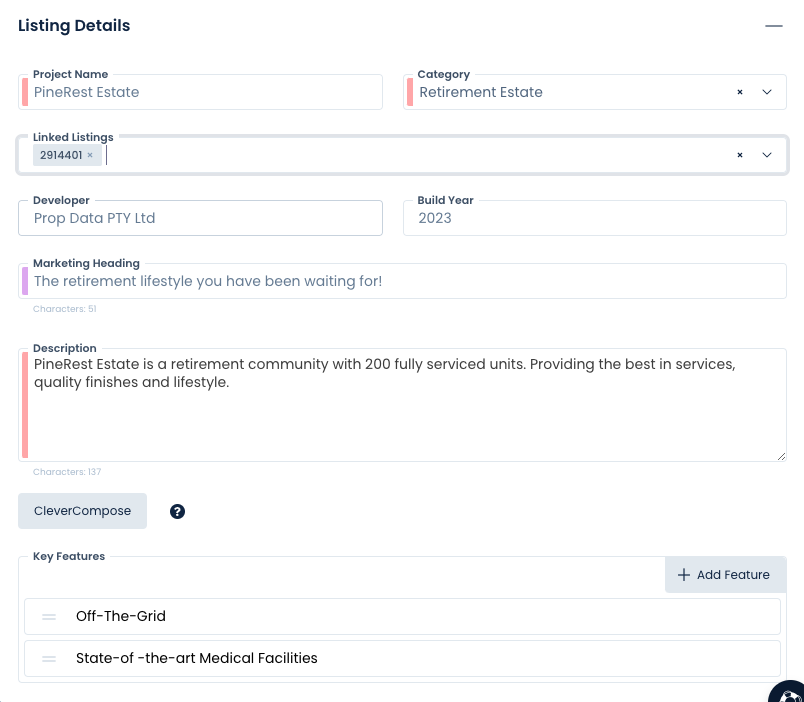
Listing Details
Project name: List the name of your project. Eg. Zimbali Lakes, Pineworx etc.
Marketing Heading and Listing Description: Your Marketing Heading should be a brief (less than 100 characters) statement about your listing. The Wow factor. Please do not make excessive use of punctuation or capital letters as the portals may remove these without informing you. Capitalise the first letter of your sentence only or where applicable, use a single ! or .
There is a character count below the field name for your information.
Your Listing Description is a required field. Here you will describe the project in enough detail to get your buyers attention, describe the estate/development, the various build options and their features and the lifestyle of the estate/development. Ideally you want your description to be more than 250 characters. There is a character count below the field name for your information. Always exclude your contact information from the listing description, cell and office numbers as well as any email addresses.
You can increase the size of your Description text block by pulling the triangle icon to the bottom right of the Description box.
Category: Select the projects category from one of the predefined options.
Linked Listings: If you have already listed individual listings (Residential or Commercial) that fall within this Project, add those listings now by using the Linked Listings dropdown. You can also add a listing to the estate/development from the Listings add/edit page, see the Residential and Commercial listings training guides.
Key Features: Here you will list the highlights of the particular estate/development. Keep your Key Features short and to the point. To add a Key Feature, click on the + Add Feature button. There is no limit to the number of features you can add but try keep the number below 10 if at all possible to not lose your buyers interest. See examples below:
Important Update to the Property Types Section
Please take note of the following updates that occurred with version 2.16.0 if Prop Data Manage with regards to the Property24 developments feed. Read this before proceeding with the process below.
Property Types
In this section you will list all of the Property Types that the estate/development will comprise of, the type of property, the number of units, the size and the starting price (Amount From).
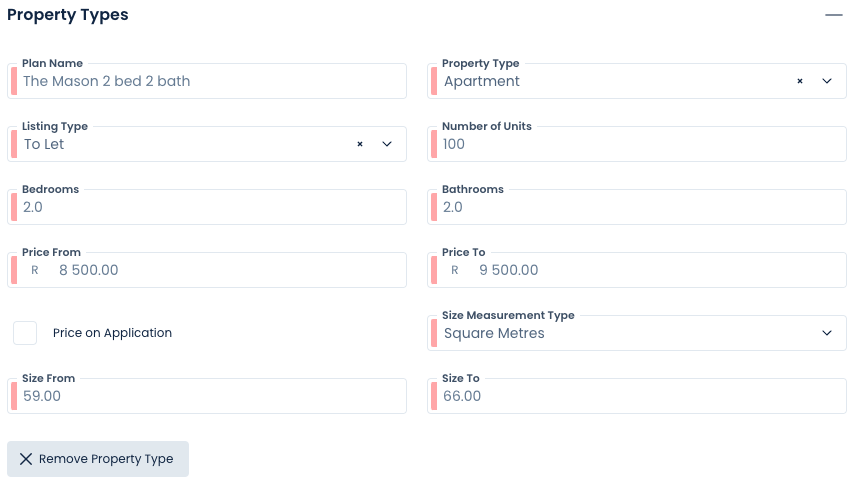
As most Estates and Developments comprise of more than one Property Type we have added the + Add Property Type button so that you can list all Property Types found within the estate/development. See how to add additional Property Types in the shorty video below:
To remove an incorrect Property Type that may have been added, click on the X Remove Property Type button.
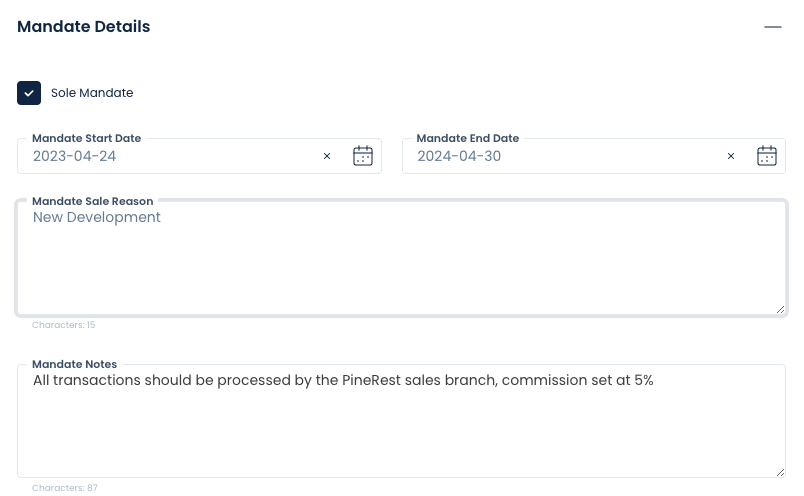
Mandate Details
Stipulate all relevant Mandate Details here, these fields are for office use. However a banner may be displayed on your website should you select Sole Mandate.
Bank/Bond Details
Add your seller's/developers bank and bond information here. The fields in this section are for office use only and will not be displayed outside of Prop Data Manage.
On Show Details
Whether you are scheduling a single show day for the month or you want to schedule a show day for every Sunday of the month, Prop Data Manage can accommodate this. To add a show day:
Select the On Show checkbox, additional required fields will be presented to you:
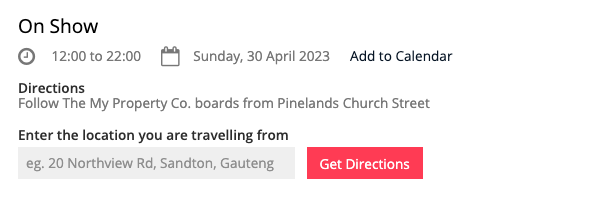
On Show Date: Select the required date from the calendar.
On Show Start Time: Type in the required Start time or use the up and down arrows.
On Show End Time: Type in the required End time or use the up and down arrows.
On Show Directions: The information that you add into this field will only be displayed on your Prop Data website. Add the directions to your show house or add a note you wish prospective buyers to be aware of.
There are 3 additional options on this section: Add On Show Every Saturday, Add On Show Every Sunday and + Add Show Day
Selecting Add On Show Every Saturday will pre-populate the On Show Date and start and end times for the next 8 weeks, you can add and remove days you see fit as well as edit the start and end times.
Selecting Add On Show Every Sunday will pre-populate the On Show Date and start and end times for the next 8 weeks, you can add and remove days you see fit as well as edit the start and end times.
The + New Show Day button will allow you to specify any additional show days.
View History: Selecting this for listings that have previously been on show will show you the past show day dates.
Prop Data Manage will remove show days and add additional show days as soon as the days become current, banners are removed and added and the listings are added to the next show day alert run.
.png)
On Show information as it would display on your listing on your Prop Data website:
External Link
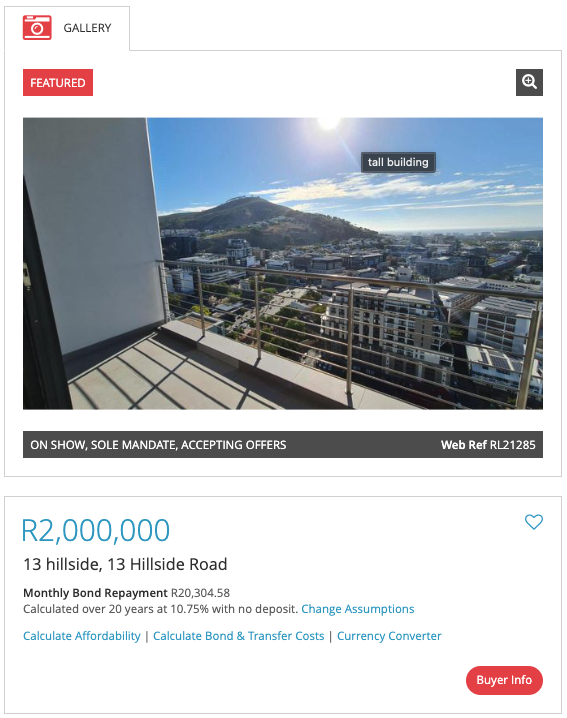
This is a Prop Data website exclusive field. The external link allows you to add a button to your listing on your Prop Data website. The External Link can be used in a multitude of ways. Here are some suggestions: Add a link to your cloud storage for clients to download bond application forms, add a link to a separate form on your website or point the button to an external website that may contain more information about the estate that the listing is part of. To add an external link, complete the fields:
External Link Name: The text you want to display on the button. In this case, we have typed in Buyer Info.
External Link URL: This must be a valid URL, so make sure the URL starts with https:/http: e.g. https://www.buyerinfo.co.za.
.png)
The information you capture into the above fields will result in a button being displayed on your website. Note the Buyer Info button in red at the bottom right of the below image.
Videos
Adding a video to your listing will immediately increase your listing's quality score and will hopefully result in more enquiries! To add a video or Virtual tour to your listing, please read below:
YouTube
Please ensure that your agency or branch has its own YouTube channel. This will avoid having your videos blocked by the portals. Keep logos and long video intros to a minimum. To add your YouTube video to your listing, insert the YouTube video ID into the field: YouTube Video ID. The YouTube video ID can be obtained by clicking Share while viewing your video on YouTube.
YouTube share link: https://youtu.be/7H7QNRjZGXg
Copy and paste all the digits and letters after the .be/ leaving you with: 7H7QNRjZGXg
Now paste the ID into the YouTube Video ID field.

Matterport
Once you have been issued with the Matterport URL from your relevant media agency, you may be given a URL that looks like the below:
https://my.matterport.com/show/?m=1WMV533oo92&brand=0&nt=1 or https://my.matterport.com/show/?m=1WMV533oo92
The Matterport ID can be found between the m= and & sign. So in the case of the above, the Matterport ID is 1WMV533oo92
Copy and paste 1WMV533oo92 into the Matterport ID field.

EyeSpy360 URL
If you have a virtual tour that has been created using EyeSpy360 software, copy and paste the entire URL into the EyeSpye360 URL field:

Virtual Tour URL
Add the full URL of any virtual tour or video into this field, excluding YouTube, Matterport and EyeSpy360 as these are handled in their own fields as you have seen above.
The system requires the full URL. For example: https://www.myvideotour.co.za/w53fefsfsfsff

Your Images, YouTube video, Matterport Virtual Tour and floor plans will be shown on your website as seen in the below image:
.png)
Your Prop Data website supports the above media types. Property24 will accept YouTube videos, EyeSpy360 tours and Matterport Tours. Private Property will accept YouTube videos and Matterport Tours.
Logo
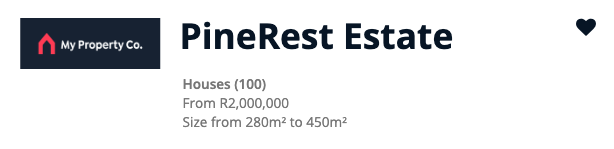
Upload your estate/developments logo into this section of the Add Project form. The logo will be displayed on your Prop Data website when prospective buyers view the estate/development. Example below:
Photos
Photos can make or break your estate/development listing on your website or on P24. Before uploading your images, follow our guidelines below:
Only take images in a landscape orientation.
Your max image size should be 1920x1080. Adding images with a higher resolution will only slow down the upload process and increase the size of your storage. The maximum any portal will display an image at is 1920X1080.
Avoid having logos and contact numbers displayed on your images.
Try not adding too many images. A good count is between 30 and 45 images per listing.
Do add Captions to your images. Captions provide context to your images and are SEO gold.
Try not to reuse images, which may be the case with rental listing images where you market the property every 12 months. Rather upload recent images.
Property24 accepts a max of 60 MB for all your images combined.
To upload images, click on Upload.
Now select the images from the correct folder on your computer and click Open.
Please see the image below for more information: The total image size at the top left (Property24 Limit), individual image size in bytes, and captions that have been added to images.
*Images used below are for demonstration purposes and do not represent images that would be associated with an estate/development.

Once uploaded (remembering that larger images will take longer to upload) you are now able to click and hold (drag) your images to get them into the correct position. Windows users can press CTRL and - to zoom out on the browsers to get a better view of all their images, Mac users use: CMD and -. Zoom back in by pressing CTRL/CMD and +.
You can rotate your images by clicking on the ⟲⟳ icons.
Delete duplicate or unwanted images by clicking on the bin icon.
Using the blank checkbox, at the bottom left of each image, allows you to bulk delete the selected images or download the selected images. Please see the image below:

Progress Tracker
Upload progress images for your New Development listing here, progress images will only display on your Prop Data website. Upload progress photos as described under the Photos section above.
Floor Plans
Floor Plans are managed in exactly the same way as your listing images. Please note that Property24 only accepts 5 Floor Plan images per listing. There is no limitation to the number of floor plan images on your own website.
Documents
Prop Data website only option: The Documents section is for any documents you wish to add to your listing to be displayed on your Prop Data website. Adding documents here will make them available for your buyers/tenants to download. Do not add private and confidential documents here. Examples of documents that you may want the public to be aware of: Body Corporate Rules, Rental application forms, Terms and conditions, etc.
To upload your documents, click on Upload and select the required documents from your computer.
Once uploaded your documents will appear at the bottom of the Documents block.
To rename your documents (user-friendly name), click on the pen icon, specify the new name and click on Save. Repeat this process for all documents you have added.
Change your document order by clicking on the double horizontal line icon in front of the document name. In this case, we have renamed our documents to Tenant Application Form and Body Corporate Rules and Regs. Please see the image below:
.png)
The name you have given your documents will now be available on your website on the listing page for download by your clients. Please see the image below:
.png)
Reminder: Do not add private and confidential documents into the Documents section. Add any private and confidential documents into the Private Documents Section. Please read more information on this below.
Private Documents
Here you can add all private documents to the listing that you do not want to be available outside of Prop Data Manage. Private documents include docs such as identity documents, contracts, and mandate agreements.
Uploading Private Documents is done in the same manner as that of Documents.
How to edit a project listing
Editing a project listing draws on same fields that you used to create a new listing. You will use the same form, but only edit the fields that apply.
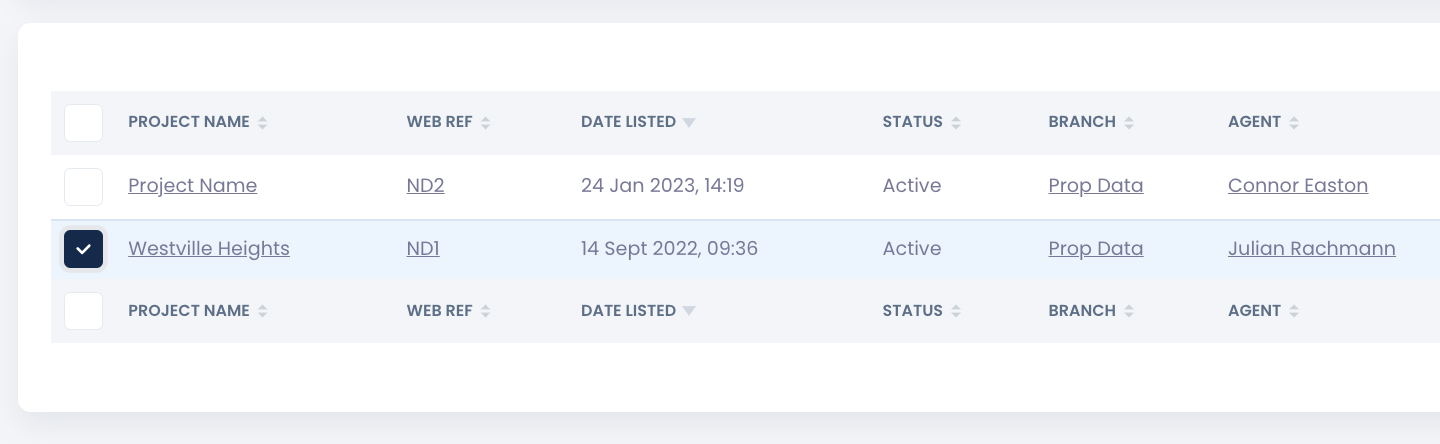
Should you wish to edit information on a specific listing, you will first need to find the listing. You can do this by using the Keyword Search function on the summary page. Once you have found the listing, select it by placing a tick in the check box to the left of the listing name, as shown below.
When you have selected the listing, a new menu will appear on the top right corner that looks like this:
.png)
Edit
The Edit button is where you will go should you want to edit any listing information.

When selecting Edit, a new form will appear, it is the same form you would have used to create the listing originally. From here, you are able to edit all information on the listing. When you are done, remember to click the Save Listing button on the top right of the form.
Project dashboard
Here you are able to view all your project listing stats on a single, easy-to-view page. The Dashboard provides a daily overview of how well your listings are performing which can help you refine your marketing strategy and improve your sales. Here is an example of what you will see if you click on the Dashboard of a selected project:
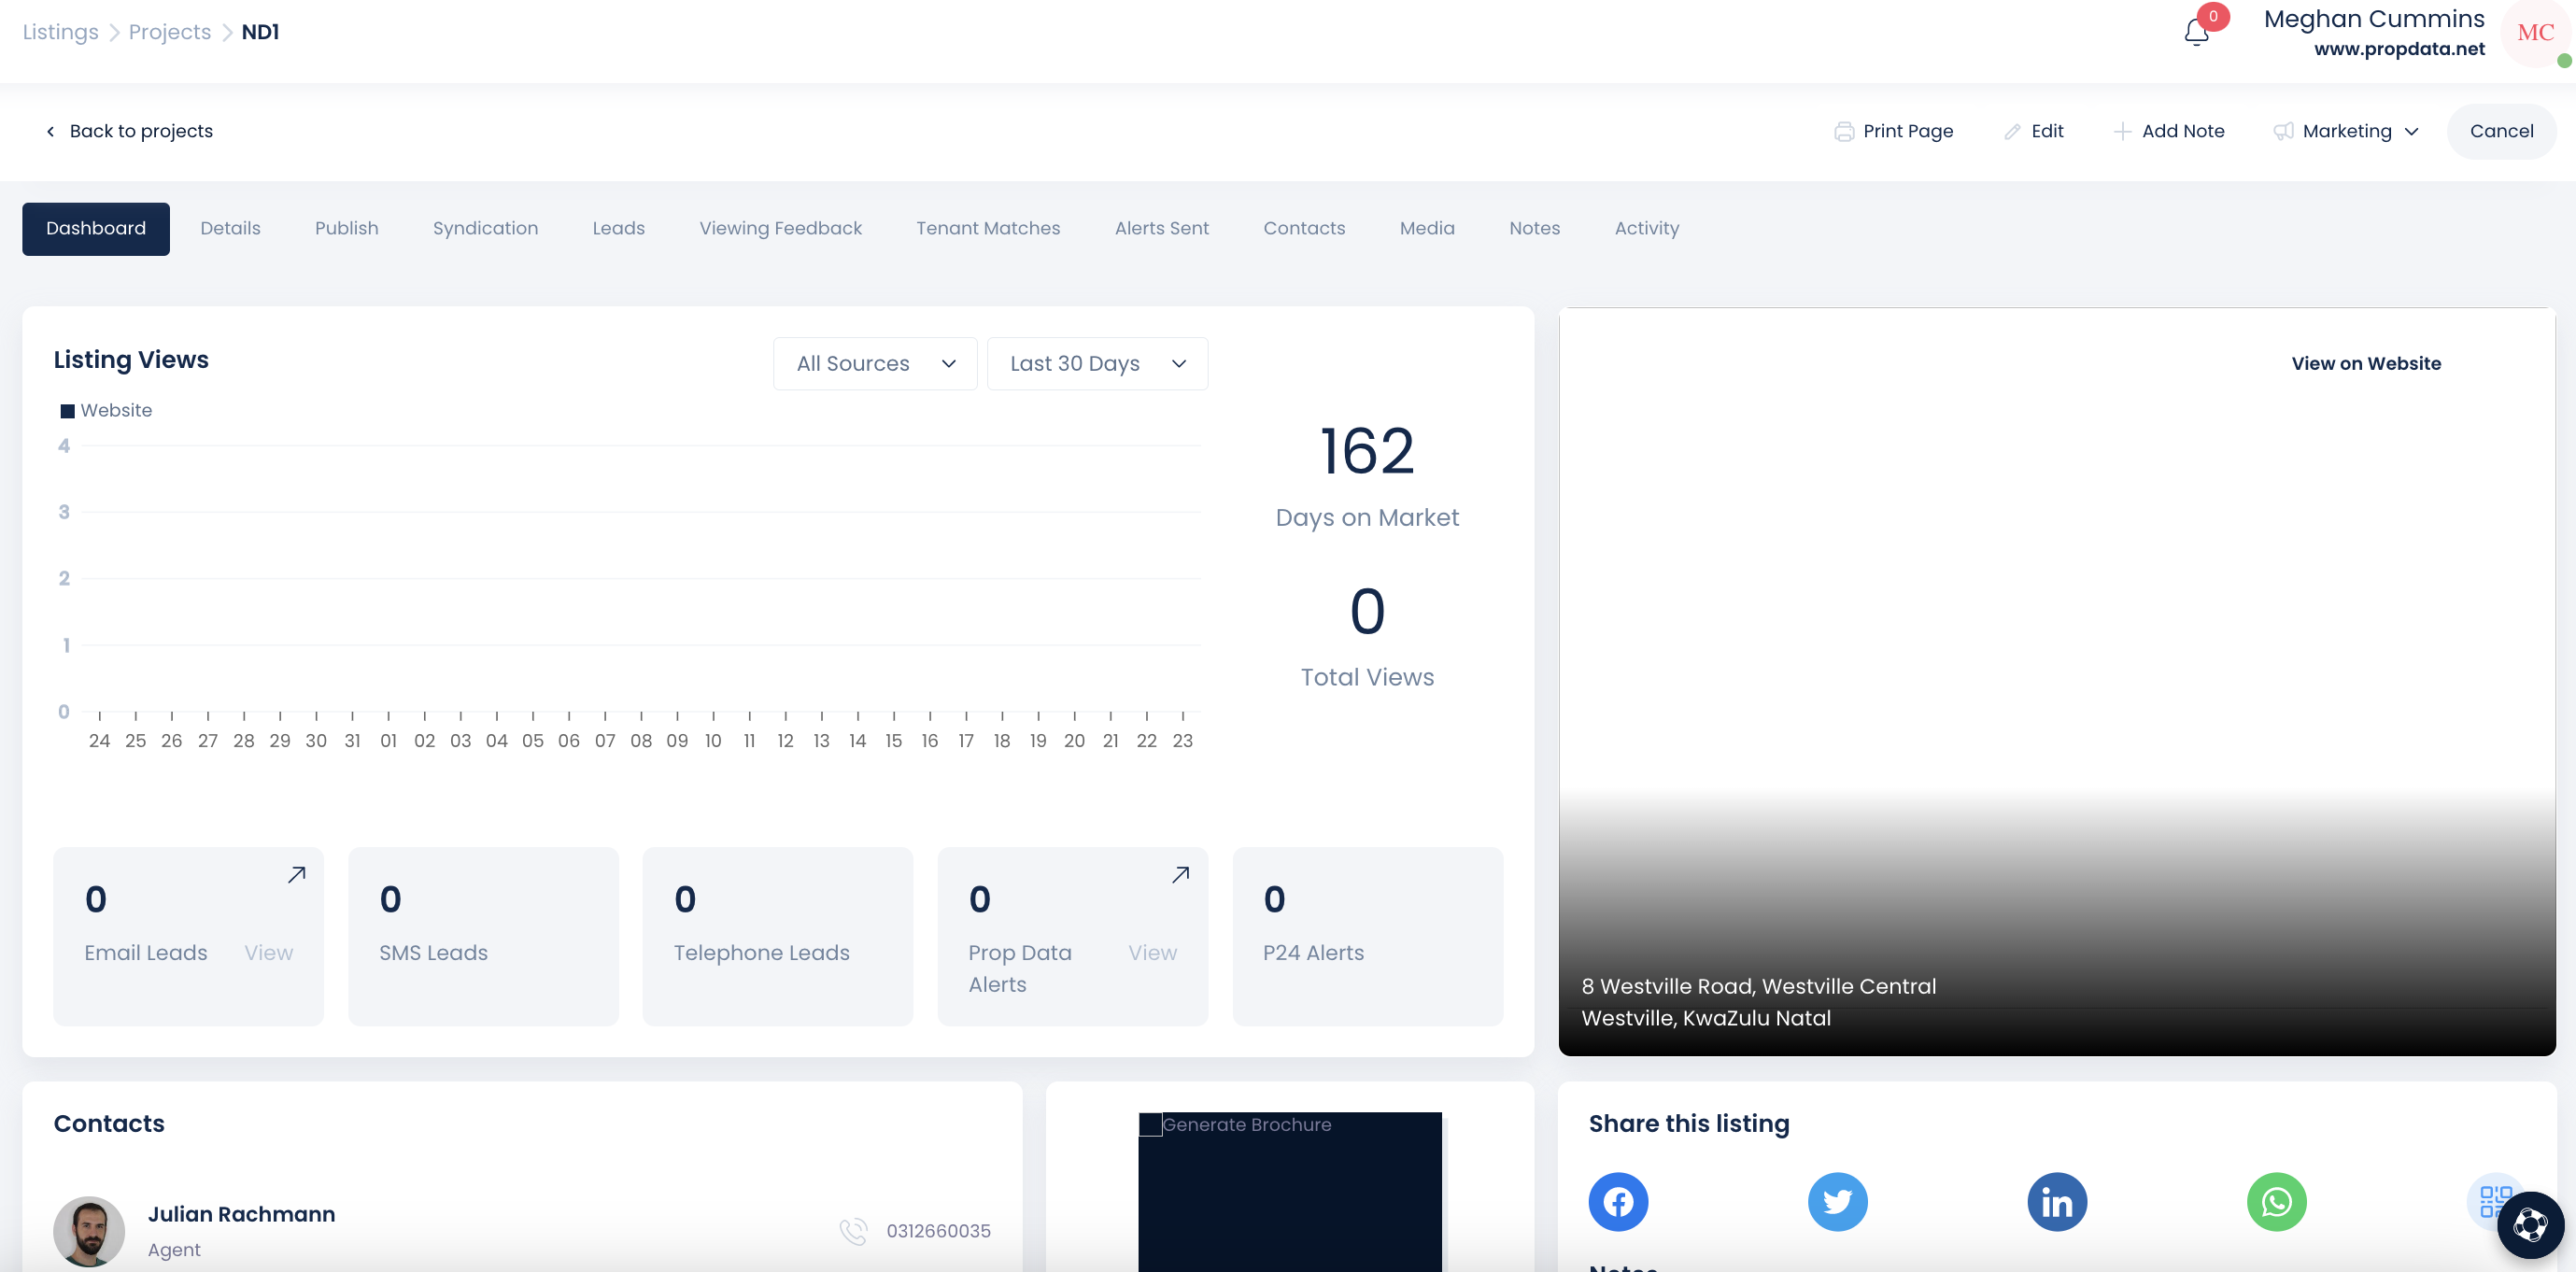
The Dashboard also allows you to effortlessly share your listing to your favorite social media platforms or via WhatsApp.
On the Dashboard you will see a full overview of your listing information including listing views, days on market, images, contact information for the agents assigned to the listing, all lead information, all alerts sent and all syndication information. There is also a direct link to view the project listing on your website by clicking View on Website from the top right of the Dashboard page. You can also generate a listing brochure, which you can then export as a PDF.
Project listing record tabs
Details
Allows you to view all the details of the listing you have selected.
Publish
Here you can view your publishing settings and where your listing is feeding to.
Viewing feedback
Provides details of all viewings logged for your specified project with feedback on interest and not interested, with reasons thereof.
Activity
Allows you to view all activity (audit log) that has taken place on a listing, which includes all changes or updates made by yourself or another agent that your listing is available to.
Tenant matches
Provides and overview of the potential tenant matches for your listing.
Alerts sent
Shows what alerts have been sent and to whom.
Contacts
This shows the agent/s contact that is associated to the project listing
Copyright © 2023 Prop Data (Pty) Ltd Privacy Policy