

Residential Listings
Welcome to the Residential Listings module. This provides you with all the functionality needed for you to run your day-to-day business as an agent. With exciting add-on features, you have everything you need complete tasks effortlessly. This guide will show you how to get the most out of it.
Residential Listings Overview
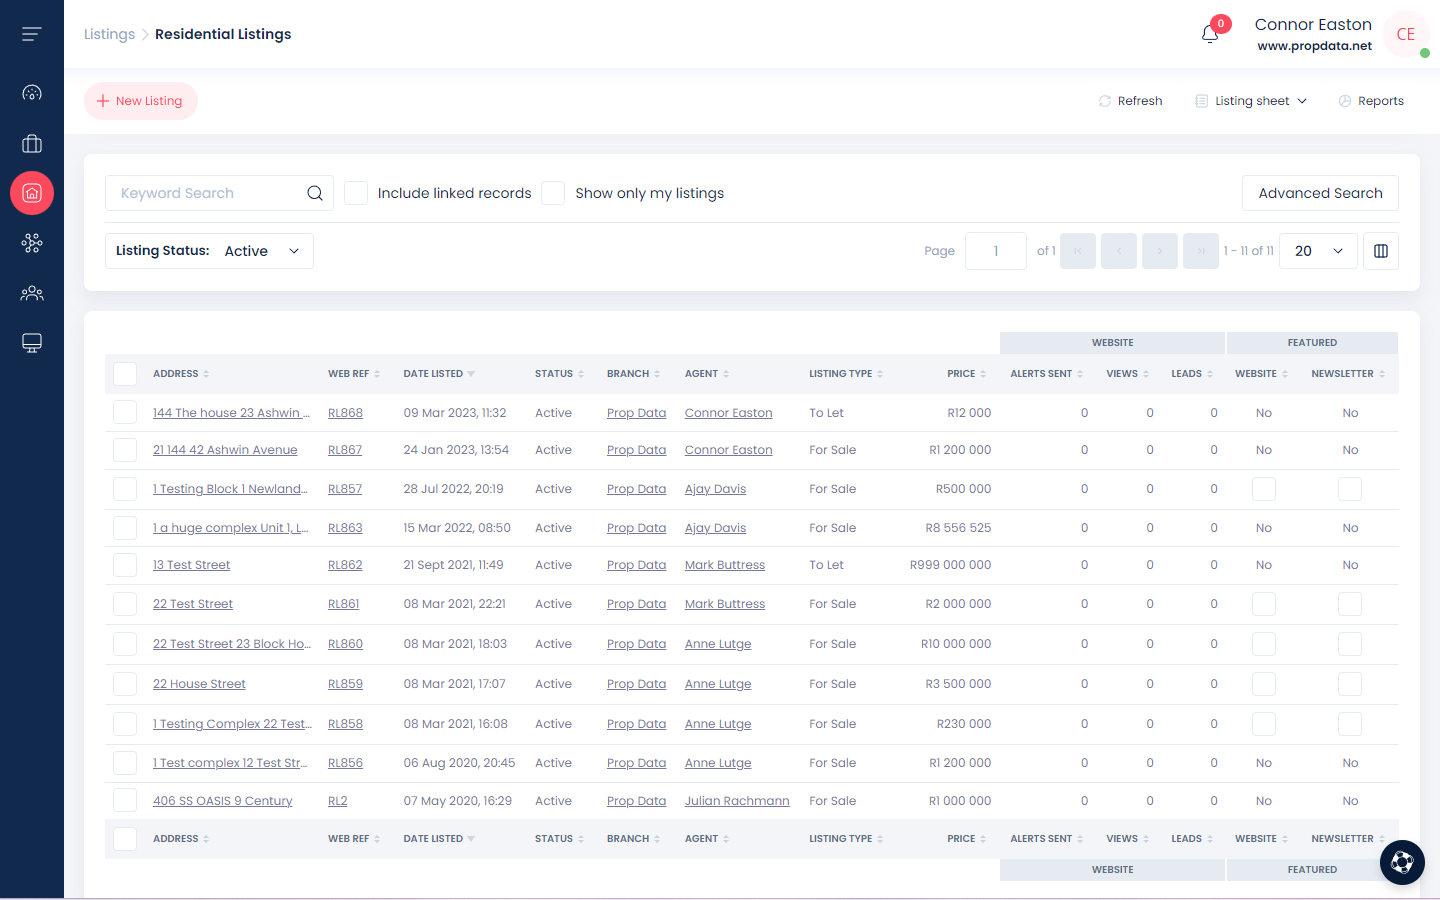
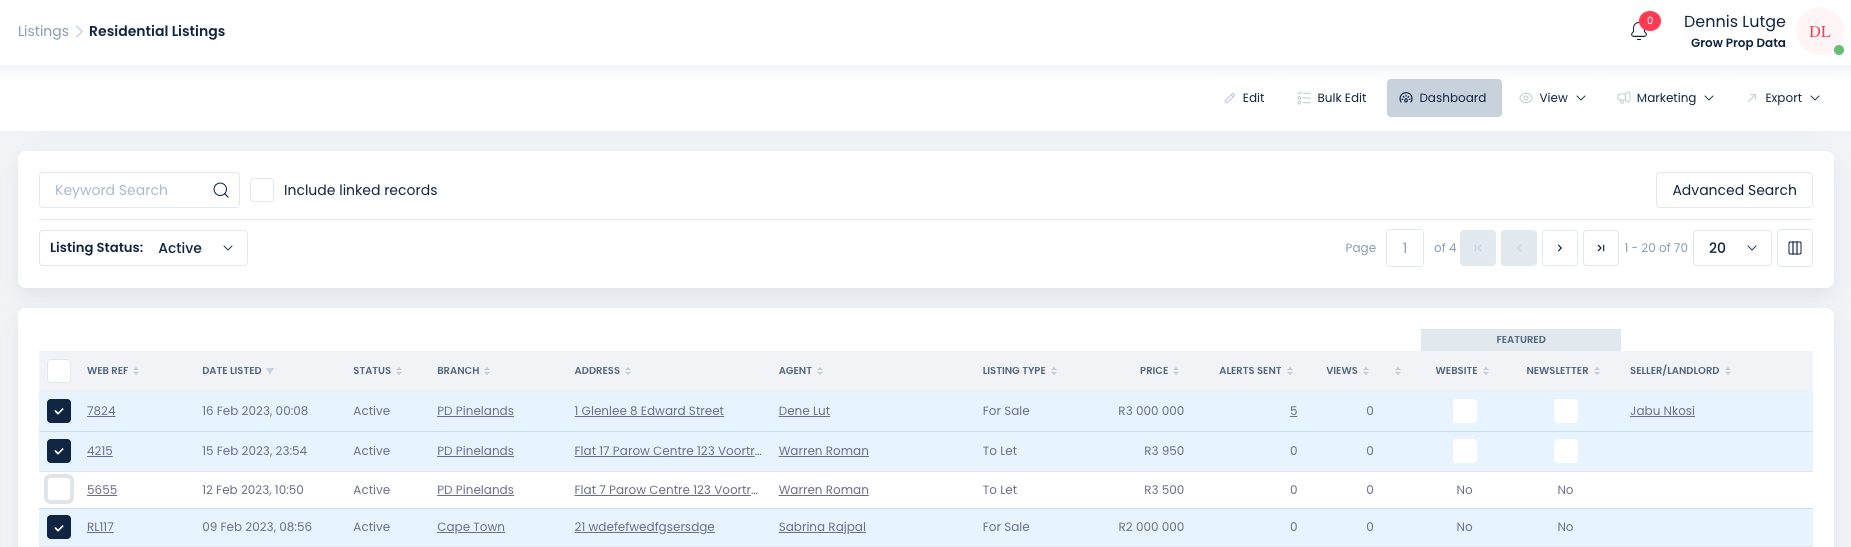
When accessing the Residential Listings section of the Listings Module, you will land on the Residential Listings summary page (shown below). The summary page is a detailed overview of all (default status — Active) Residential Listings on the system. By default, you are able to view the property address, web ref, date listed, listing status, branch, agent association, price, alerts sent, views and leads. These columns, shown below from left to right, can also be adjusted to a customised view should you wish to view any other information that is not shown by default on the listing summary. This can be done using the Column Management tool. For a detailed instruction guide on using our column management tool, please refer to the General Functions chapter of this training guide.
The listings that you are able to view on the summary page will be dependent on your viewing rights (User Group access). Generally, if you are an agent logging in, you will see only your own listings, whereas a branch manager may be able to see their own listings as well as the listings of the entire agency or branch.
Keyword search
At the top left you will see the Keyword Search bar (pictured below). Here you can search for any listing with the web ref number, Property24 (P24) reference, Private Property (PP) reference, an address or any other keyword or tag. The Keyword Search works best where a short (one or two-word) input has been added. You can also filter your listing search by using the Listing Status dropdown and selecting either Active, Pending, Sold, Rented, Valuation, or All listing statuses.
.png)
Advanced search
At the far right, you will see the Advanced Search button, which will allow you to do a more specific search. We have upgraded our Advanced Search function and you will notice it is much more streamlined than the old system version and now allows for more effective searches. For a detailed overview on the Advanced Search function, please refer to the General Functions section of this training guide.
Activity tabs
On the top right of the Listings summary page, you will see three activity tabs, as shown below. These are Refresh, Reports, and Export. Please note that depending on your access level (User Group), you may not have the Report and/or Export buttons.

Refresh
Clicking Refresh will refresh the summary page with any new listings that have been created.
Reports
Clicking Reports will allow you to generate an Activity or Listings report for your listings. For a detailed guide on generating these reports, please go to the General Functions section of this training guide or click here.
Export
The Export function allows you to download an Excel or PDF version of selected listings/fields or all fields you have selected or you can download a complete summary of all the records on the system. The export tab will open a dropdown, showing the options available as shown below. Read more about the Export function here.
.png)
How to Add a New Residential Listing
There are two ways to add a new Residential listing. You can do this from the main Dashboard and from the Listing Summary page.
From the main Dashboard, you will simply click on the New Listing button and select the type of listing you wish to upload from the dropdown — Residential, Commercial, Holiday, or Project. From the Residential Summary page, click on + New Listing
.png)
Once you have clicked on Add New Listing, you will open a page which includes all the fields required to create a new listing.
Take note of the fields coloured in Red — these are required fields, meaning they have to be filled out in order to be synced to the portals. If any red fields are not filled in, the listing will not be able to sync to the portals.
Fields that are marked in purple are quality fields. These fields do not have to be filled in, but if they are, your listing will rank higher on the property portals and be more visible to potential leads.
Below is an overview of the form to add a new listing. We will go through the various fields and point out any additional information you may find useful.
At the top right is a menu showing the following:
Show required fields — clicking here will change your page view and remove all non-required fields. This allows you to only fill in the fields that are necessary to have your listing uploaded onto the portals. We strongly advise that you also fill in the remaining fields that aren't required as this gives you a much more effective listing that will rank higher on the portals with better visibility.
Below is an in-depth look at the fields available for you to select when adding a new listing.
Note: The + New Listing button will not be displayed if you have already selected a listing using the left-hand checkbox on the listing summary page.
The add and edit listing form is exactly the same therefore the same fields would apply if you are editing a listing. The form will adapt and provide additional options as you provide more input. Certain sections like the Publish section will only be available once all required fields have been completed.
.png)
Web Ref
The web ref (Website Reference) will be allocated by the system. If you want to create your own series of web refs, please specify the required web ref at the time of adding the listings as this cannot be changed at a later stage. If you will be using your own series of Web Refs, ensure that the reference is not too long or complicated as buyers/tenants will use the Web Ref to search for a specific listing on your website.
Status (Required)
The listing status affects how your listing will display on your website and the property portals. Below we discuss each status relevant to your new listing:
Active: This status is used to specify that you want to actively market your new listing. You can add a listing in this status but exclude the checks to Display on Website and Feed to Portals if you are still working on the listing.
An Active listing that has Display on Website checked will only display on your Prop Data website. The additional checkbox Feed to Portals must be checked in order for your listing to syndicate.
Rented: Add a listing in this status only if you intend to keep the listing for your records. New listings will not syndicate if this status is used when the listing is first added.
Sold: Add a listing in this status only if you intend to keep the listing for your records. New listings will not syndicate if this status is used when the listing is first added.
Pending: Use this status to specify that you have an offer (sale pending) on your listing.
Valuation: This status is handy to use when you are still working on your listing, for example, you are waiting for your signed mandate but would like to get the listing basics added in the meantime. Adding listings in this status will not permit you to publish the listing to your website or the portals. Look at this status as a way of drafting your listing as this listing will not be viewable by the public and will only exist in Prop Data Manage.
Tags
Tags are useful in the case where a field does not exist within the system already. Depending on your access level (User Group) you may be able to add a tag or you will be presented with a list of tags that have been added by your management team. It is not necessary or efficient to add a tag for a field that exists within the listing add/edit form. Adding a tag for suburb or adding the listing street address as a tag, for example, is counter-productive as you can search for those fields with the Keyword Search and Advanced Search.
Useful tag additions could be: 10 000L JoJo tank, Airbnb ready, Off-the-Grid Solar, or 10 ha irrigation dam.

If a tag/s has been added to a listing you will be able to use the Advance Search function and find the tagged listing/s or use the Tags column on the summary page (Column Management) to find your tagged listings. Read more about adding Tags here.
Branch, Agent, and Team (Required)
By default, the branch you have been allocated to will appear in the Branch Field. If you are added to more than one Branch, you will be able to choose the specific branch by clicking the Branch dropdown.
Your name will be defaulted to the Agent field. If you are adding the listing on behalf of another agent, select the specific agent from the Agent dropdown. You are able to add 4 agents to your listing. However, some portals may only display 2 or 3 agents on their listing pages and not all of the agents added in Prop Data Manage. Type the required agent's name into the dropdown search to find the agent more quickly.
Teams are used in the case of a group of agents. If the Team is selected, only those agent names that belong within the team will appear in the agent dropdown. Learn more on Teams here.
Lightstone Lookup
Prop Data has partnered with Lightstone to allow you to identify your listing on Lightstone via their API. The Lightstone lookup is provided free of charge to Prop Data clients.
To identify your property on Lightstone, click the grey Lightstone Lookup button.

A slide-in menu will appear at the right of your screen as shown below:
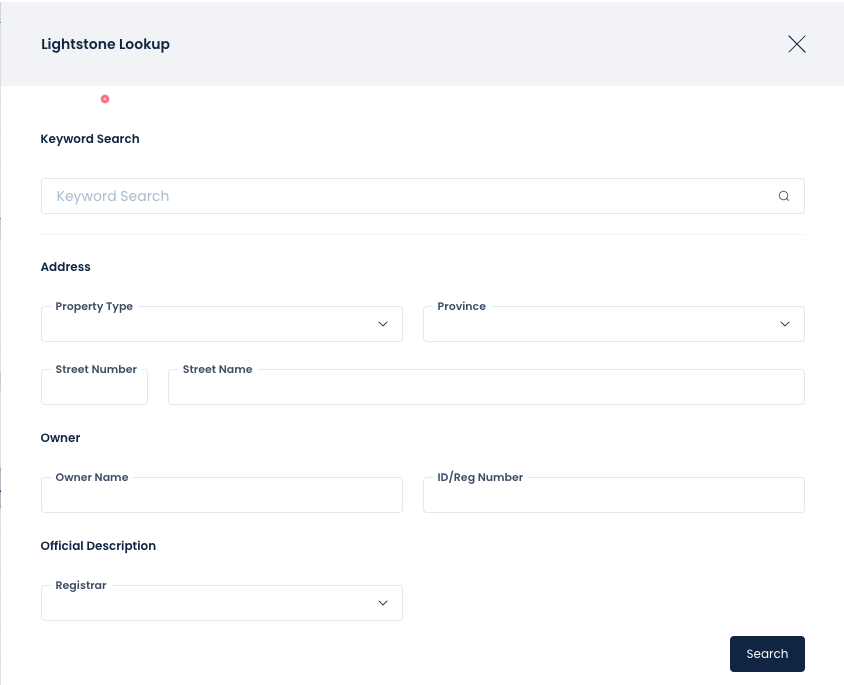
The easiest way to find your listing is by using the Keyword Search. Enter your seller's identity number, seller surname name (in that order) or the listing address (street number and name).

The relevant results will be returned when you click on Search. Now use the + button in the search results to associate the Lightstone record with your listing.
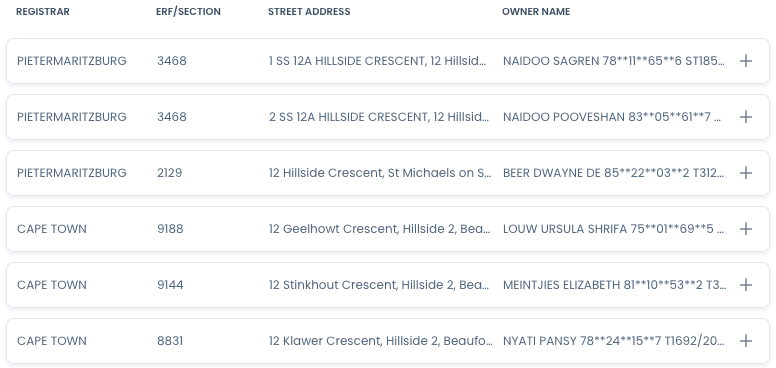
The Lightstone Lookup will populate the following information into your new listing record:
The Lightstone ID, the property's street number and street name, the ERF number, any sectional scheme details and the property's coordinates. We suggest that all new listings be identified on Lightstone for your records.
Our Valuations Report provides you with a branded report which you can present to your prospect. We use the Lightstone Toolkit as well as your own listing data to separate your report from the competition. Chat with your Prop Data account manager for more information.
Listing Type (Required)
Select whether this is a new rental listing (To Let) or a new sale listing (For Sale). You are able to add the same listing as a rental and a sale on Prop Data Manage.
Property Type (Required)
Prop Data Manage has a range of Property Types for you to choose from; the Property Type you select will display as such on your own Prop Data website but may have to be mapped on syndication to the relevant property type that the various portals support. Please do not use legacy Property Types: Freehold, Freestanding, and Sectional Title. The Title is now handled in the Property Title field.
Location (Required)
Now select the suburb the listing falls under. The most efficient way to get your desired location is to type the first four words of your location into the Location field and then select the location from the results. Please remember that we use the Property24 location set. By doing this, we effectively syndicate your listing without issue.
The Property24 location data can be found here. Use CTRL and f (CMD and f for Mac) to find your location by searching the page.
Should your desired location not appear on the location dropdown, it has probably not been added by P24 as yet. You may contact P24 support and request that a new location be added. Here is their email address: support@property24.com
A note on Private Property locations: once PP has received a listing in a specific suburb, this cannot be changed by the feed until PP support has "unlocked" that listing's location on their database.
Street Number and Name (required)
If you have already identified your property using the Lightstone Lookup tool, these fields will now be populated. If not, please add the exact street number and name into the appropriate fields. If, for example, you are listing a farm without a registered street name or number, you can always specify the farm ERF number as your Street Number and your Farm name as your Street Name. Prop Data does not validate the information added to these fields. However, it is in your best interest to ensure the fields are populated as accurately as possible.
Unit Number and Complex Name
These fields are only required once a Sectional Title Property Type is selected (Apartment, Townhouse, etc.) or if the Property Title is changed to sectional title. If a Unit Number is added, you will be required to add a complex name and vice versa. Please ensure that this information is accurate as the major portals do validate these fields and assign portal reference numbers accordingly. Using the same unit number on multiple listings may get your listings blocked.
Floor Number
This field must only contain a number, for example, 1. Adding "Ground Floor" into the field, for example, will return an error message. This field is used to specify the number of floors that are present in the actual building and not the floor the listing is on.
Mapping and Publishing the listing location
You can map your listing (set the pin) in a few ways. The first is to identify your listing using the Lightstone Lookup. The second is typing the listing address into the Google Maps search bar and the third is clicking on Map From Address once you have already populated the suburb, street number, and name fields.
You can also use the map to populate your Street number and name fields by clicking on Copy to Address after adding the location into the map first.
There are many instances where you will not want to display the actual address of your listing. In this case, type the suburb name of your listing into the Google map. This will add the pin to the middle of the suburb name and then select Publish Location As: Suburb. Or click on the map to where you would like the pin to display and Publish Location as: Suburb.
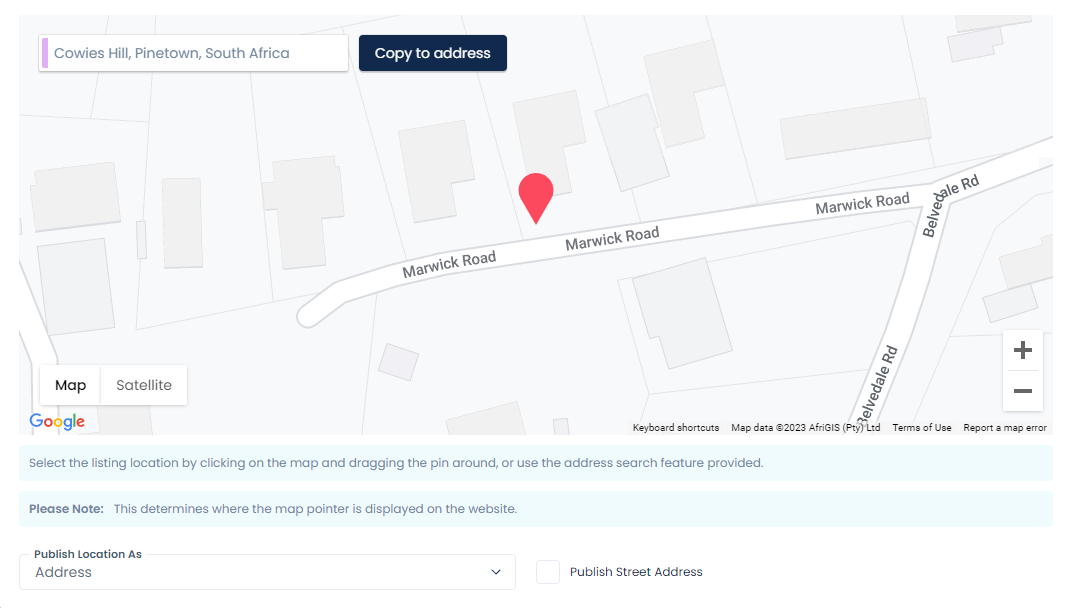
Should you wish to display your listing's address on your website, select Publish Location As: Address, then check the Display Street Address checkbox. The Display Street Address check will only affect the address being shown on your own Prop Data website. Displaying your listing address is useful in a number of ways but mainly in the way search engines index the page. By default, we will add the address to the listing URL (web address), to the listings "breadcrumbs" and display the address on the front-end listing summary page as well as when the listing has been clicked and the buyer/tenant is on the specific listing page. Displaying your listing's address on the portals is handled under the Publish section of the listing add/edit form.
The image below shows the "breadcrumbs" at the very top. This is a summary of your listing and the address. You will also notice the address information below the listing price.
.png)
Land and Floor Size
Adding the land and floor size to your listing is not required but these fields are considered quality fields.
Specify the Unit of Measure for your land size in Ha or m2
Note that if you select the Property Type: Vacant Land, the land size will become a required field.
Property Title
Specify the property's Property Title here: Freehold, Sectional Title, etc.
Linked Project
If you have added a Project listing (Residential Estate or Development), you will use this field to select which estate or development this listing should display under. Your previously added estate and development listings (Projects) will be available in the dropdown. In doing this, when the development or estate is viewed on your website, your listing/s associated with this development will be available for selection by your prospective buyer. Please note the Apartment count in the image below:
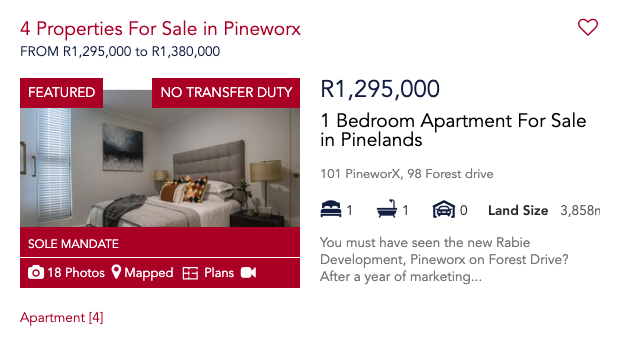
For more information on adding an estate or development, click here.
Marketing Heading and Listing Description
Your Marketing Heading should be a brief (less than 100 characters) statement about your listing. Please do not make excessive use of punctuation or capital letters as the portals may remove these without informing you. Capitalise the first letter of your sentence only or where applicable (South Africa, for example) and use a single exclamation point (!) or full stop (.).
There is a character count below the field name for your information.
Note: Private Property does not accept a Marketing Heading.
Your Listing Description is a required field. Here you will describe the property in enough detail to get your buyer/tenant's attention, describe the flow, the rooms and their features and the lifestyle of the property. Ideally, you want your description to be more than 250 characters. There is a character count below the field name for your information. Always exclude your contact information from the listing description, cell and office numbers as well as any email addresses. Including this information in your listing description will result in your listing being blocked on the paid portals.
You can increase the size of your Description text block by pulling the triangle icon to the bottom right of the Description box.
Prop Data offers an additional ChatGPT service called CleverCompose which can assist with writing great listing descriptions. Chat with your Prop Data account manager for more information on usage and cost. Read more here.
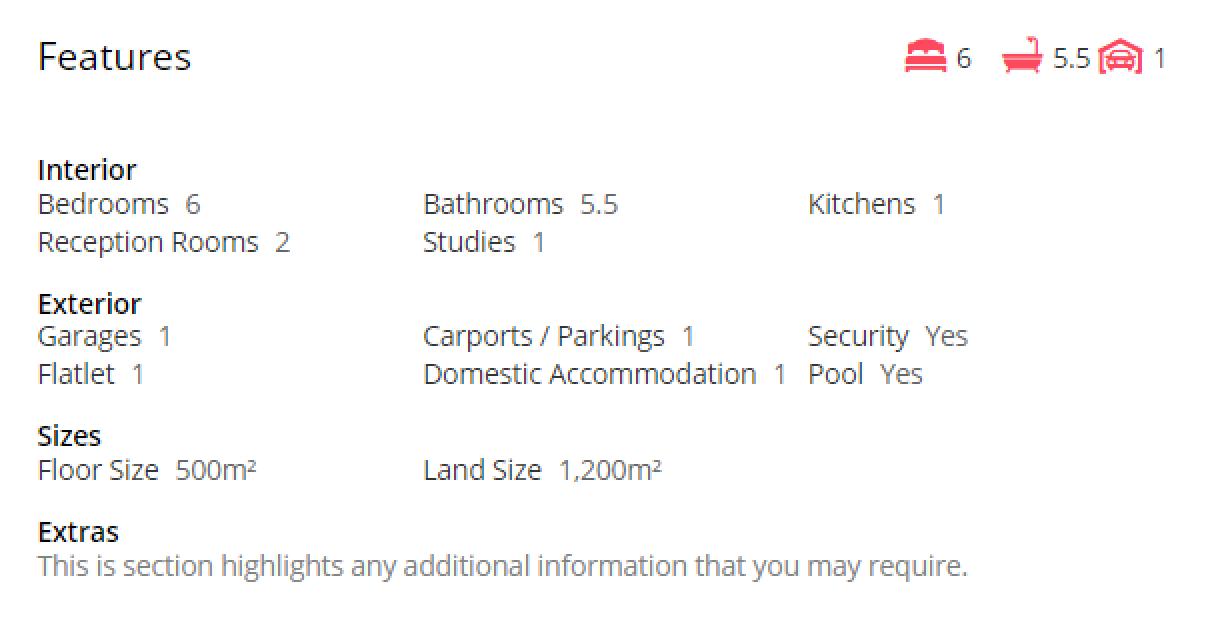
Features & Amenities
Below the Description field, you will find the various features and amenities that the portals will accept via their listing feed. We have added these for your use.
.png)
We have also specified which portal accepts the particular feature or amenity with a label, either P24 or PP or both P24 and PP. In addition, we have specified the type of feature, i.e. window, style, facing and so on. We don't just feed features and amenities to the portals, we also add these to the Extras on the listing on your website as seen below:
To find your required feature or amenity, simply type the first few letters of the feature you require into the Features & Amenities dropdown, select the required feature and type the first few letters of the next feature you wish to add. You do not need to scroll through the dropdown list. See the video below:
Pricing Details
Depending on which Listing Type you have selected previously (To Let or For Sale), the Pricing Details section will adapt and provide the specific pricing options for that listing type.
Price on Application: By selecting this checkbox, your listing price will display on your website and property portals as POA. You are still required to add the asking price of the listing into the Price field — this is for office use and will not display on any websites.
Price: Enter your listing's price — you do not need to add .00 at the end of the price. For example, add 1000000 for 1 million.
Valuation Price: Should you have added the listing in the Valuation status, this field will be required. If not you can enter this price for your own records. Only the Price will be displayed on your website and property portals.
Municipal Valuation: This is the municipal valuation as per the valuation roll. This field is for office use only.
No Transfer Duty: This checkbox will push a No Transfer Duty banner to your website and P24.
Distressed Sale and Bank Repossessed: These checkboxes should only be used if you have an agreement with the specified bank. Otherwise, leave these fields unchecked.
Important: When editing your listing and changing the status to Sold or Rented, you will be required to insert the actual price the listing was sold or rented for. Adding the sold date is useful for office records.
Rates & Levies
These are quality fields. Only add a value into these fields if you know the amounts. Otherwise, leave them blank. Do not add 0.01.
Interior Features
Many of the interior features are required fields. If you do not have a Study present within your listing, for example, the value must be set as 0. This holds true for any other field where the feature may not exist within the property. Do not leave the field blank.
You may also add Bathrooms as 2.5 for example.
The Notes button will allow you to add additional information on each Interior Feature. There is a character limitation here and we suggest that you add the additional features using the Features & Amenities functionality to cover most of these. The notes will only be populated to Property24.
The Flooring field is a multiple-select field (you can choose more than one option).
Furnished: By default, we will push listings as unfurnished unless this check has been selected.
Exterior Features
Here again, these are required fields that must have a value added even if that value is 0.
The Notes button will allow you to add additional information on each Interior Feature. There is a character limitation here and we suggest that you add the additional features using the Features & Amenities functionality to cover most of these. The notes will only be populated to Property24.
Parkings: Use this field to indicate the available number of parkings. Then specify which type of parking the property has available using the Parking Type dropdown.
Note that the Parking Type dropdown menu allows you to select more than one Parking Type. See screenshot below.

A number of Quality Fields are also present in the Exterior Features, Patio, Balcony, Roof, Exterior, Garden Type and Walling. Garden Type, Exterior and Walling are multiple select fields: you can select more than one option per field.
The below checkboxes should be selected if your listing has one or more of the following:
Store Room
Scenery/View
Pool
Security
Pets Allowed
Lease Details (adding a Rental Listing)
Specify all information that pertains to your lease here:
Lease Period (Required): Select the period from the dropdown.
Deposit: The required deposit amount.
Lease Excludes: What is not included in the lease.
Available From (Required): When will the property be available from? You have three options to choose from: Immediately= Today's date will be applied, Negotiable= Today's date will be applied and Specify Date, choose the relevant date from the date picker displayed.
Occupation Date: When the property will be available for occupation by the new tenant.
Your Lease end date will be used for reminders that will be emailed to you as the end date approaches. This is calculated by the lease period you have provided and the Available From date. This reminder is particularly useful for rentals where you will be sent a reminder that the lease is expiring and that you should actively market the property again.
Mandate Details
In this section, you will specify the mandate type you have received from your client/another agency.
If you select Sole Mandate, additional required date fields will be shown. Please complete these fields by adding in the required dates. You can edit your listing at a later stage and amend these dates if required.
The On Market Since date will be used when displaying the Days on Market on your listing Dashboard and Seller/Landlord Reports. If no mandate information has been added, the system will use the date the listing was first added to calculate the Days on Market figure. If you are relisting a property, please ensure that this date is amended. Please see the image snippet of the Listing Dashboard showing the Days on Market value.
Your Mandate End Date will be used for reminders that will be emailed to you as the end date approaches.
The date specified as the Mandate End date will not remove your listing from your website or the portals. Your website uses the listing status and Display on Website check to determine if the listing should display. The paid portals use their predefined date parameters. Please see more on the portals below:
Property24: Property24 will remove your sales listing from their portal after 120 days of inactivity. By inactivity, we imply that no updates have taken place on the listing and fed to the portal. If you edit your listing, make an update to the description or images, and sync the listing again, that period will then be increased to a further 120 days. Please note that rental listings will be marked as expired by P24 after 6 weeks or 42 days.
Important for P24: P24 allows you to specify a date to remove your listing from the portal and we suggest a date is added here to avoid the above-mentioned automatic expiries occurring on your listings. The field name is Expiry Date and can be found under the Publish section of the listing add/edit. Adding a date here will not remove the listing from your own website.
Private Property: PP will remove your rental listing from the portal after 6 months of no activity. Your sale listing will be removed from the portal after 12 months of no activity. Here again, activity applies to no updates taking place on the listing during that time. Editing your listing will force a resync to the portal and the listing will again be displayed. The edit must occur within the last 7 days of the listings expiry date, you will be notified by the portal via email. Once updated, sales listings will then be extended by 3 months and rentals by an additional month only. Listings that have already expired will not go live on the portal after an update, please contact Private Property support to make your listing active again, support@privateproperty.co.za.
Seller, Landlord, Current Tenant, Property Sold To - Details
Depending on the Listing type you have selected (To Let or For Sale), you will be presented with options to add either Seller, Landlord or a Current Tenant contact to your listing. Adding this detail to your listing allows you to associate a seller to a listing or in some cases multiple listings and keep all associated contact records with your listing. Adding a Seller or Landlord contact to your listing will allow you to email them the Seller/Landlord Feedback report directly from the Feedback Report page. You are also able to use the WhatsApp and mailto: options provided on the Listing Contacts section as seen below:
You are able to add multiple sellers and landlords to your listing. The process to add a new contact is exactly the same for all contact types. However, you will specify the appropriate type in the Contact Type field (this is a multiple-select field, more than one type can be selected).
To add a contact to your listing, select either Add New Contact or Search Contact under the appropriate section, Seller, Tenant, etc.
Ideally, you should search for a contact first to establish if the seller/landlord/tenant already exists within the branch. The best way to search for a contact is by using their email address (as this is a required field when adding a contact) or you can also use a combination of first and last name or just first or last name. However, your results may not be very specific in this case. Should the contact already exist for the branch then choose the contact by selecting the + icon.

If you do not get any results from your contacts search, you will then click the Add Contact button and a slide-in menu will appear from the right of your screen with the Add Contact form displayed. Please note the required fields on the Contact Add form in the image below. All required fields must be completed before the contact record will be saved and associated with your listing. Once all fields (required and any additional fields of your choice) have been completed, scroll down the form and click on Save.
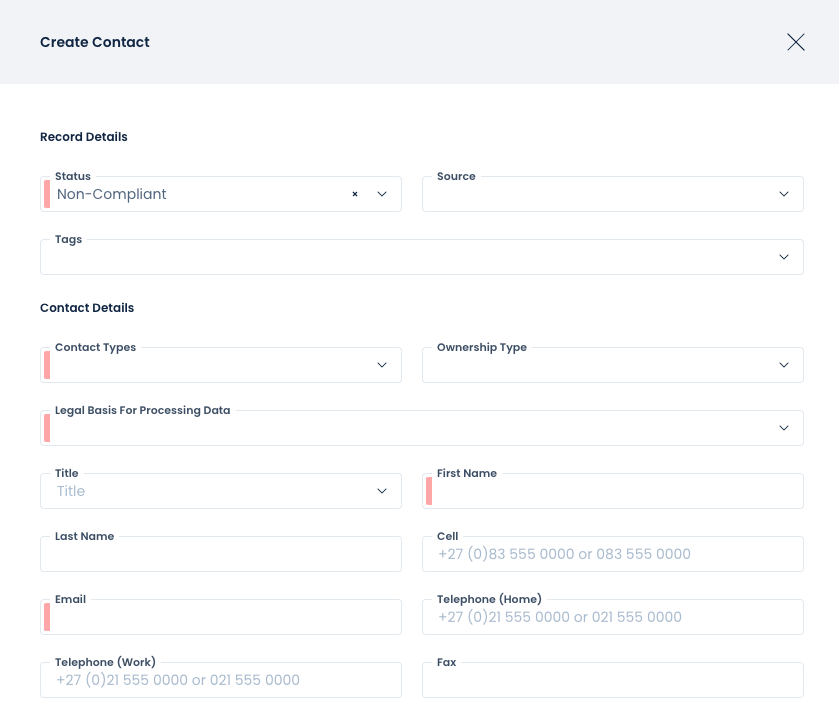
Status: Due to POPIA, you may not add contacts in an Active status onto your system (South Africa only). Specify Non-Compliant or Inactive, whichever is applicable, Non-Compliant being preferred. Important: On saving the record, the contact will be sent an opt-in mailer from your company.
Contact Types: These can be one or all of (multiple select): Buyer, Seller, Tenant, Landlord, or General Enquiry.
Legal Basis For Processing Data: As a POPIA requirement, specify why you are adding this person's information. Generally, for a sole/exclusive/joint mandate, you would select "Freely Given Consent from Contract" as you would have a POPIA clause contained within your mandate agreement.
Email: This must be a valid email address on a valid internet domain. The system will verify the domain and alert you if the domain is not valid.

Branch: This field will be defaulted to the branch the agent belongs to.
Primary Agent: The agent who will be designated the 'owner' of the new contact record.
Associated Agents: Here you can add any of your colleagues that you wish to have access to the contact record by selecting them from the Associated Agents dropdown. This is user group access dependent.
Adding the Sold To contact will allow you to keep track of which client/s or entity bought your property.
Your Prop Data Manage system is fully POPIA compliant!
Complex Details
If you have added a listing that is a sectional title listing, you can add additional information to your listing. The fields in this section are for office use only and will not be displayed outside of Prop Data Manage.
Bank/Bond Details
Add your seller's bank and bond information here. The fields in this section are for office use only and will not be displayed outside of Prop Data Manage.
Viewing Details
This applies if there are any specific viewing arrangements for this listing. The fields in this section are for office use only and will not be displayed outside of Prop Data Manage.
You can also add a note to your listing to store this information. Please see more about Notes here.
Open Hour Details
The open hour section is for your records only. This section is intended for you to keep a record of the open hour when you have invited other agencies or agents to view your listing. Do not use this section to schedule show days. Show days are handled under their own section on the listing add/edit form. The details can be found below. The fields in this section are for office use only and will not be displayed outside of Prop Data Manage.
On Show Details
Whether you are scheduling a single show day for the month or you want to schedule a show day for every Sunday of the month, Prop Data Manage can accommodate this. To add a show day:
Select the On Show checkbox, additional required fields will be presented to you:
On Show Date: Select the required date from the calendar.
On Show Start Time: Type in the required Start time or use the up and down arrows.
On Show End Time: Type in the required End time or use the up and down arrows.
On Show Directions: The information that you add into this field will only be displayed on your Prop Data website. Add the directions to your show house or add a note you wish prospective buyers to be aware of.
There are 3 additional options on this section: Add On Show Every Saturday, Add On Show Every Sunday and + Add Show Day
Selecting Add On Show Every Saturday will prepopulate the On Show Date and start and end times for the next 8 weeks, you can add and remove days you see fit as well as edit the start and end times.
Selecting Add On Show Every Sunday will prepopulate the On Show Date and start and end times for the next 8 weeks, you can add and remove days you see fit as well as edit the start and end times.
The + New Show Day button will allow you to specify any additional show days.
View History: Selecting this for listings that have previously been on show will show you the past show day dates.
Prop Data Manage will remove show days and add additional show days as soon as the days become current, banners are removed and added and the listings are added to the next show day alert run.
.png)
On Show information as it would display on your listing on your Prop Data website:
.png)
Offer Details (Sale Listings)
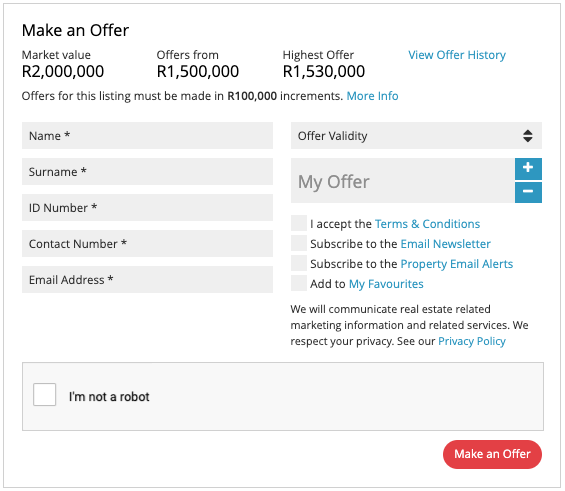
Offers are exclusive to your Prop Data website. Selecting Enable Offers will present you with three additional required fields:
Offer Status: Accepting Offers, Offer Pending and Offer Accepted. If you are accepting offers, buyers will be able to make an offer at your desired increment and asking price.
Offers From: The minimum amount that will be accepted.
Offers Increment: The value each additional offer should increase by.
As mentioned, enabling offers will only display on your listing on your own Prop Data website. Please see an example of an offer on a listing page below. Once an offer has been submitted, this will be logged as a lead and an email will be sent to the listing agent.
Auction Details (Sale Listings)
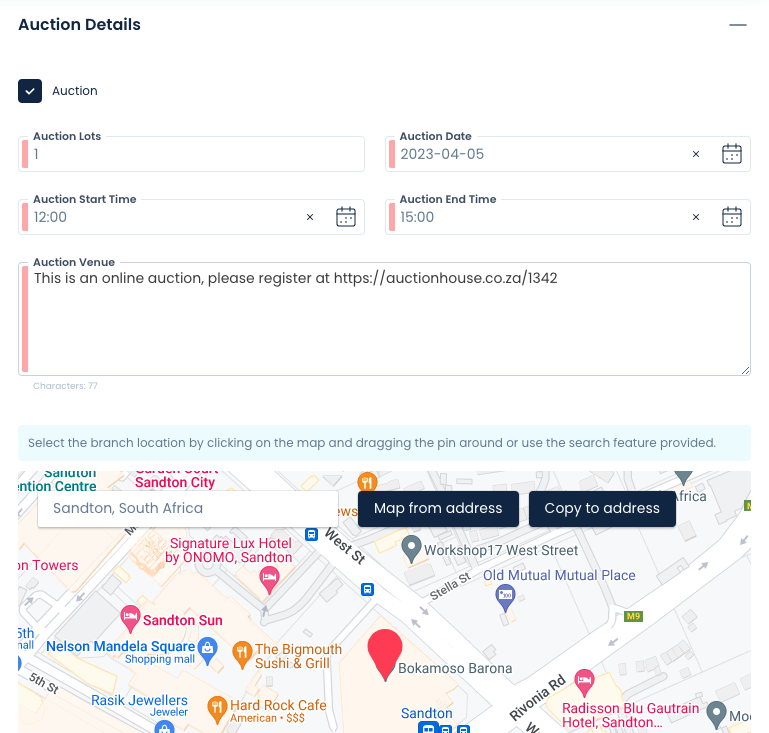
Should this be an Auction listing, select the Auction checkbox and additional required fields will be available for you to complete. This can be enabled along with Offers if you wish to do so. Select POA in the Pricing Details section to hide all property pricing.
Auction Lots: The number of lots to be auctioned. Generally, with property, this value will be 1.
Auction Date: Specify the auction date from the provided calendar.
Auction Start Time and Auction End Time: Specify the start and end times for your auction.
Auction Venue: Type in the location where the auction will be taking place.
You can also "pin" the auction venue using the Google map provided.
Prop Data is integrated with PremProperty. Please chat with your Prop Data account manager for more information.
External Link
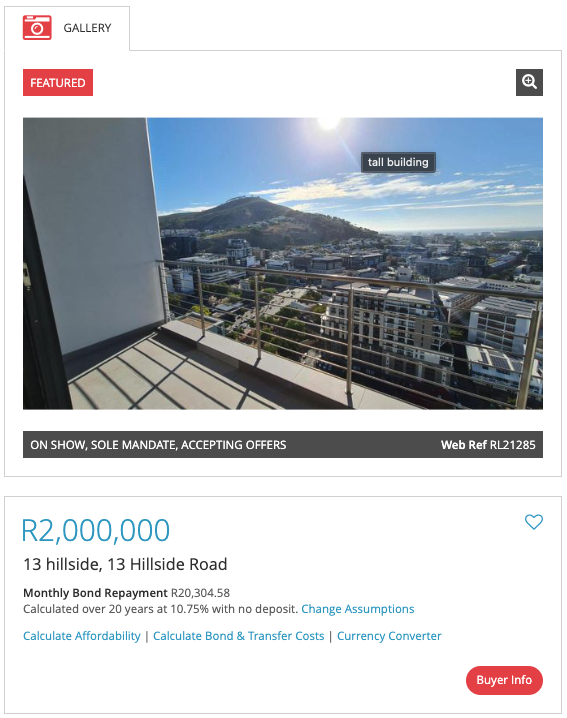
This is another Prop Data website exclusive field. The external link allows you to add a button to your listing on your Prop Data website. The External Link can be used in a multitude of ways. Here are some suggestions: Add a link to your cloud storage for clients to download tenant application forms, add a link to a separate form on your website or point the button to an external website that may contain more information about the estate that the listing is part of. To add an external link, complete the fields:
External Link Name: The text you want to display on the button. In this case, we have typed in Buyer Info.
External Link URL: This must be a valid URL, so make sure the URL starts with https:/http: e.g. https://www.buyerinfo.co.za.
.png)
The information you capture into the above fields will result in a button being displayed on your website. Note the Buyer Info button in red at the bottom right of the below image.
General Notes
Add any notes about the property here. The text in this section is for office use only and will not be displayed outside of Prop Data Manage. You can also add a note to your listing to store this information. See more about Notes here.
Photos
Photos can make or break your listing on your website or on the portals. Before uploading your images, follow our guidelines below:
Only take images in a landscape orientation.
Your max image size should be 1920x1080. Adding images with a higher resolution will only slow down the upload process and increase the size of your storage. The maximum any portal will display an image at is 1920X1080.
Avoid having logos and contact numbers displayed on your images.
Try not to add too many images. A good count is between 30 and 45 images per listing.
Do add Captions to your images. Captions provide context to your images and are SEO gold.
Try not to reuse images, which may be the case with rental listing images where you market the property every 12 months. Rather upload recent images.
Property24 accepts a max of 60 MB for all your images combined.
To upload images, click on Upload.
Now select the images from the correct folder on your computer and click Open.
Please see the image below for more information: the total image size at the top left (Property24 Limit), individual image size in bytes, and captions that have been added to images.

Once uploaded (remembering that larger images will take longer to upload) you are now able to click and hold (drag) your images to get them into the correct position. Windows users can press CTRL and - to zoom out on the browsers to get a better view of all their images, Mac users use: CMD and -. Zoom back in by pressing CTRL/CMD and +.
You can rotate your images by clicking on the ⟲⟳ icons.
Delete duplicate or unwanted images by clicking on the bin icon.
Using the blank checkbox, at the bottom left of each image, allows you to bulk delete the selected images or download the selected images. Please see the image below:

Floor Plans
Floor Plans are managed in exactly the same way as your listing images. Please note that Property24 only accepts 5 Floor Plan images per listing. There is no limitation to the number of floor plan images on your own website.
Documents
Prop Data website only option: The Documents section is for any documents you wish to add to your listing to be displayed on your Prop Data website. Adding documents here will make them available for your buyers/tenants to download. Do not add private and confidential documents here. Examples of documents that you may want the public to be aware of: body corporate rules, rental application forms, terms and conditions, etc.
To upload your documents, click on Upload and select the required documents from your computer.
Once uploaded your documents will appear at the bottom of the Documents block.
To rename your documents (user-friendly name), click on the pen icon, specify the new name and click on Save. Repeat this process for all documents you have added.
Change your document order by clicking on the double horizontal line icon in front of the document name. In this case, we have renamed our documents to Tenant Application Form and Body Corporate Rules and Regs. Please see the image below:
.png)
The name you have given your documents will now be available on your website on the listing page for download by your clients. Please see the image below:
.png)
Reminder: Do not add private and confidential documents into the Documents section. Add any private and confidential documents into the Private Documents Section. Please read more information on this below.
Private Documents
Here you can add all private documents to the listing that you do not want to be available outside of Prop Data Manage. Private documents include docs such as identity documents, contracts, and mandate agreements.
Uploading Private Documents is done in the same manner as that of Documents.
Videos
Adding a video to your listing will immediately increase your listing's quality score and will hopefully result in more enquiries! To add a video or virtual tour to your listing, please read below:
YouTube
Please ensure that your agency or branch has its own YouTube channel. This will avoid having your videos blocked by the portals. Keep logos and long video intros to a minimum. To add your YouTube video to your listing, insert the YouTube video ID into the field: YouTube Video ID. The YouTube video ID can be obtained by clicking Share while viewing your video on YouTube.
YouTube share link: https://youtu.be/7H7QNRjZGXg
Copy and paste all the digits and letters after the .be/ leaving you with: 7H7QNRjZGXg
Now paste the ID into the YouTube Video ID field.

Matterport
Once you have been issued with the Matterport URL from your relevant media agency, you may be given a URL that looks like the below:
https://my.matterport.com/show/?m=1WMV533oo92&brand=0&nt=1 or https://my.matterport.com/show/?m=1WMV533oo92
The Matterport ID can be found between the m= and & sign. So in the case of the above, the Matterport ID is 1WMV533oo92
Copy and paste 1WMV533oo92 into the Matterport ID field.

EyeSpy360 URL
If you have a virtual tour that has been created using EyeSpy360 software, copy and paste the entire URL into the EyeSpye360 URL field:

Virtual Tour URL
Add the full URL of any virtual tour or video into this field, excluding YouTube, Matterport and EyeSpy360 as these are handled in their own fields as you have seen above.
The system requires the full URL. For example: https://www.myvideotour.co.za/w53fefsfsfsff

Your Images, YouTube video, Matterport Virtual Tour and floor plans will be shown on your website as seen in the below image:
.png)
Your Prop Data website supports the above media types. Property24 will accept YouTube videos, EyeSpy360 tours and Matterport Tours. Private Property will accept YouTube videos and Matterport Tours.
Publish
Only once all required fields have been completed and at least a single image has been added to your listing will the Publish options be available for you to choose from.
In order to publish your listing onto the portals, the listing must first be checked to Display on Website. The purpose of this functionality is that your listing should always be published to your own site first so that search engines understand that the source of the listing is your agency. Doing this increases your brand's presence on the web. Once you have checked Display on Website, you will be given additional options. We will discuss Feed to Portals next and then list the function of the other options at the end of this section.
Now would be a good time to go back through your listing and ensure that your price is correct, your description is free of spelling and grammar mistakes, your features' counts are correct, and your images are in the correct order.
Display on Website: This check will push your listing to your website only. In some cases, you may not be permitted to advertise the listing outside of your own website and at this point, you will save your listing without checking the Feed to Portals checkbox.
Feed to Portals: By selecting this checkbox, you are instructing Prop Data Manage to set your listing up for syndication. On selection, you will be presented with the portals your agency/branch has elected to feed to. The list will contain all paid and free portals you may have agreements with. See the video below and note that the Feed to Website is the "master switch" to enable all other feeds.
Let's discuss the syndication options that are presented when you select either Property24 and/or Private Property.
Property24
.png)
Property24 Toggle: Click on the toggle to enable Property24. Toggling this on indicates to the system that you want your listing to feed to P24.
Expiry Date (Required in some instances): Select the date you would like the listing to be removed from Property24, remembering that this date will not remove the listing from your website. However, if you change the listing Status to archived, Sold or Rented, this will override this date and remove the listing from the portal. Sold listings will remain on the portal for 7 days, rentals will be removed immediately.
Development ID: This field must be completed only if you have a development on Property24 that is being paid for by you or your agency. You cannot link your listing to another agency's development. Otherwise, leave this field blank.
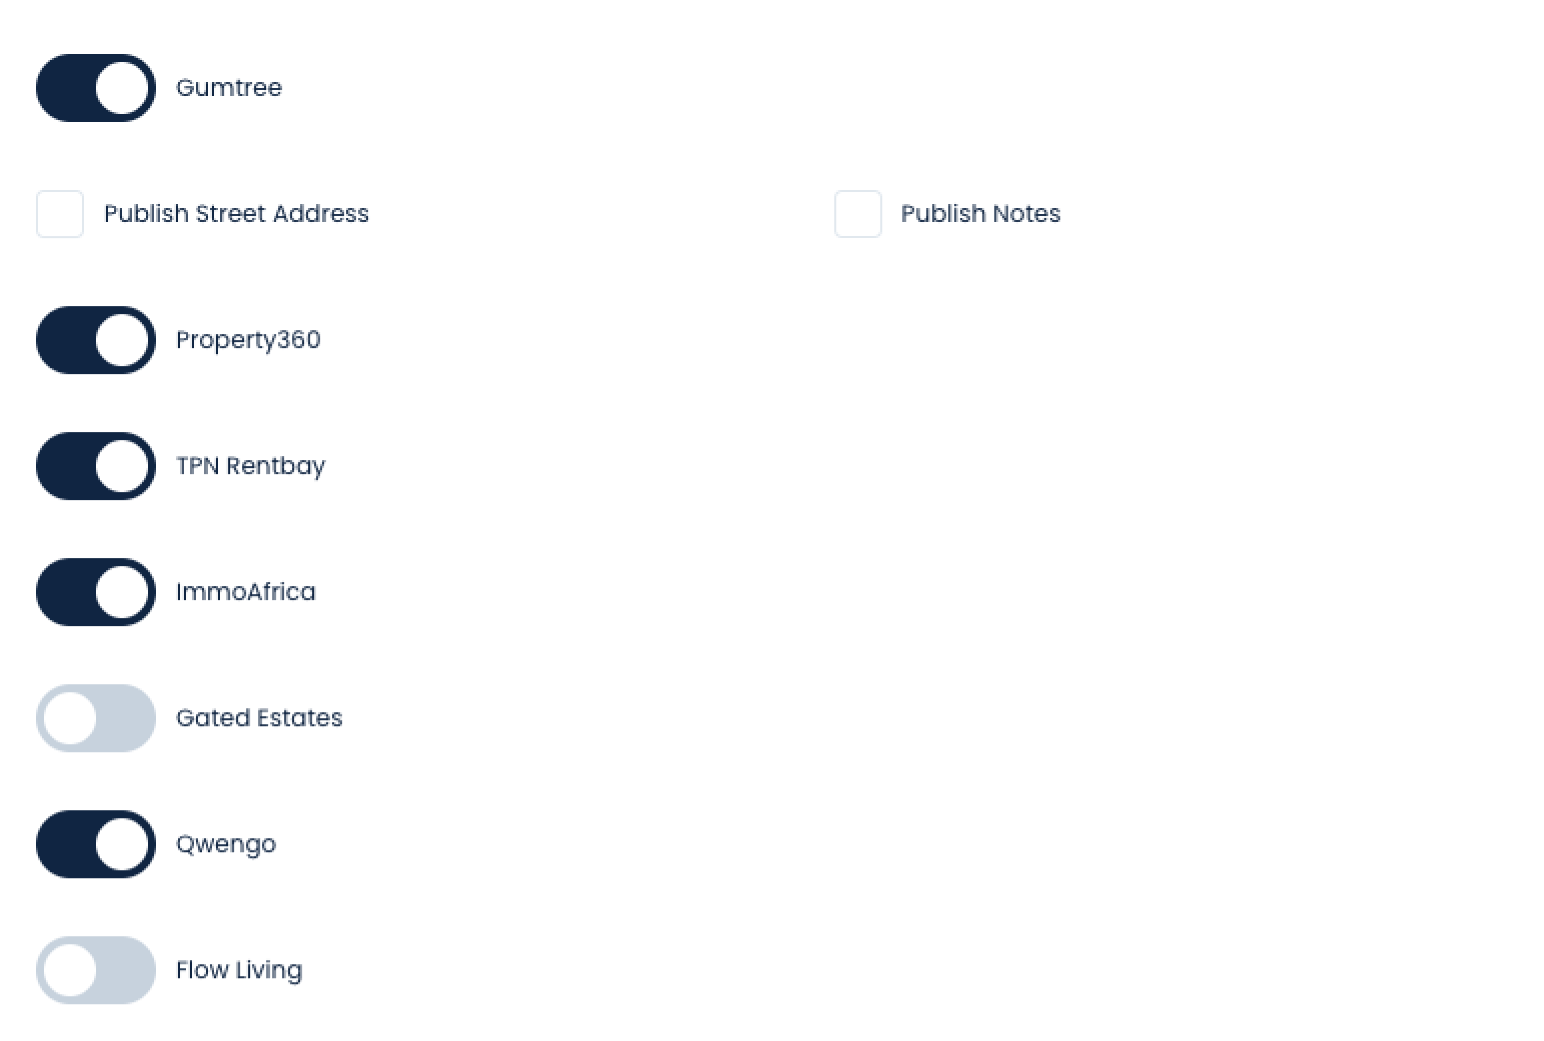
Publish Street Address: Push your listing street name and number to the portal, adding to the listing quality score.
Publish Mapped Address: Push your listing's coordinates to the portal, adding to the listing quality score.
Publish Notes: This check pushes the Notes that you may have added when you were adding your interior and exterior features to Property24.
Zoning: Select the zoning type you would like to display on Property24.
Property24 may moderate your listing at its discretion in accordance with the Listing Moderation Policy. Agents/admins will receive a moderation email stating why the listing has been moderated and/or blocked. As your feed provider, we cannot unblock any listings that P24 may have moderated. Please contact their moderation team directly on moderation@property24.com
Reasons why listings may be moderated: This includes using the same images on more than one listing (resulting in multiple listings having the same P24 reference), duplicating your listing description (resulting in multiple listings having the same P24 reference), adding watermarks to your listing images, displaying logos on your listing images and where another agency has proved that they have a mandate on a particular listing.
Prop Data Manage will display the relevant response that we receive back from Property24 when you syndicate your listings.
Successfully updated on the portal: This means the listing has successfully been added or updated on the portal.
Listing has been blocked by P24: This means that there has been a moderation issue with your listing. Please check your email (moderation message) and contact moderation@property24.com
Private Property
.png)
Private Property Toggle: Click on the toggle to enable Private Property. Toggling this on indicates to the system that you want your listing to feed to PP.
Expiry Date: At this stage, Private Property does not accept an expiry date. PP will remove your rental listing from the portal after 6 months of no activity. Your sale listing will be removed from the portal after 12 months of no activity. Here again, activity applies to no updates taking place on the listing during that time. Editing your listing will force a resync to the portal and the listing will again be displayed.
Publish Street Address: Select to display your listing address and coordinates on Private Property, adding to the listing quality score.
Private Property does moderate listings and will communicate with you via email if your listing has been moderated or blocked.
Reasons why listings may be moderated: This includes using the same images on more than one listing (blocked), duplicating your listing description (blocked), adding watermarks to your listing images, displaying logos on your listing images, and where another agency has proved that they have a mandate on a particular listing.
Prop Data Manage will display the relevant response that we receive back from Private Property when you syndicate your listings.
Successfully updated on the portal: This means the listing has successfully been added or updated on the portal.
Duplicate entry based on address: This means that Private Property already has a listing with this address information active or under offer on their portal. Contact support@privateproperty.co.za
Free Portals
Free portals are added by request. Prop Data Manage supports many of the local free portals and Qwengo in the United Kingdom. If the portal has been added to your site, you will have the option to toggle that portal on.
If you have a Rightmove or Zoopla International account, we are able to syndicate your listings to these portals. Please chat with your Prop Data account manager for more information.
Saving Your Listing
If all required fields have been completed, you may now save your listing. If you are drafting a listing, you do not have to upload images or select Display on Website just yet. However, if you have double-checked all your required fields, price, property type, address and so on and you have uploaded at least one image (three images for a rental listing), you can check Display on Website and Feed to Portals. Clicking on Save will now queue your listing to feed to your website as well as the portals you have selected. Syndication will take approximately 3 minutes to both paid portals. The free portals generally collect listing data once a day, in the evening.
If your listing has been saved you will be returned to the Listing Details page. If your listing requires an update (missing required field for example), you will be directed to the field that needs completion.
.png)
From the details page, you can then click on the Syndication button to view the status of the listing as it feeds to Property24 and Private Property.
How to edit an existing listing
Should you wish to edit information on a specific listing, you will first need to find the listing. You can do this by using the Keyword Search function on the summary page. Once you have found the listing, select it by placing a tick in the check box to the left of the listing name, as shown below.
.png)
When you have selected the listing, a new menu will appear on the top right corner that looks like this:
.png)
Edit
The Edit button is where you will go should you want to edit any listing information.

When selecting Edit, a new form will appear, shown below. From here, you are able to edit all information on the listing. When you are done, remember to click the Save Listing button on the top right of the form.
Price Reduced
In many cases, you may need to reduce the price of your listing. The Price Reduced checks: Reduced Banner and Send Price Reduced Alerts will only be available to select if the listing price has been reduced.
Price Reduced: Use this check to push a Reduced Banner to your website and Property24. Private Property adds a reduced banner by default when the price is reduced by R5000 or more. Please contact PP to have the banner removed from your listing on their portal.
Send Price Reduced Alert: Use this check to force the system to send reduced alerts. This check will only affect your own website alerts and Property24. Private Property will send alerts by default.
Tip: If you have already reduced the listing price but forgot to check the banner and alert checkboxes, edit the listing, increase the price by R100 and save the listing, now edit the listing again, correct your price and click the required checkbox/s and save.
When Will I Edit a Listing?
Any listing that has already been added can be edited. All the fields detailed above will be available on the edit form. Edit a listing to publish your sale, archive the listing to remove the listing from public view, add a new show day or amend a price.
Note: All of our add and edit forms are exactly the same to keep things simple.
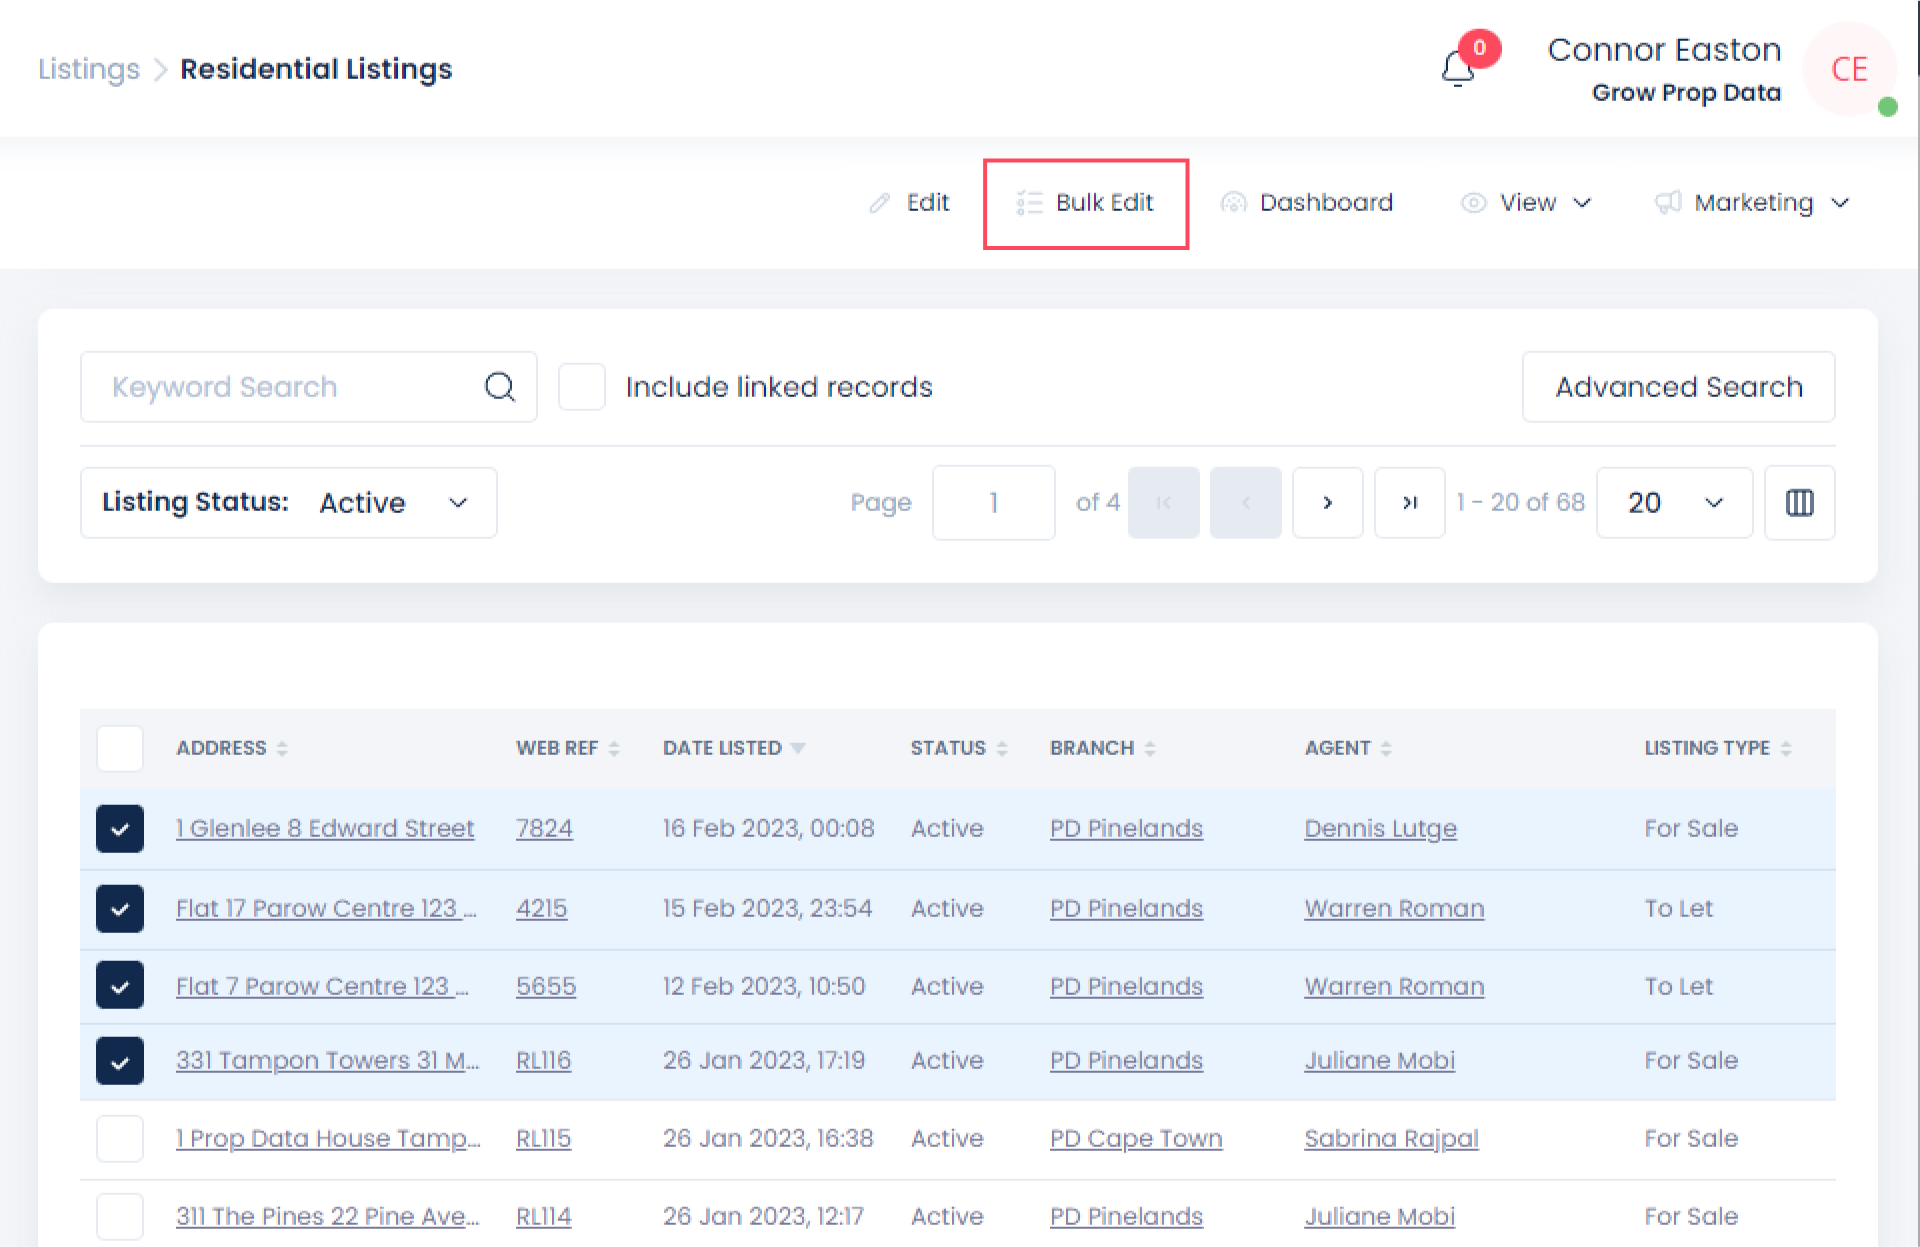
Bulk Edit
The Bulk Edit is a handy way to perform a selected action or actions (if more than one field is completed) on a group of listings. Use the bulk edit to move listings to a new agent in a separate branch or archive listings that should no longer be on your website or the portals. To initiate a Bulk Edit, select more than one listing on the Listings Summary page, you will be presented with the Bulk Edit button. See the screenshot below.
Once the listings have been selected and the Bulk Edit has been clicked, you will be presented with a form with various options. Read below for more details on each field:
- Bulk archive listings using the Status dropdown
- Bulk add Tags to the selected listings
- Bulk change the Branch of the listings
- Bulk change the Agent of the listings, or add additional Agents to the selected listings
- Bulk change various Property Details of the selected listings.
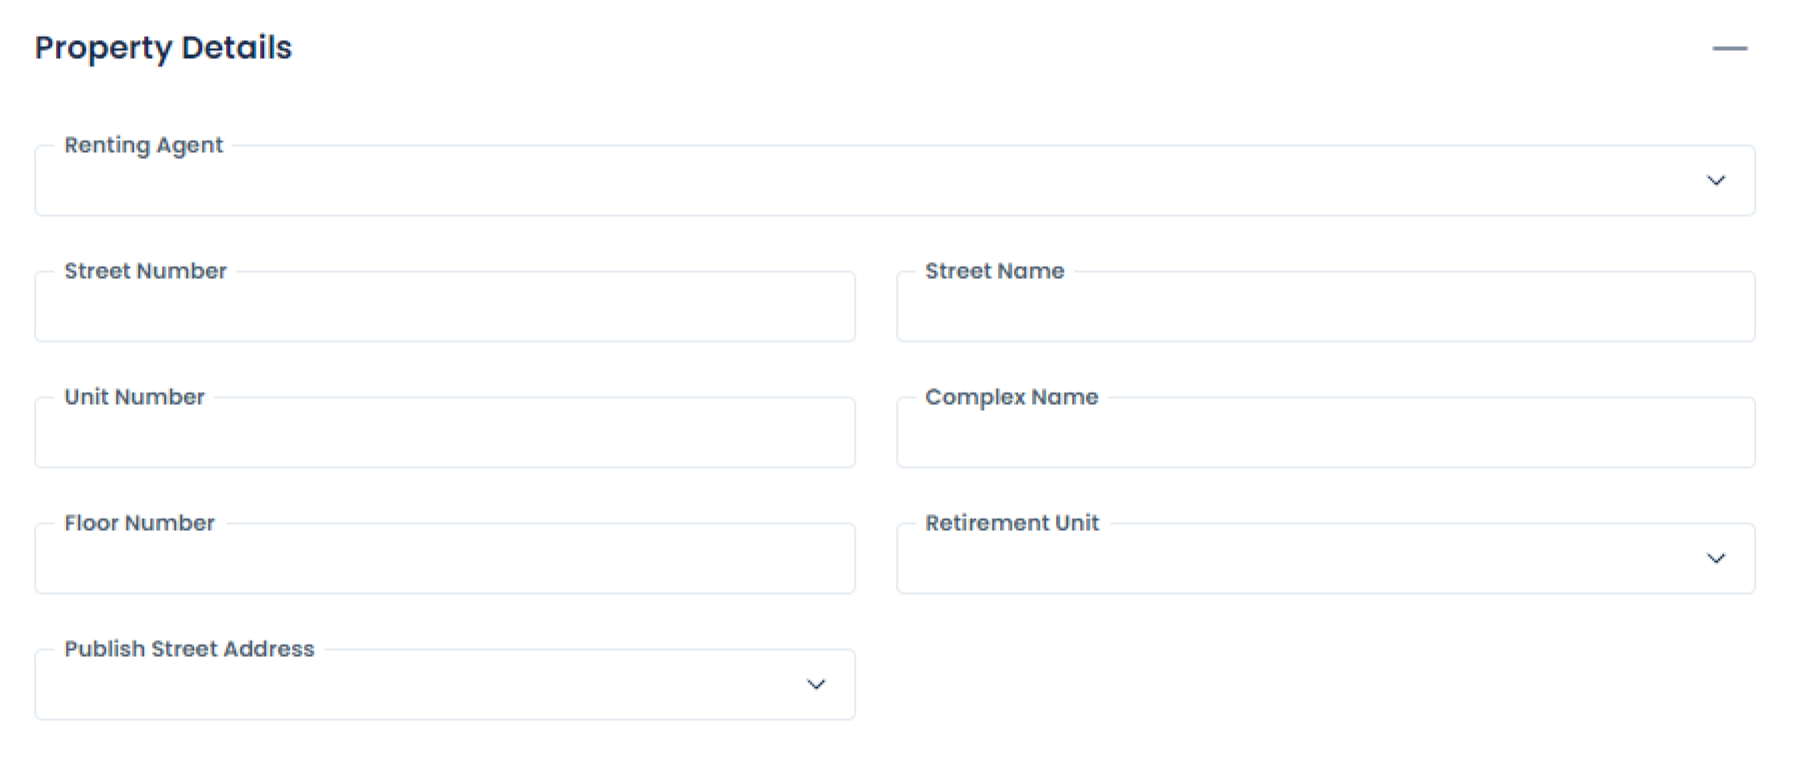
- Listing Details, Linked Project, use this field to bulk add the selected listings to a previously added Estate or Development project.
- Pricing Details, bulk add Selling or Rental Agent/s, this is a multiple select field, you can select more than one agent.
- Bulk add Pets Allowed to the selected listings by selecting the checkbox.
Duplicate
This function will allow you to duplicate/copy your listing. This is useful if you have more than one apartment in a complex, for example and helps save you time. However, the system will not copy over the listing images or the listing description. You will need to add a new description and DIFFERENT images for each listing, even if the properties look similar or have the same features.
Take images from different points of view if you are marketing units that are the same or very similar.
To duplicate a listing, select the listing you wish to duplicate and click on the Duplicate button.
When duplicating always have unique Unit Numbers for your listings
Listing Dashboard
To access your listings dashboard, select your listing and then click on the Dashboard button:

Here you are able to view all your listing stats on a single, easy-to-view page. The Dashboard provides a daily overview of how well your listings are performing which can help you refine your marketing strategy and improve your sales. Here is an example of what you will see if you click on the Dashboard of a selected listing:

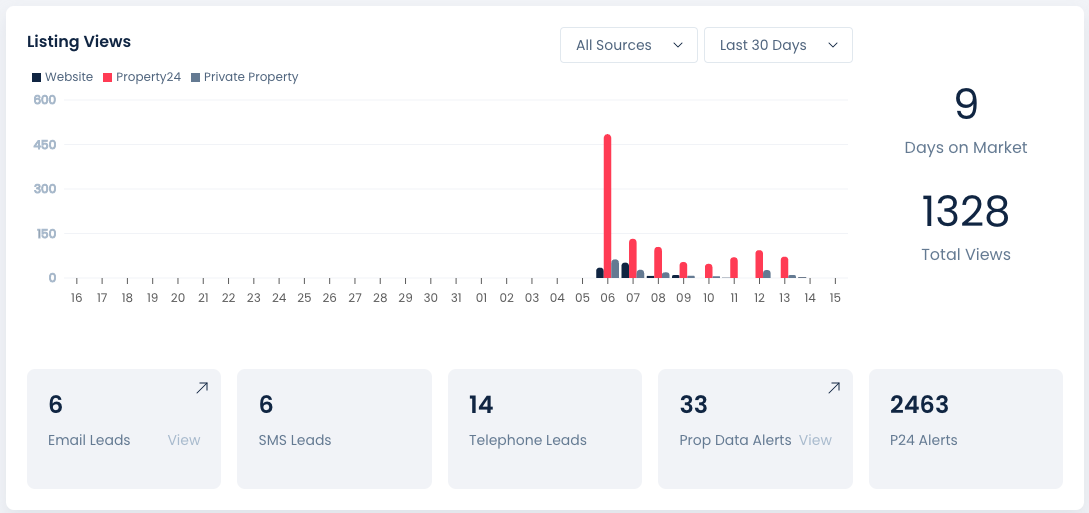
Listing Views: Your Prop Data website uses Google Analytics to determine the number of page impressions that are made. We only record a view if a real person has viewed the page and have excluded all bots, scrapers and the like from the count. Use the All Sources dropdown to specify the source of your views and view those stats on their own, Use the Last 30 Days dropdown to change how the views are filtered. Your choices are: Last 30 days, last 90 days and last 12 months.
See video below showing how selecting a specific viewing source changes the listing leads and alerts to reflect that stats from the selected viewing source portal.
Days on Market: This figure is directly calculated from the date you entered into the On Market Since date while adding or editing listing, so be sure to amend this date if you are re-listing a property.
Total Views: The total count of your listings views across all portals, this value will change should you use the All Sources dropdown and give you the specific sites view count.
Leads and Alerts counts: Email leads are calculated from the number of actual form submissions that have been made on your listing, SMS and Telephone Leads are where we only know that a person has selected a WhatsApp, message me or Show Number button, we do not have any additional information as that person is not obliged to leave any of their contact information. These stats are a record of those clicks.
Prop Data and P24 Alerts: Prop Data sends alerts from your Website if clients have signed up for alerts using one of the forms on your website or if they have opted-in for alerts on receipt of the opt-in POPIA mailer. Prop Data Alerts include New Listing, Price Reduced and Show Day alerts. Read about how we match properties to people here. P24 Alerts are all the alerts that have been sent to individuals for your property.
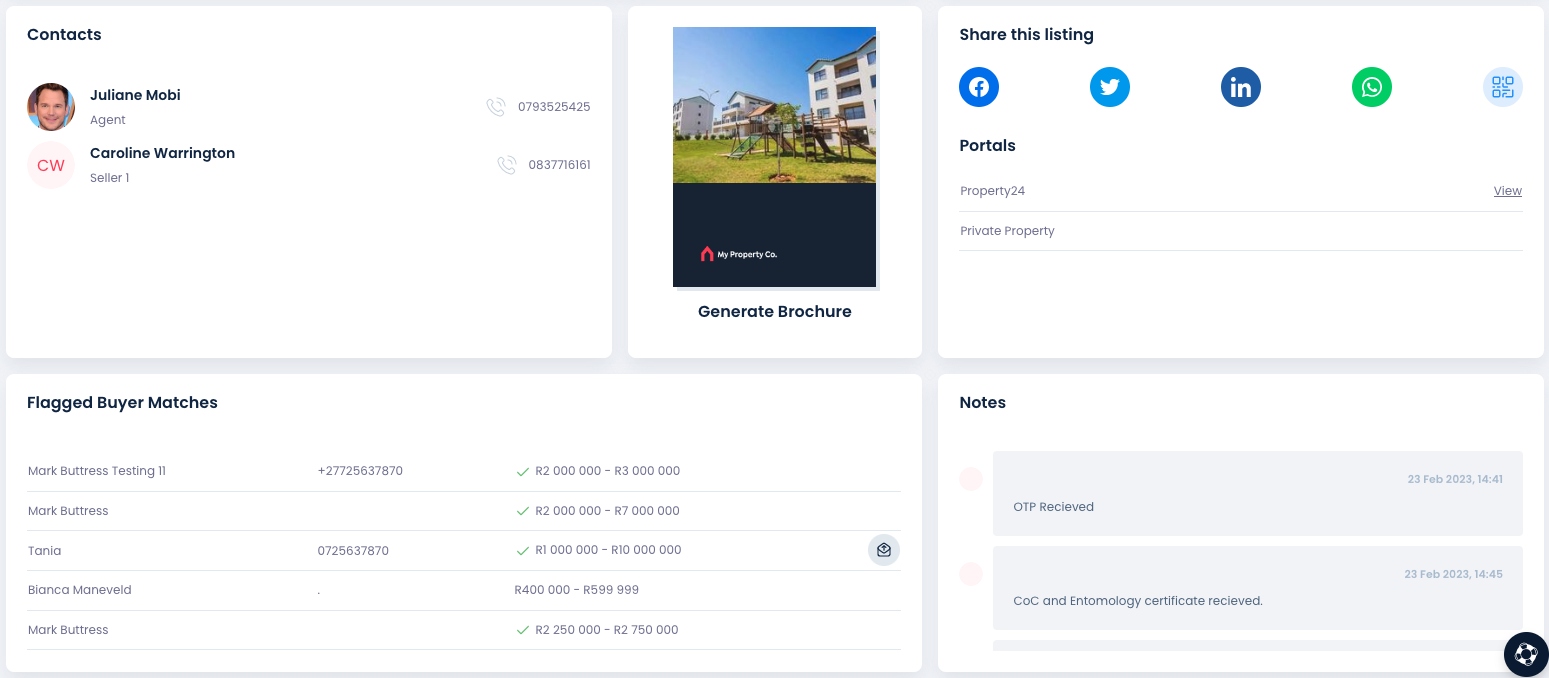
The Dashboard also allows you to effortlessly share your listing to your favourite social media platforms or via WhatsApp. Selecting one of the social media platforms will take you to your Facebook/Twitter/LinkedIn account or allow you to select an account should you have more than one. Your listing will be displayed on the social platform with your hero image (first image) and will link back to your own Prop Data website. Selecting WhatsApp will open WhatsApp web if you are working on your PC, or WhatsApp mobile if you are sharing from your cell phone. The link shared will also link back to your listing on your Prop Data website.
Clicking the QR code Icon will allow you to download a QR code which you can use in print and digital media. See Social links in the below screenshot. You are also able to view your listing on P24 and PP.
To the bottom right of the Dashboard, you will find the Contacts section, here, all of the agents associated with the listing will display as well as any sellers or landlords added to the listing. Below the contacts you will find the Flagged Buyer/Tenant Matches, read more about matches here.
To the centre of the Dashboard you will have Generate Brochure, clicking on your listing image will take you to the brochure generator page.
Lastly, at the bottom right you will be able to view any Notes that have been added to the listing.
You can select more than one listing to scroll through the various dashboards, syndication, details and so on. See video below.
View (after selecting a listing/s)
When you select this button you will be able to do one of three actions; view details, activity or download a listing sheet (completed listing sheet of listing selected).

Details - allows you to view all the details of the listing you have selected.
Activity - allows you to view all activity (audit log) that has taken place on a listing, which includes all changes or updates made by yourself or another agent that your listing is available to.
Listing Sheet - allows you to download a summary of the particular listing you have selected. Listing sheets can be sent to prospective buyers or tenants and contain the full listing information on one single page. Once you click on Listing Sheet, your download will start automatically. When it is ready, you will see a notification appear in the notification bell at the top left.
Print Listing Details
Clicking the Print Page button will open a new tab with all of your listings details, including the listing images.
.png)
To print the page click on the 3 dots at the top right of screen and then click on Print, the default should be Print as PDF, now click Save and then give your file a name, preferably use the listing web ref and address. See video below:
Add note
Adding notes to you listing is an easy way to keep track of of documents that have been received, updates you wish your colleagues to be aware of or simply to keep a record of what activities you have undertaken on the listing. For ore information on adding notes, click here.
Marketing
This tab has a dropdown with numerous options to choose from such as generating a QR code or Brochure. This has been covered in detail the above section on the Dashboard.
Syndication
This section allows you to review all the syndication details for a specific property. What you see on your syndication overview is dependent on what portals you selected to feed your listing through to. The syndication section also allows you to sync listings to the portals after any changes are made. The changes will then reflect on the portal within 5-10 minutes after you have synced.
You can also view any syndication updates on the various portals from the syndication section via a direct link.
Leads
If you click on Leads, you will be able to view both your leads as well as your buyer matches for a specific property. Leads are all the people that have filled out a contact form via your website or property portal regarding a specific listing. Your lead stage flow will also appear, which you can then update (more on Lead Stage Flow in the Leads section of this guide). Buyer matches are all the profiles that the system automatically associates to a specific property. We will cover Buyer Matches in more detail in the Clients Module of this training guide.
Export
The export tab can be used to download a pdf version of the listing summary page. You can export the file in PDF or Excel and you can select what information you wish to download. You can either download a summary of the current summary page you are on or you can download All Records which will show you a summary of all listings on the system. Simply click on Export, select the file type you wish to export and it will download automatically. When your download is ready, a notification will appear on the notification bell.
Residential Listing Record Tabs
When you select a single listing or multiple listings and click on Dashboard, or click on View and then Details. You will be presented with additional options which we discuss in more detail below.
Dashboard
View the selected listing/s dashboards, discussed in more detail above.
Details
This section will give you a summary of all the information that makes up your listing including branch and agent details, listing details, pricing breakdown, the listing marketing heading and description, features, on show details, offer details, auction details, general notes and so on. Should you wish to view the listing images click on the Media button.
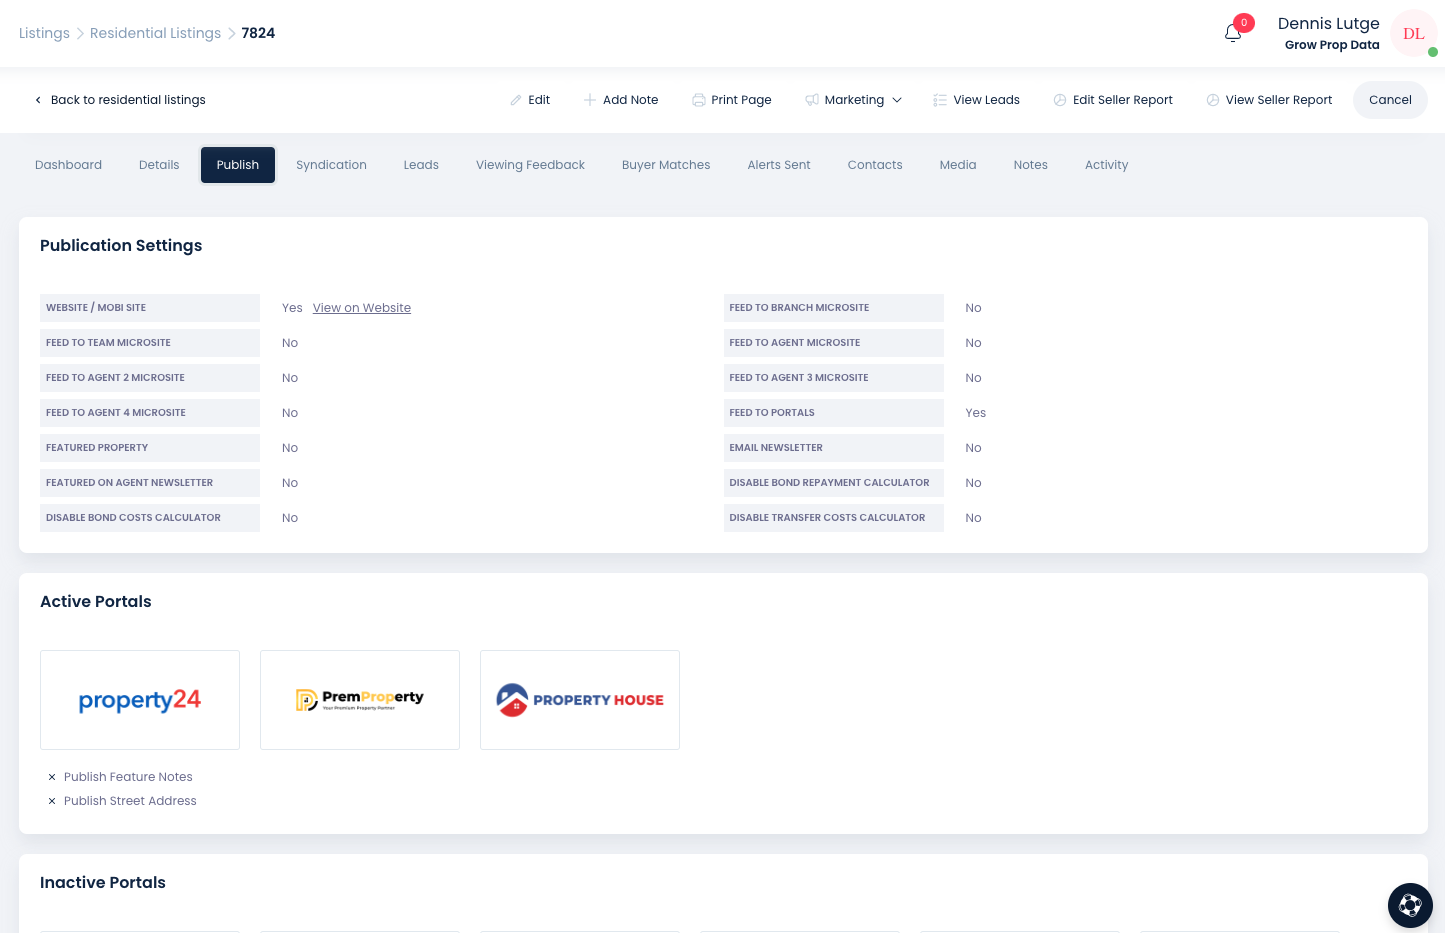
Publish
Here you will view all publishing information such as has the listing been set to feed to your website and the link to your website, active/inactive portals and should you have an agent or branch microsite with Prop Data, you will be able to view your listing on those sites using the populated link.
Syndication and Re-syncing Your Listing
The Syndication tab will display the paid portals with whom we have integrated with, namely Private Property and Property24. The Gumtree feed status will also be displayed. Here you will be able to see the status of your listings syndication with each portal. On saving or editing your listing we will automatically queue the listing to feed to the portal. Syndication on average takes a few minutes. You are also able to re-sync your listing to the desired portal by clicking on the Sync Again button, note that this button will read Sync should the listing not have feed through previously (new listing for example). Once you have clicked on Sync Again, the button will not be clickable again until we have received a "reply" from the portals, click the Refresh button at the top left of the screen to get the updated portal message.
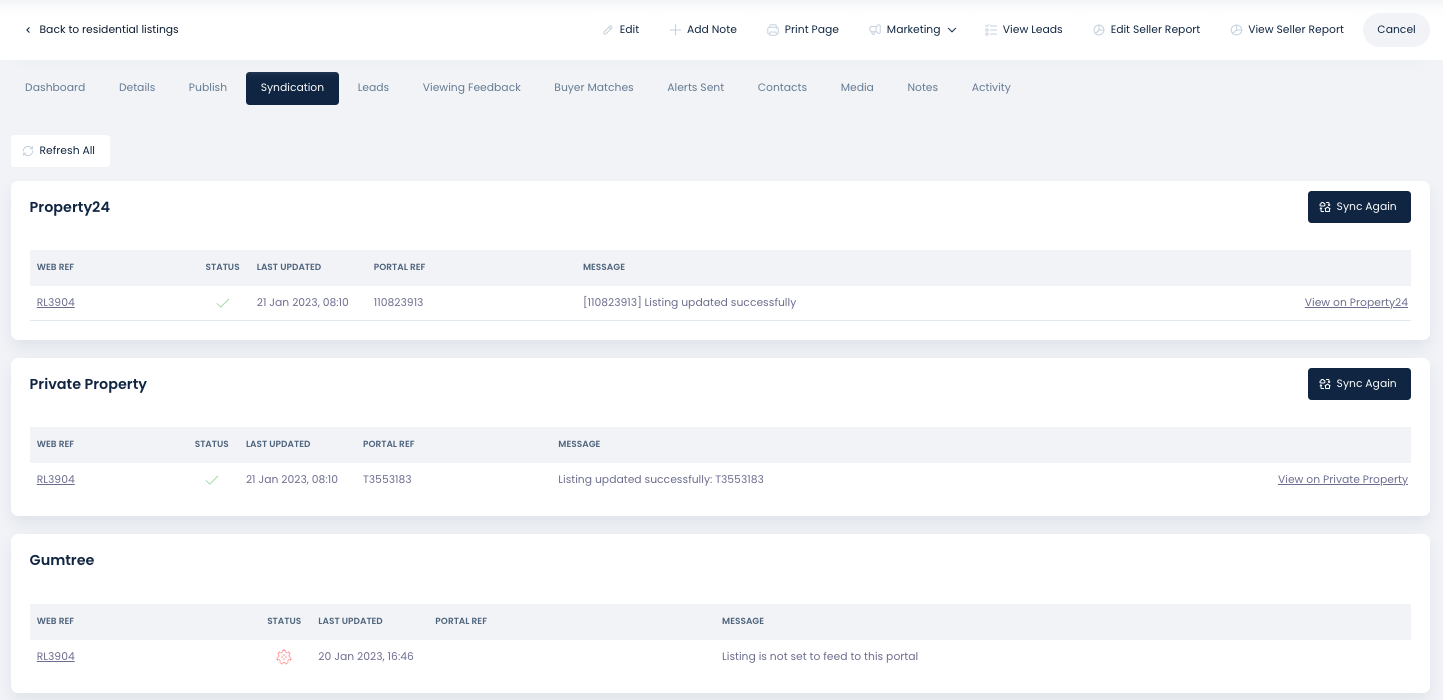
When we receive the update from the portal we will display the relevant message in the Message section as can be seen above. In this case the listing has successfully synced to both PP and P24 on the 21st of January 2023 at 08:10. The green tick under the status column provides a visual queue that all has been successful. You can now use the View on Property24 and Private Property links to view your listing on the desired portal, note that the portals may take a minute or two to display your listing.
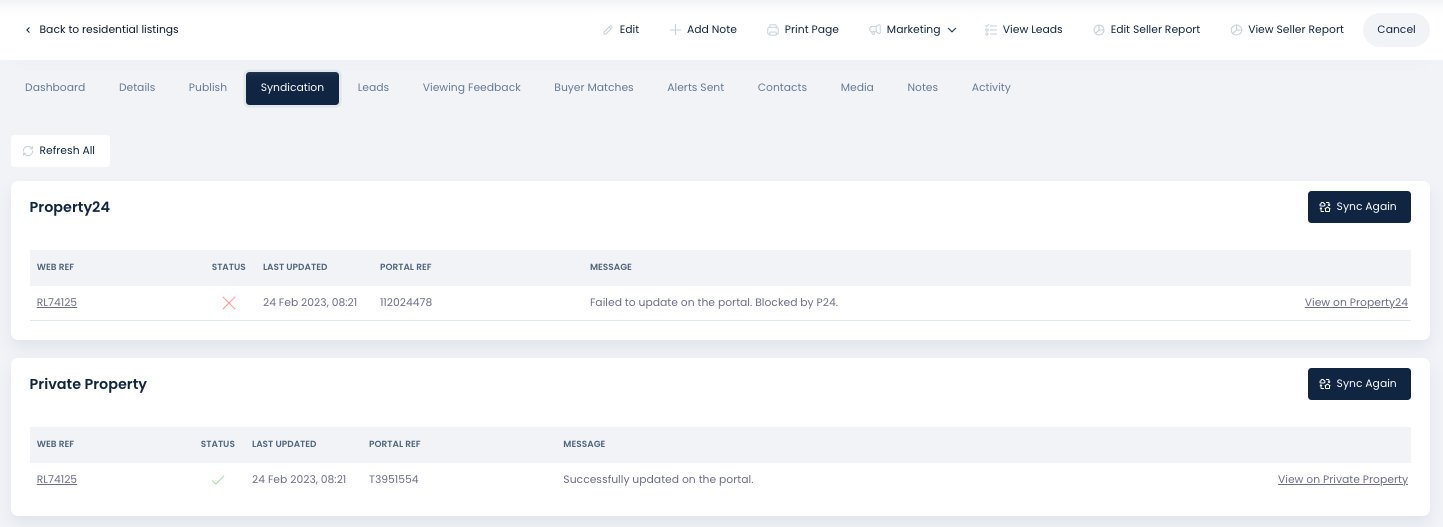
Should your listing have failed to sync as seen below, you will have a red X under the status heading and the Message from the portal will be displayed. In this case the listing is blocked by P24.
Syndication Errors
Below are some of the error messages that will be displayed and how to correct them:
Property24
Failed to update on the portal. Blocked by P24. Please contact P24 and establish why the listing has been blocked, moderation@property24.com.
Failed to update on the portal. Expiry date must be in the future. Please edit your listing and update the expiry date under the P24 Publish section.
Failed to update on the portal. Description may not contain a phone number: Description may not contain a phone number. Phone number is: '+27821234567'. Edit your listing and remove all contact information from the listing Description.
Validation failed. New or renewed listings cannot be added with a status of sold, or modified to sold status within 24 hours. Ensure that when you "re-list" a property that the status is added as Active, Pending.
Branch is not set to feed to property24. Please contact support@propdata.net. Please contact Prop Data support (support@propdata.net)
We could not process this listing. Please contact Prop Data support (support@propdata.net) Error: Server raised fault: 'Some of the specified agents are not active. AgentIds: 193503.' Check the following: Ensure that the agent is set to Display on Branches and that the agents cell number has been added in this format only, 083 123 4567, once amended please Resync the listing or please contact Prop Data support (support@propdata.net)
Private Property
Failed to update on the portal: PP50 - Cannot update property details for active listings. Please contact Private Property Support. Private Property do not allow your listing address details to be changed once the listing has been added to the portal.
Failed to update on the portal: PP104 - Branch does not have a valid contract, please contact your account manager for any queries. Generally an account issue, please make contact with your Private Property Account manager.
Failed to update on the portal: PP105 - Cannot create a new listing with a Property Status other than ForSale. Edit your listing and amend the listing status to Active.
Failed to update on the portal: PP70 - Failed Mandate Validation : Duplicate entry. Based on matching of the address to another address. Please ensure that you do not already have an Active or Pending listing with the same street number and name and/or in the case of a SS the same unit number and complex name. Use the Listings Advanced Search, All listing statuses, to find the duplicate listing/s. Private property do validate these details.
Leads (Managing Your Leads)
In this section you will be able to see all the leads that have been generated for your listing, regardless of POPIA status, when the lead was added and the contact who submitted the lead. You will also be given a visual cues as to the lead stage: New Lead, Contacted, Viewing, Offer, Sold/Rented and Archived. Below we will demonstrate how to Log Communication, Log Viewings, Log Offers and Archive leads that are now not interested in the property.
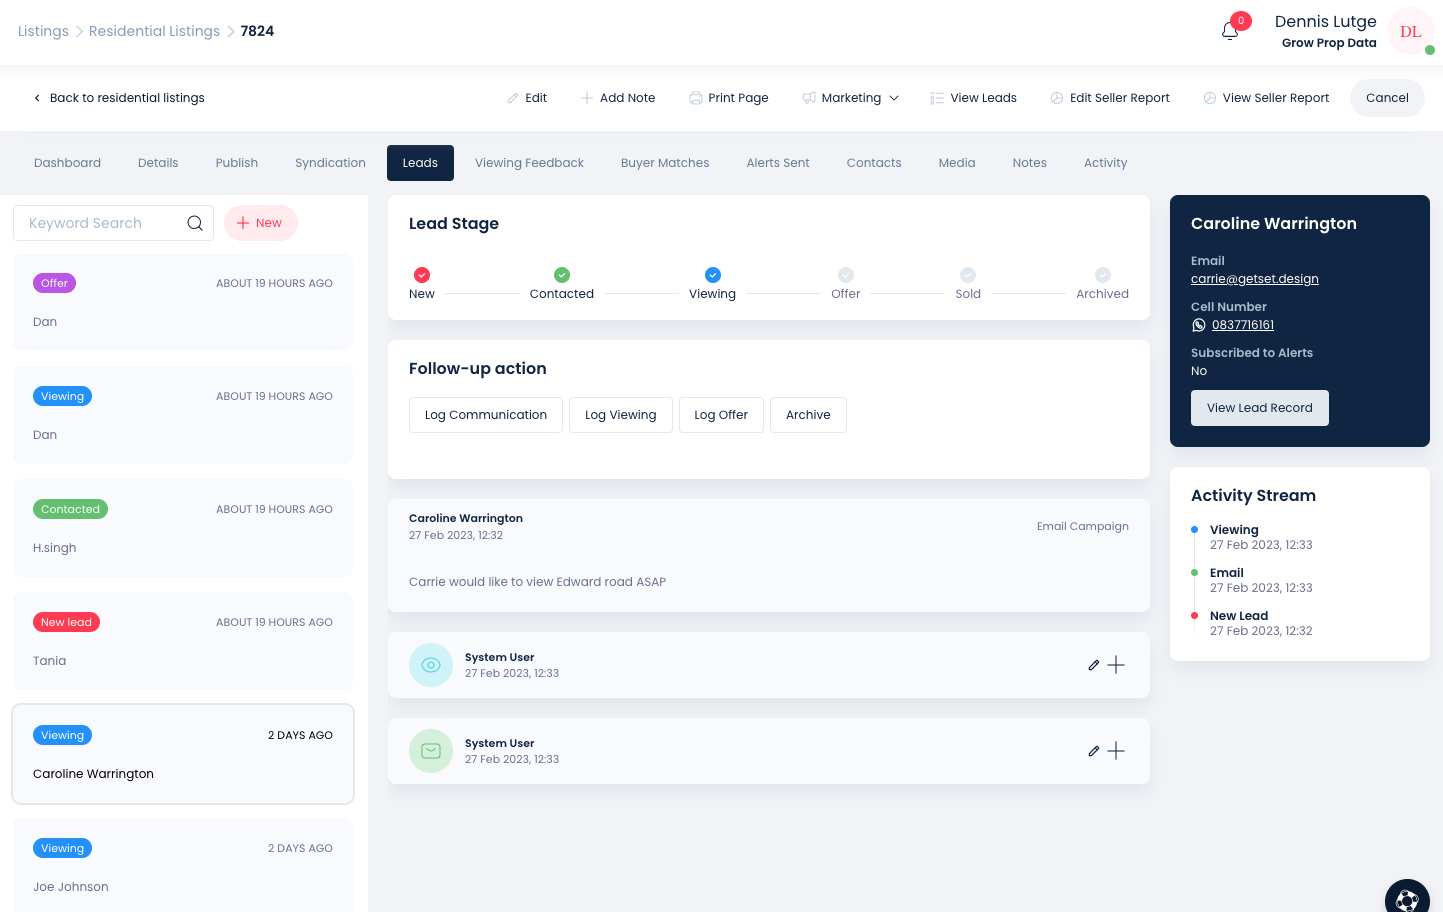
Lead Stage - How To
When a lead comes into the system for your listing the lead stage will be New Lead. Clicking on a specific lead will present you with additional functionality, known as the Lead Stream.
Log Communication
In the screenshot below, once you have clicked on Log Communication you will be presented with new required fields. Communication Type and Interested in Viewing.
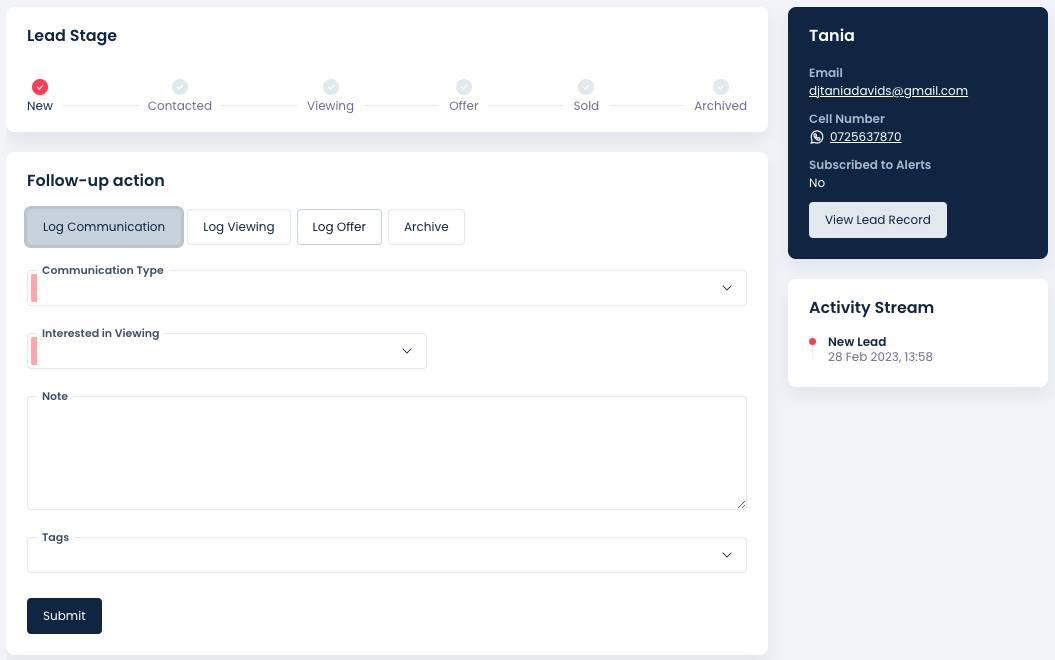
Communication Type: Select how you communicated with the client by selecting an option from the dropdown. Email, Phone Call, SMS/WhatsApp, In Person. When done click on Submit
Interested in Viewing: Yes, No, Maybe. If you specify Yes, the system will prompt you to add a Viewing Date. If you specify the Viewing Date the lead status will now update to Viewing. Selecting No or Maybe will move the lead status to Contacted. Click Submit once done.
You do not necessarily have to add each step of the Lead Activity Stream, you can for example, log an Offer for the lead without having added a Viewing.
Log Viewing
Use this activity to record how the viewing went with the client. In the example below we have logged a viewing with Tania, we have specified if she is still interested and listed her concerns with a note of her comments.
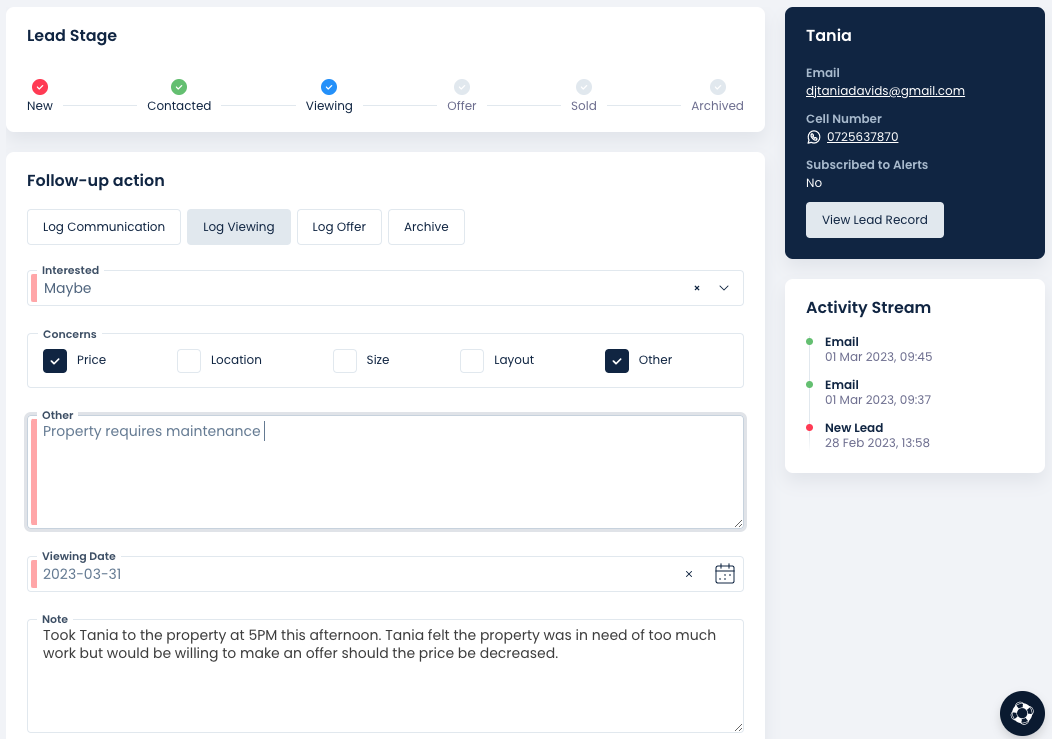
Interested: Is the person still interested in the property after viewing? Yes, No, Maybe.
Concerns: Check one or more of the Concerns checkboxes. Should you specify Other, an additional required field will be presented : Other, here you would type in the other concerns the client has, as seen above. Once done, scroll down and click Submit
IMPORTANT: Viewings that you record here, the viewing dates, whether the client is interested or not and their comments are added directly into the Viewing Feedback section which we discuss below. This information will also be available for you to add to your Seller/Landlord Feedback Report. The buyer/tenant feedback you receive and add to your Viewing Feedback is a great way of showing your seller/landlord that perhaps the listing price needs to be adjusted or that some essential maintenance needs to be undertaken.
Log Offer
If you have an OTP or signed lease agreement you can capture this by logging an offer. You will need to complete the required fields, as seen below before submitting your offer.
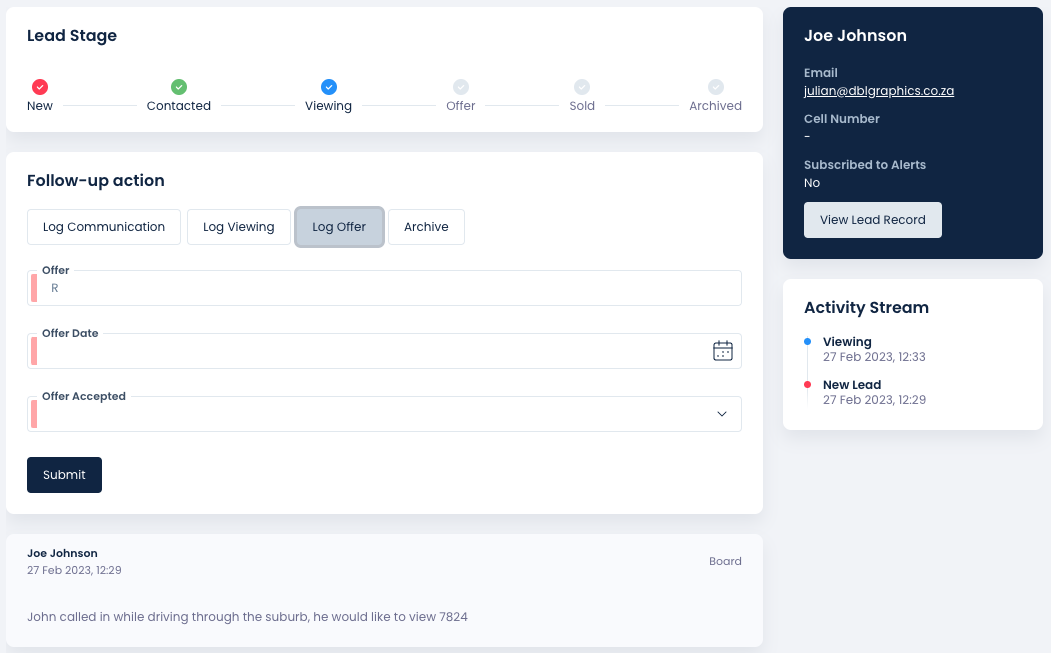
Offer: The price the buyer/tenant has offered to pay.
Offer Date: The date of the offer.
Offer Accepted: Pending, Not Accepted or Accepted. Should you select Accepted, the lead stream will now reflect Sold/Rented.
Archived
If the lead has gone 'stale' and the person no longer wishes to continue with the listing you can Archive the lead.
How to Edit Any Lead Stream Activity
If you would like to go back and make a change to any logged communication, viewing feedback and offers. Select the lead on the left of screen and then either click on the Pen icon (to edit) or the + icon to view the detail in full. See demonstration below:
Important Note: If you have already taken clients to the property who have not made a website or portal enquiry, add them as leads to your listing, (read how to add a lead here) only once they have been added as leads associated to the property will you be able to complete any viewing feedback on their viewing for your seller/landlord.
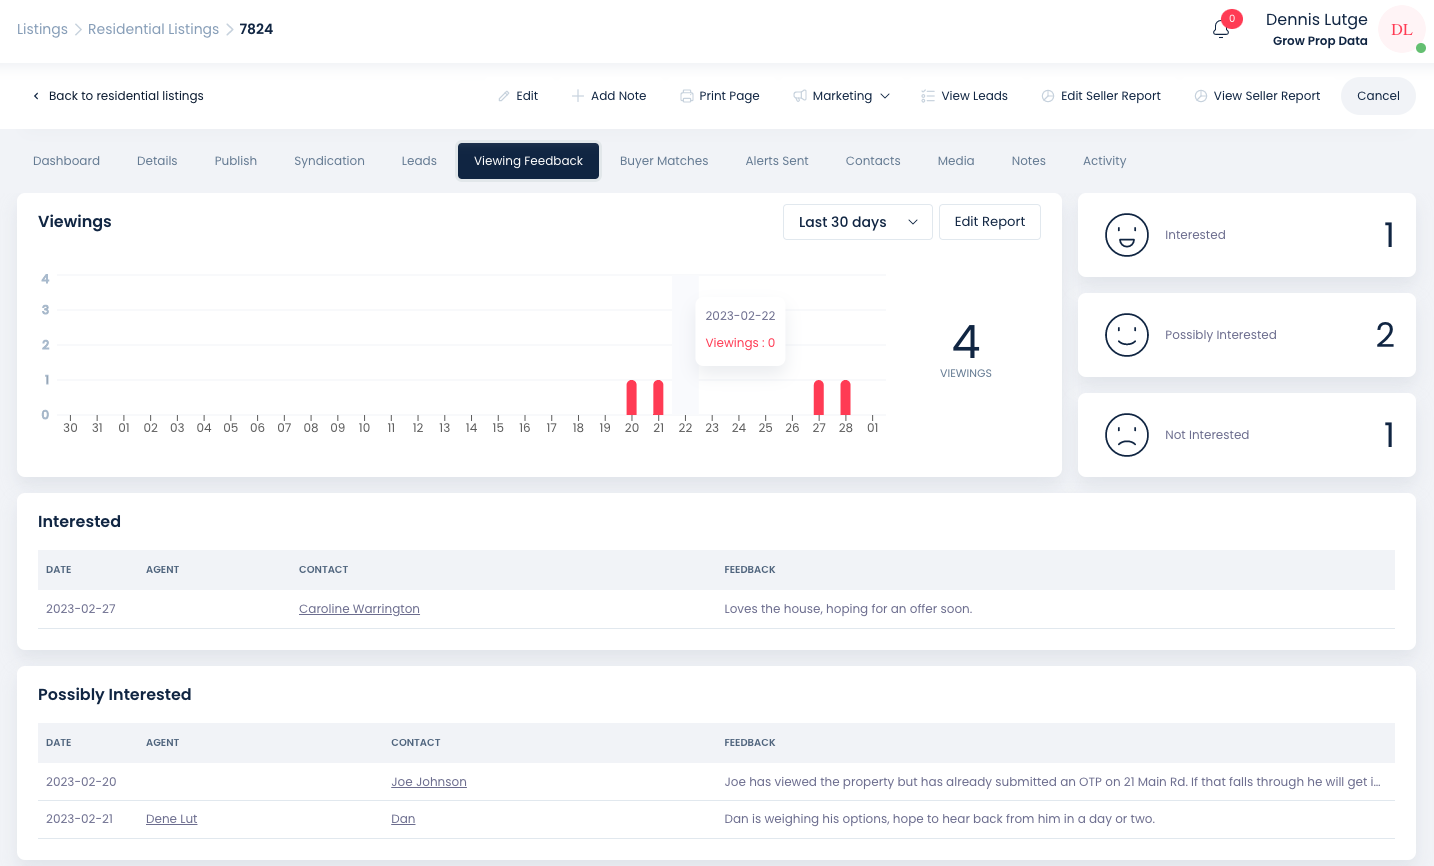
Viewing Feedback
As mentioned above in the Log Viewing section. The feedback that is captured when you log a viewing will be displayed on the Viewing Feedback page. The graph will show when a viewing was conducted and how many viewings were done on that particular day. The face emojis will indicate the number of Interested, Possibly Interested and Not Interested buyers/tenants. The Viewings can be filtered using the Last 30 Days dropdown and you can go straight into editing a seller/landlord feedback report by pressing the Edit Report button.
Your viewing feedback comments, the buyer/seller name and the date of viewing will be displayed under each viewing status. Interested, Possibly Interested and Not Interested. See screenshot below:
Buyer/Tenant Matches
Here you will view a list of potential buyer/tenant matches on a specific property and time period. Buyer Matches are client Profiles that have been added to the system previously either when an email lead was created on your listing on your Prop Data website or when the listing form has been completed on a portal. Depending on your access you will be able to add your own Profiles or edit Profiles on the system. Read more about Profiles here.
Prop Data Manage looks at the data contained on the client Profiles and then calculates whether the buyer or tenant should be a Hot match (Red Star), Mild match (Yellow Star) or Cold match (Blue Star). The criteria used to determine a match and the star colour is as follows:
Listing Type: To Let or For Sale.
Property Type: Did the buyer/tenant enquire on a house, townhouse or apartment for example.
Area/Suburb: In which suburb/s has the buyer or tenant enquired in.
Price: What is the buyer/tenant's price range? Prop Data Manage, by default, adds 20% to the price for the top end of the price range and removes 20% for the bottom end of the price range.
Now let's look at a real-world example.
Mark previously enquired on a listing (completed the listing form on your Prop Data website) that you had for sale two months ago. The listing was a for sale listing, a house on sale for R2 000 000 in the suburb Pinelands. Mark's profile would have automatically been created with the previously mentioned criteria when he submitted the form two months ago. Now, you have just added a new house for sale in Pinelands for R2 200 000.
Marks profile would be displayed as a Hot match to your new listing as ALL the criteria match.
Had your listing been priced at R2 500 000 Mark would appear as a Mild match as your listing price now falls outside of ONE of the criteria, in this case, price.
Had your listing been for sale for R2 500 000 but the suburb was Athlone (a neighbouring suburb) the match would be displayed as a Cold match as two of the criteria do not match. Price and suburb.
In summary, a Hot match = your listing matches all of the Profile's criteria. A Mild match = your listing falls outside of one of the criteria however the client may be flexible and Cold match = two or more of your listings criteria do not match the buyer/tenants profile.
Your Buyer Matches overview page will look like this:
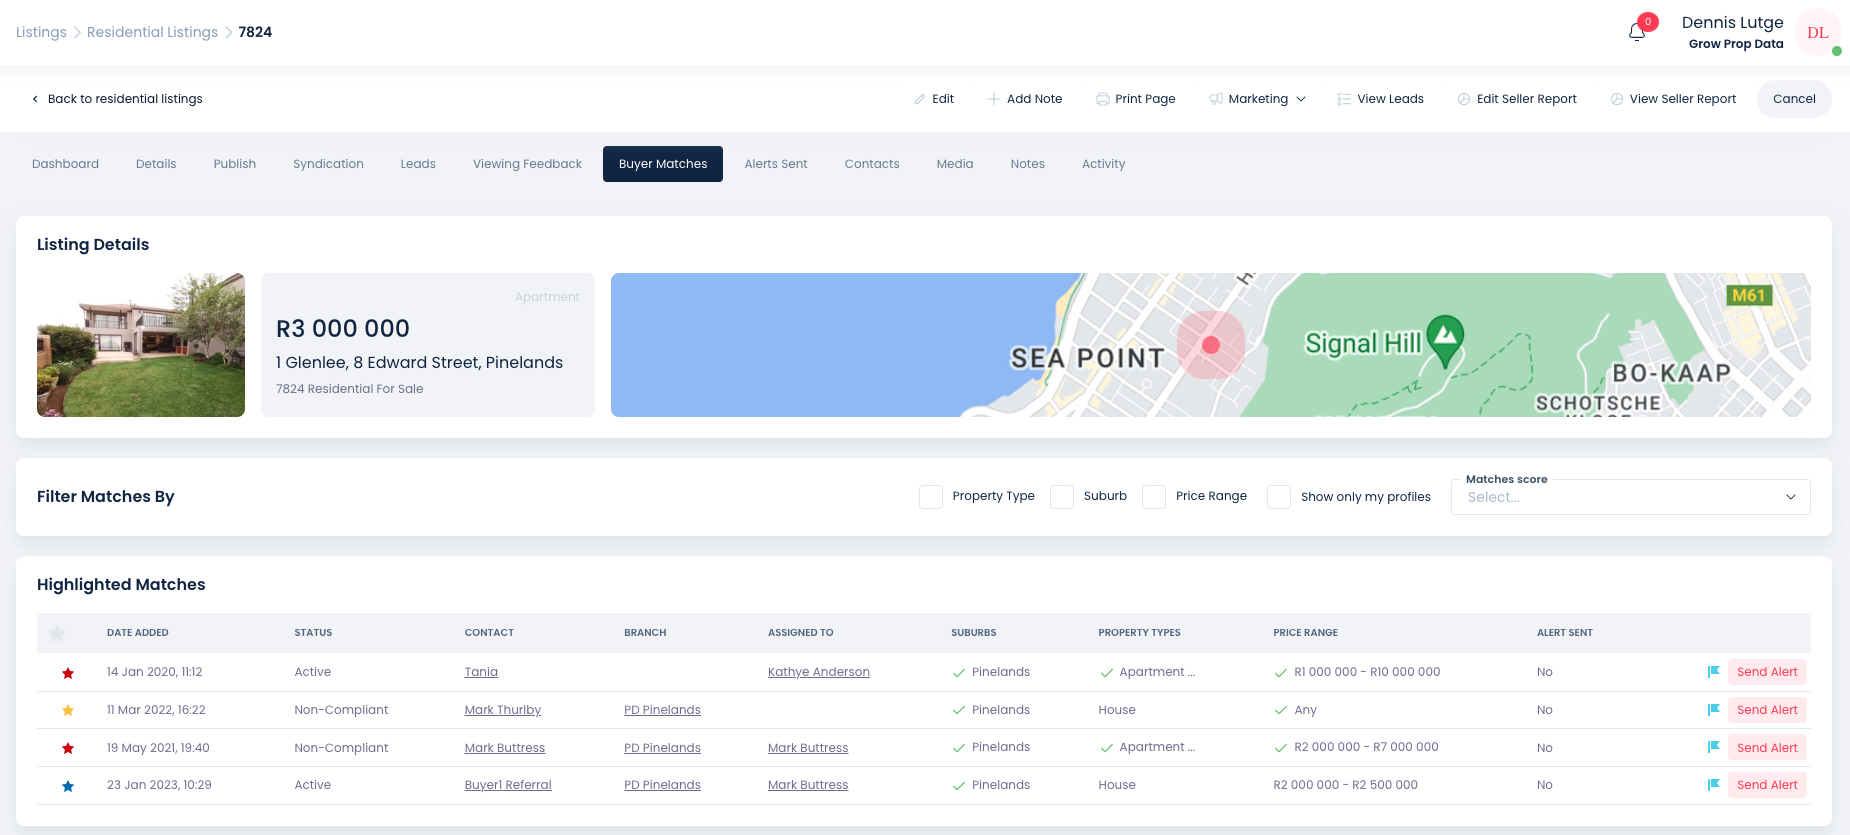
Filter Matches By
Using the available checkboxes and the Matches score dropdown you will be able to filter your matches by Property Type, Suburb, Price Range and also be able to specify if you want to view only the profiles that you "own". You may select more than one filter checkbox as seen in the screenshot below:

By default the system will display ALL matching profiles for the branch, this allows for agent's to see if another agents buyer or tenant matches their property and allows for communication and synergy between the agents.
If you prefer a more formalised referrals process, Prop Data Manage has this available with our referrals module, chat to your Prop Data account manager for more information.
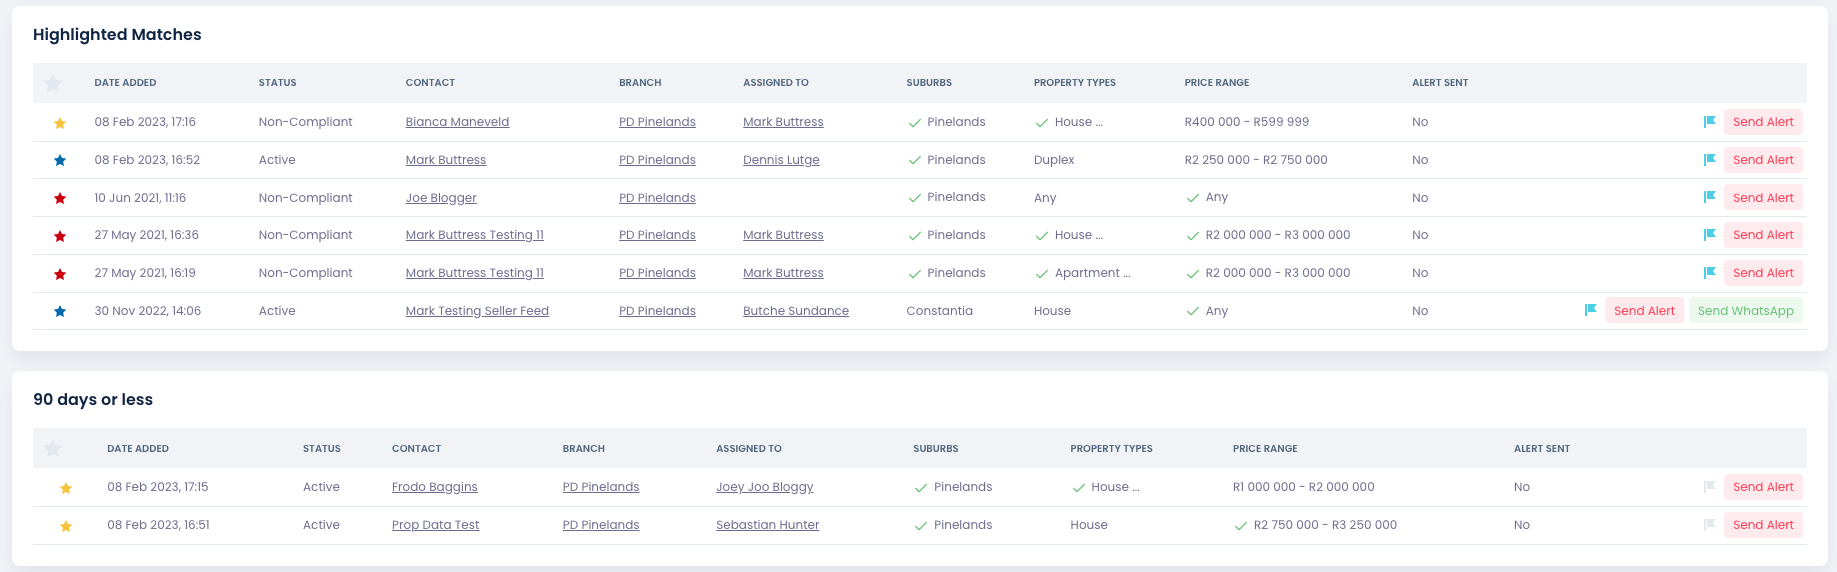
Highlighted Matches
While scrolling through your available matches you may want to select matches that you wish to work with in regards to your listing. To highlight certain matches, click on the little gray flag which appears next to the Alert button as seen in the image below:
The video below shows how the process works. Highlighted matches will also appear on your Listing Dashboard.
Matches - 90 Days or Less and More Than 90 Days
Your matches will be grouped by age in 2 separate sections on the Matches page.
90 Days or Less, these are matching profiles created within the last 90 days. Generally buyer/tenant may still be actively in the market in this time period and will be more responsive to your alerts and communication.
More Than 90 Days, these buyers/tenants may still be looking for a property however the profile was created more than three months ago and may be "stale".
Match Column Names and Functionality
Looking at the image above let's go through the column names and the various options you have available to interact with your matches.
Date Added: The date the profile was created.
Status: POPIA dictates that your clients need to be able to manage their personal data, your Prop Data website will send an Opt-in mailer to all clients who make enquiries on your website and on the various portals. You are still able to interact on a one-on-one basis with profiles in the status of No-Consent and Non-Compliant, we will discuss sending alerts to profiles with this status a bit further down. You can read more about managing your client's data here.
Contact: The Contact (person) that is associated with the matching profile.
Branch: The branch that the matching profile belongs to.
Assigned to: The agent that "owns" the profile.
Suburbs: The suburb/s the buyer/tenant is wanting to buy or rent in. Profiles can have more than one suburb allocated to them.
Property Types: The buyer/tenants preferred property types, house, townhouse etc. Profiles can have more than one Property Type added to them.
Price Range: As discussed above, Prop Data Manage will add and remove 20% to the price of a listing they originally enquired on. So if the original enquiry was on a property with the asking price of R1 000 000 the price range will be R800 000 to R1 200 000.
Alert Sent: If a New Listing Alert has already been sent to the buyer/tenant, The Alert Sent column will reflect a 'Yes'. If an alert has been sent, either an automated new listing alert or a manual alert, the Send Alert button will not be displayed.
Send Alert and WhatsApp Buttons: Sending alerts to buyer/tenant profiles with the status of Non-Compliant and No-Consent is permitted as you are sending a targeted one on one email to the client. Ideally you would have interacted with the person previously and would know what his/her needs are and if your new listing matches their criteria. Clicking on the Send Alert button will trigger a branded (your company's branding) new listing alert email to the client.
Very Important: You do not want to go through the list and click on Send Alert to every match that appears on your matches page. This will generate complaints and unsubscribes. Target your buyers/tenants whose needs you already understand and may have an existing relationship with.
The Send WhatsApp button will only appear on Profiles who, when they received their opt-in mailer, agreed to receive direct communication and SMS's.
You can view which clients have received an alert for your listing by clicking on the Alert Sent button, discussed in the next section.
Alerts Sent
Here you will find an overview of all the alerts that have been sent for a specific property. You will see the date the alert was sent, whom it was sent to and the type of alert. Remember, any field that is underlined, is clickable. Clicking on underlined elements will take you directly onto the detail of what you have selected. Clicking on Contact for example will take you to the clients contact page.
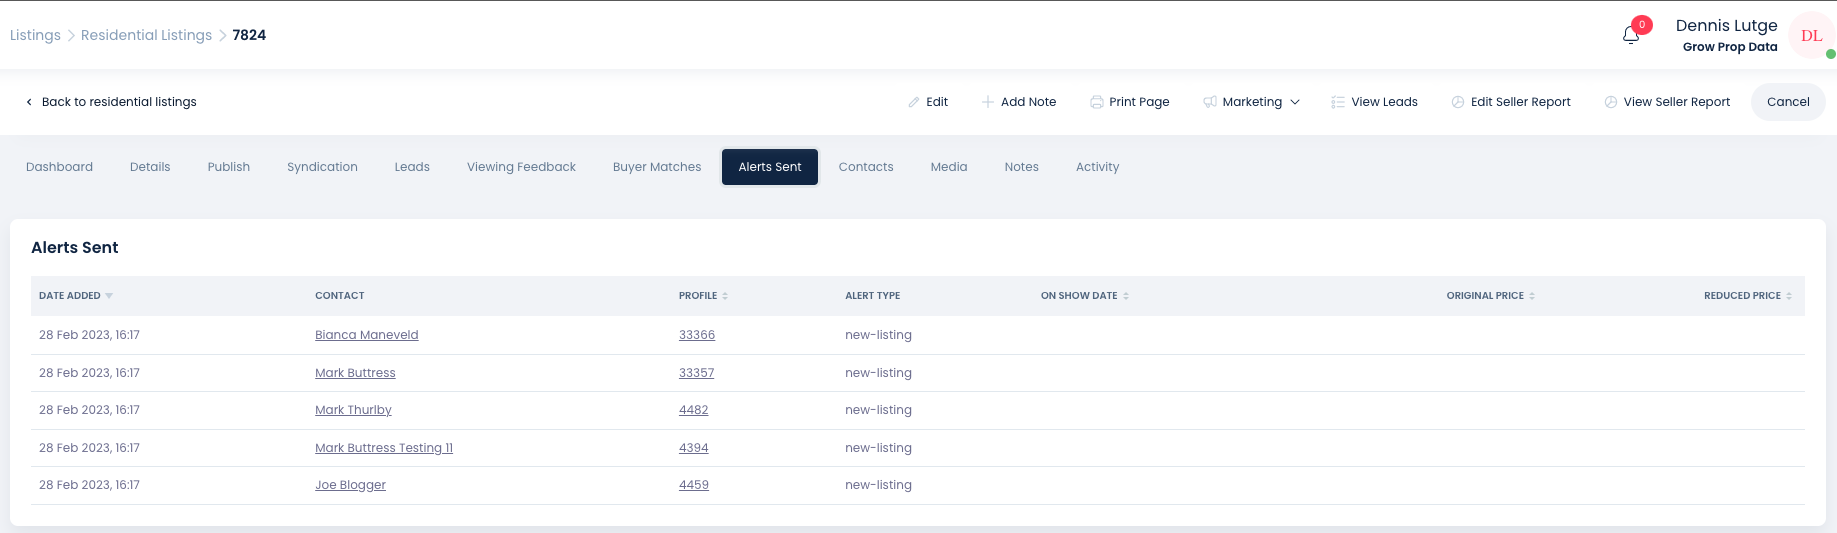
A note on Alert Types and the names you will see under that column heading:
New Listing: This is an alert that has been automatically sent to listing matches by the system itself, these are clients that would have clicked "Subscribe to Property Email Alerts from a listing or would have signed up on your Property Email Alerts page on your website. Note that this automated alert, the price-reduced alert and the on-show alert are not available on our Agency Launch package. Visit our website for more information.
Price Reduced: This alert will automatically be sent to clients who have elected to receive alerts as mentioned above when you reduce the price of your listing and select the Send Price Reduce Alert checkbox.
On Show: This alert will automatically be sent to clients who have elected to receive alerts as mentioned above when your listing is marked as on show.
Manual Listing Match: This Alert Type will display if you have click Send Alert from your listings buyer or tenant matches section.
Manual Profile Match: This Alert Type will display if you have sent an alert for the listing from the Profiles Match.
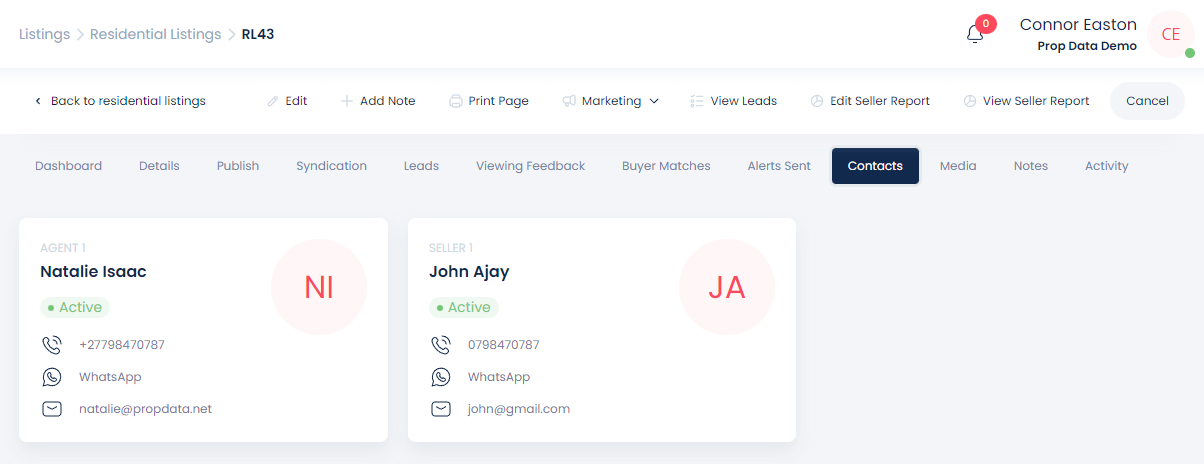
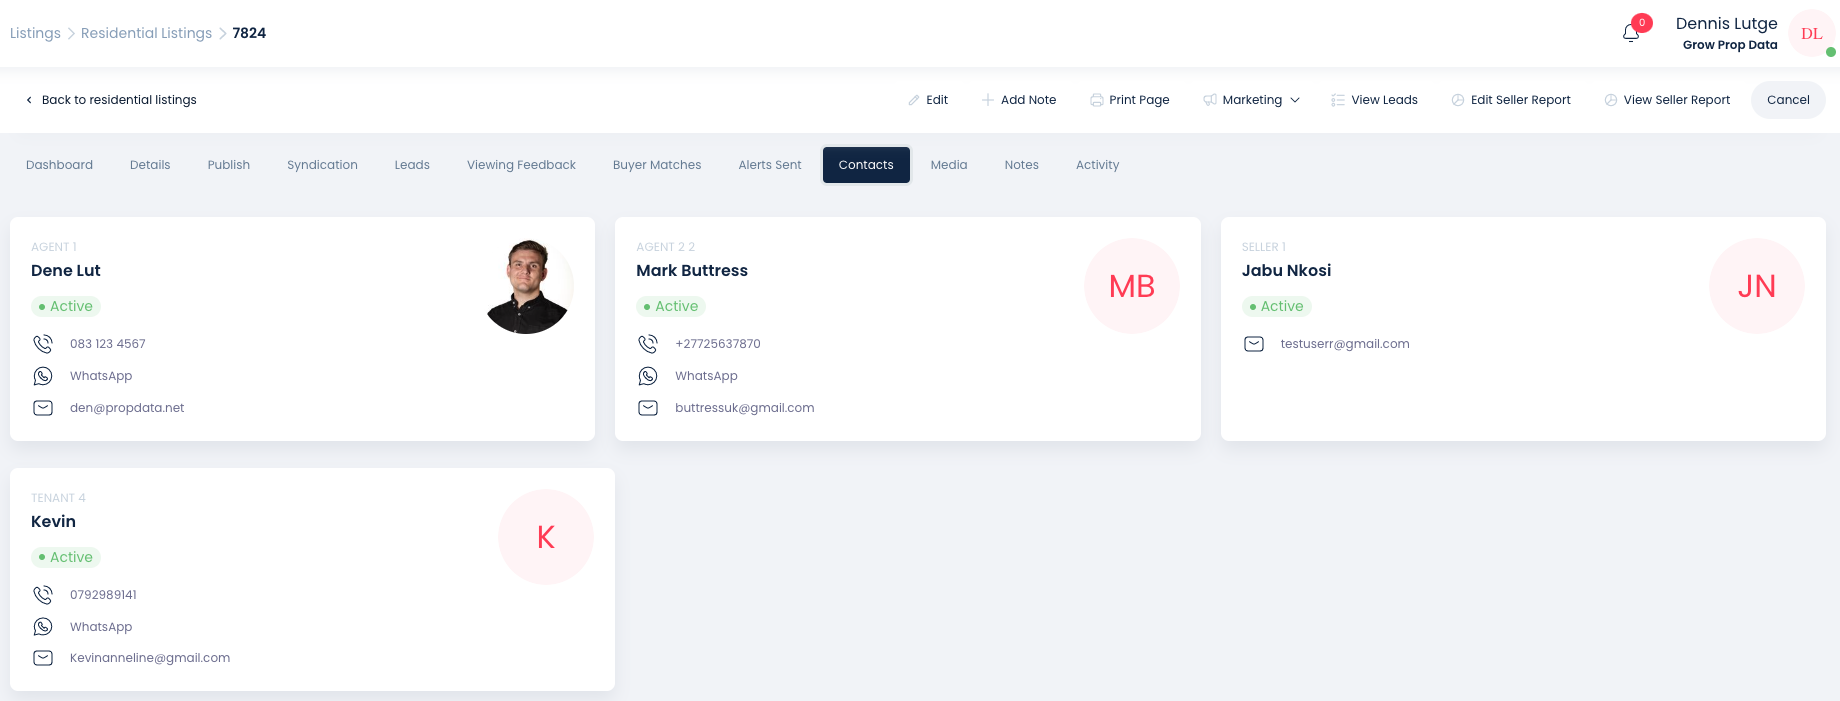
Contacts
Here you will find the contact details for all of the people associated to the listing, the agents, the seller/s, landlords and tenants.
Note that the Telephone, WhatsApp and Email links are all clickable, this means that whether you are on your phone or PC you can use these links to make a call, WhatsApp or create a new email to the contact.
Media
In the media section are all the images and videos of the specific property you are viewing as well as any floor plans and other important documents related to the listing.
Download Listing Images
To download all or some of your listing images back onto your computer, click on the Select All button at the top right or select the images you wish to download and then click on the Download Selected button. A .zip file with the listing images will be added to your downloads folder on your PC/mobile device.
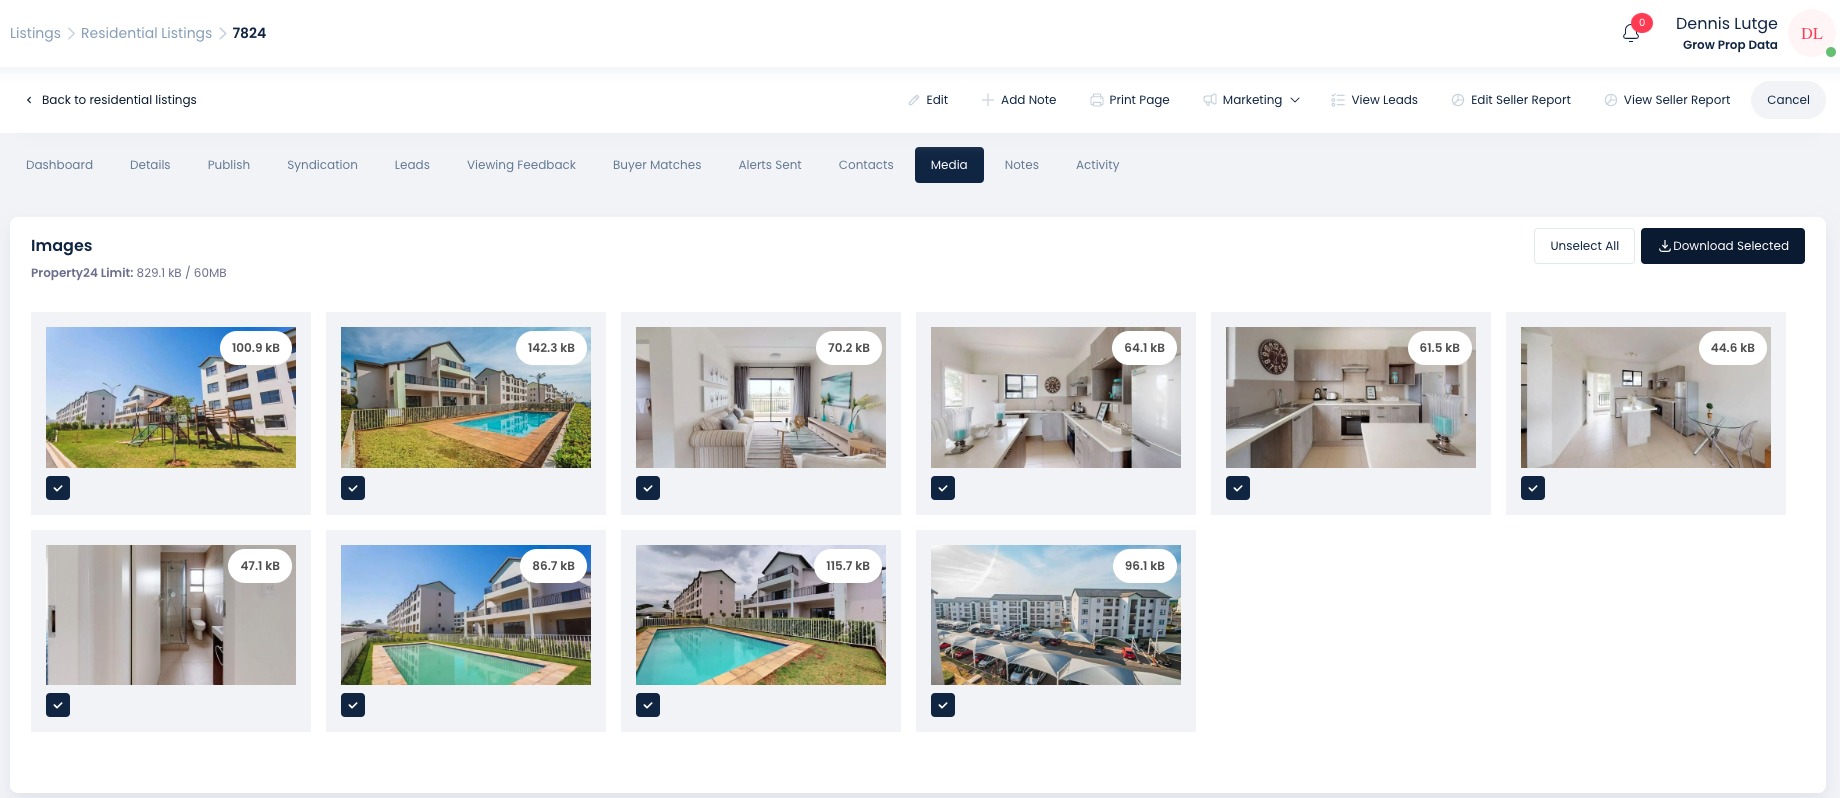
Notes
This is a log of any notes added to the listing. You can use this page to add a new note by clicking on the + New button.
Notes allow you to add more detail to a specific record, add notes as reminders, or to keep a trail of document's associated to a listing or seller. Read more about Notes here.
Activity
Here is a log of all updates and changes made to the listing you are viewing. It also tells you who made the update and when it was made. A calendar will pop up to the left of the Activity log and from there you can click on any date and it will show you the updates made for that day, if any.
View Leads
Next to the marketing button you will see the View Leads button. This functionality will show you a comprehensive list of all leads that have come through on a particular listing with the leads contact information, where the lead came from, the date the lead was added, what agent is associated to that lead, and what lead flow stage that lead is on.
Seller/Landlord Feedback Report
The Feedback Report makes the task of providing your seller or landlord with updates on their property a breeze. We combine viewing, lead and click statistics in an easy-to-view graphic format. We also bring in your viewing feedback and allow you to add any additional marketing actions you may have undertaken. Use the report to provide feedback to your seller/landlord daily, weekly or monthly, use the statics contained within the report to perhaps guide your seller to lower their asking price due to low viewing and lead counts and use the report internally to compare how listings in the same suburb are performing. Let's dive into the report in more detail.
Setting Up Your Feedback Report
The name of the report will reflect your Listing Type (To Let, Landlord or For Sale, Seller). The report functionality allows you to print, Email to seller/landlord, Send Link or download as PDF a seller or landlord report once completed.
To generate or view a report, select a listing by clicking the checkbox to the left of the listing Summary Page. Now click the Dashboard button. To the top right of the screen you will see the Edit Seller/Landlord Report and View Seller/Landlord Report. If this is the first time you will be generating a report for your seller or landlord, select the Edit Seller/Landlord Report button. See video below:
You will be presented with a report setup page. Lets run through the various options, take a look at the video at the end of this section to see the report generation in action.
Template: Select Seller Feedback, remember that the name of this field will change to Landlord feedback should you be generating the report for a rental listing.
If you have asked Prop Data to create a custom template for the seller/landlord report, the custom report will also appear in the Template dropdown. Select your custom report and then click Update Preview.
Select a Section to Edit
Firstly select the various parts (Sections) of the report that you wish to display by clicking the associated checkboxes and click on the very bottom Update Preview button.
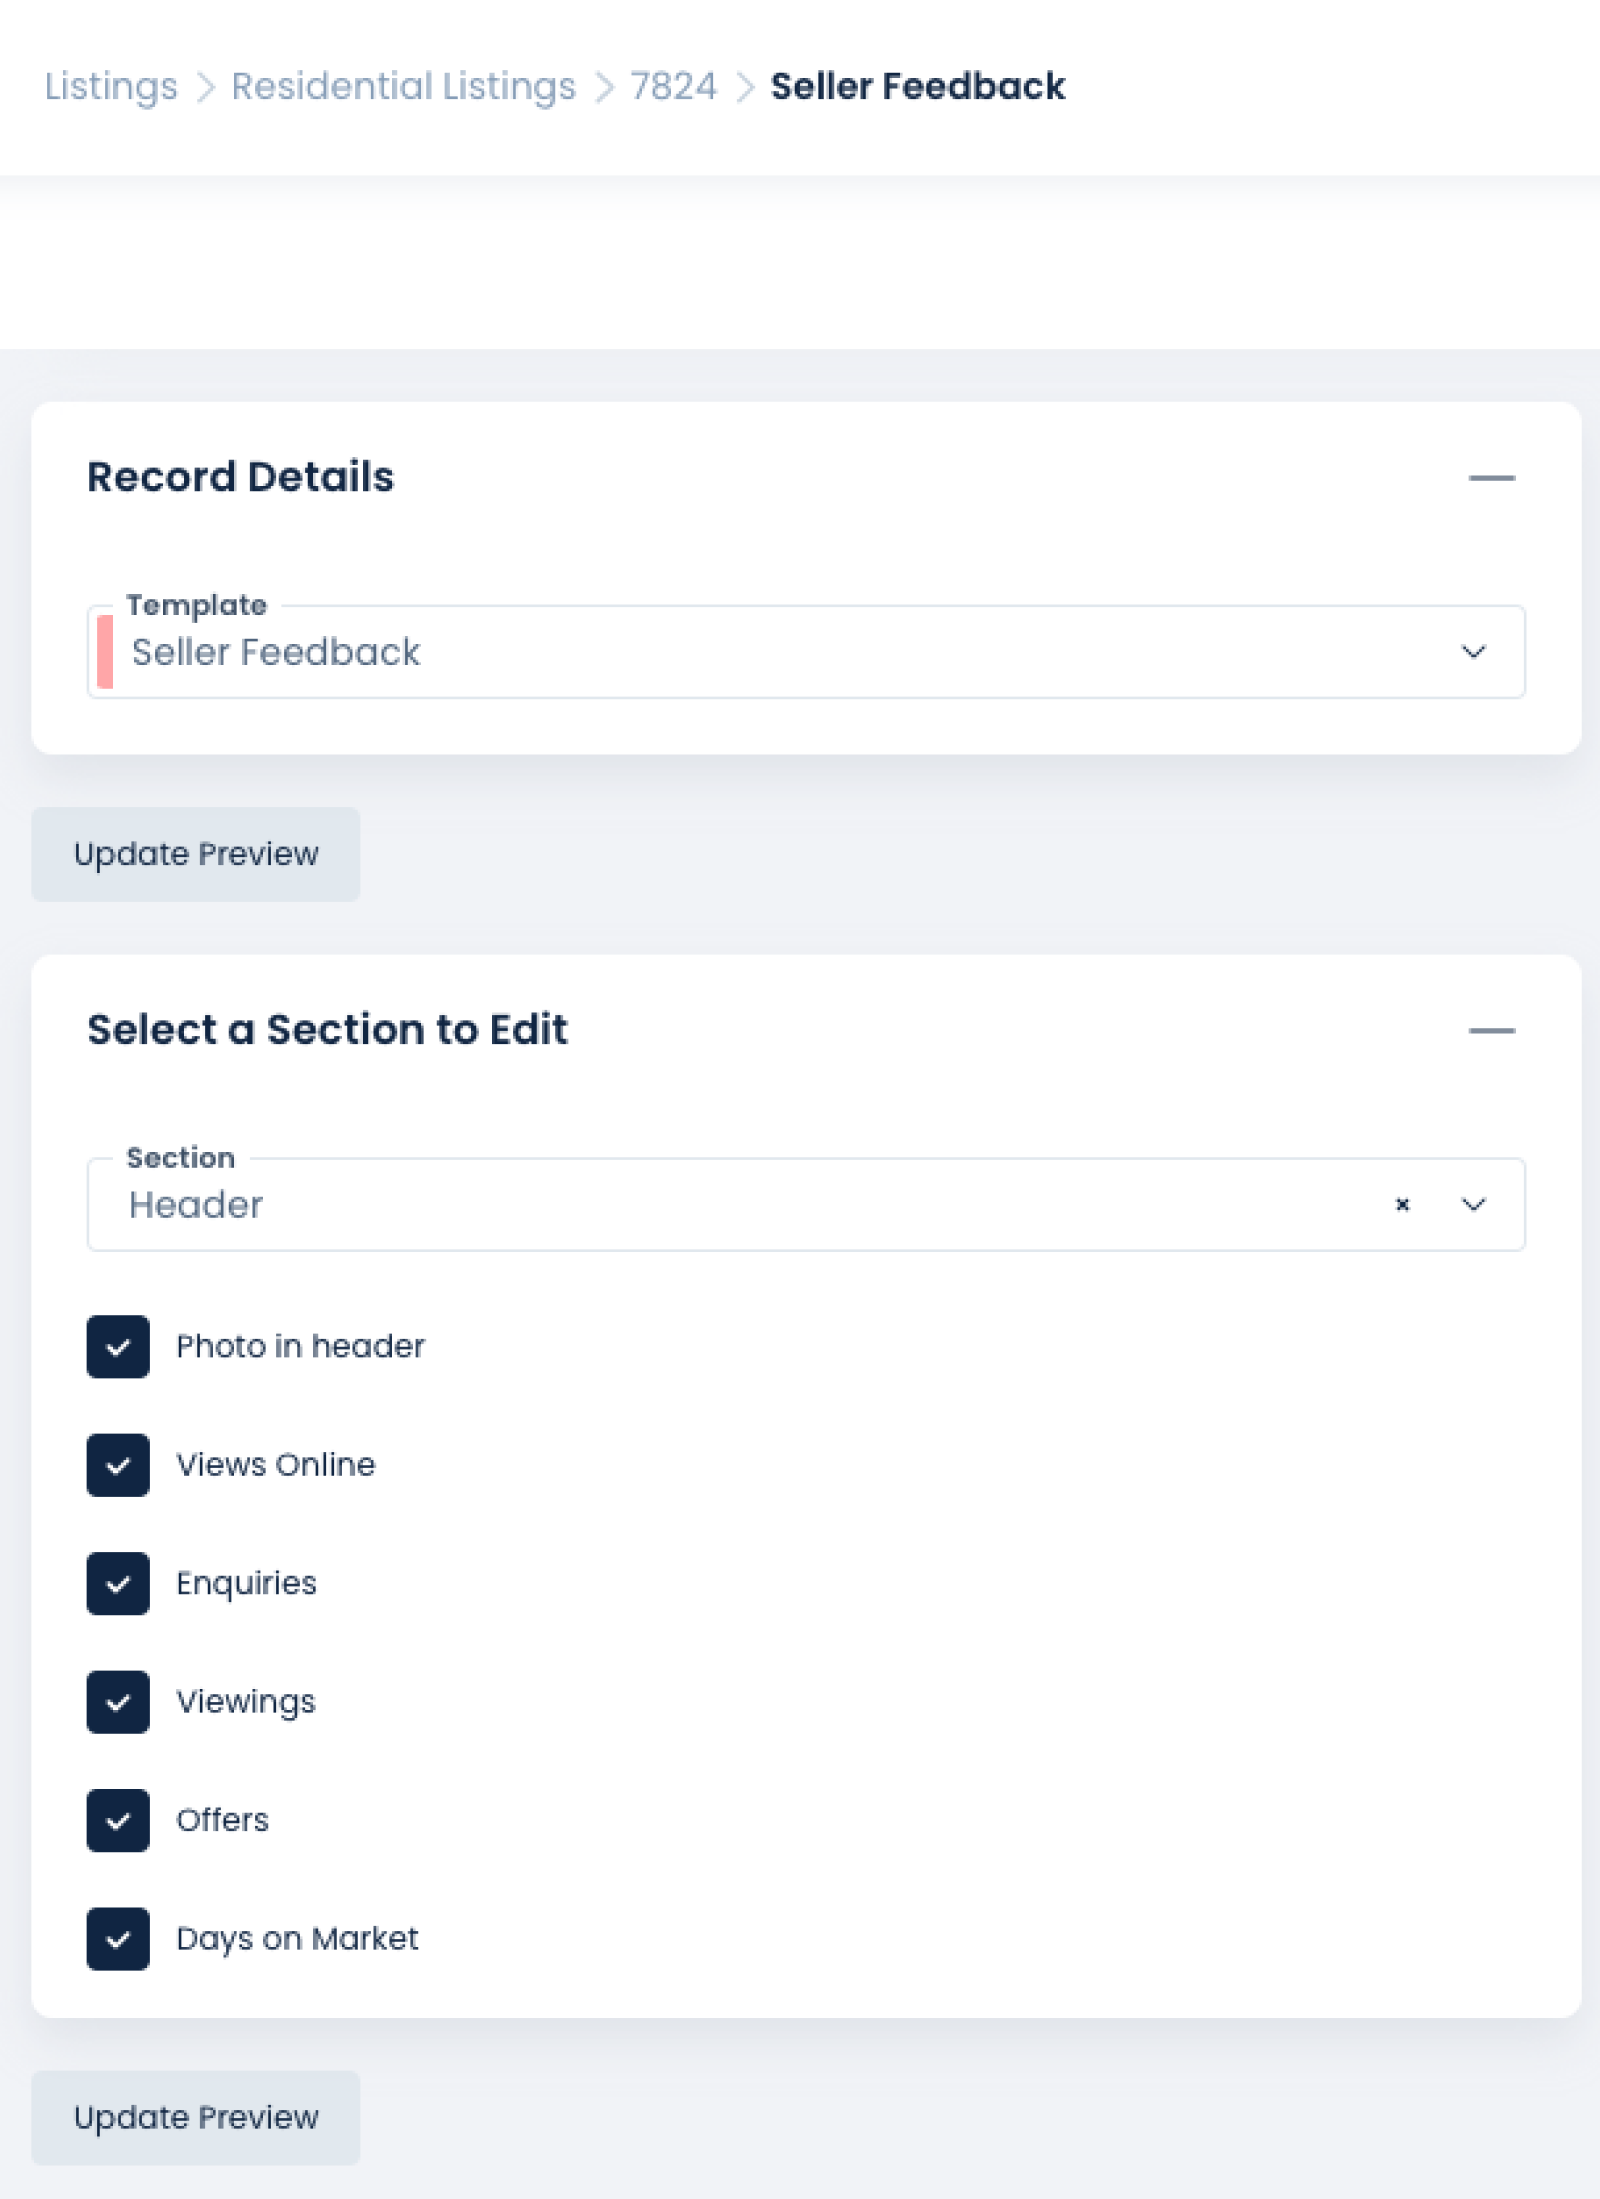
Now select Section by clicking on the down arrow, the Header has already been setup when you selected the checkboxes in the previous step.
Views Online: Add this section to your report to show the number of views the listing has received over the last 30 days, select the source of listing views in the dropdown provided. IE. Website (your Prop Data website), Property 24, Private Property and so on, now click Update Preview.
A bar graph similar to what you have on the listing Dashboard will be added to the report, below the graph will be a key to explain the various symbols above the viewing count for the day. These are: Email (leads), when a show day was done (On-Show) and Viewings (when viewings were logged). The key can be seen to the bottom right of the below image. Read more about adding Viewings to your listings here. As the report only displays the graph of the listings viewing stats for the last 30 days we have included The Views Online (Total) count and Views Online (30 Days) count from ALL sources. When the listing age is older than 30 days, the Views Online (Total) will increase to show the total number of views. Therefore when the listing is 30 days or younger, the previously mentioned fields will have the same count.
Enquires Online = Total Email Leads
.png)
Now click the Section down arrow again and select Enquiries (leads).
You will be given the following enquiry sources to select from:
.png)
Select which lead sources you wish to present to your seller/landlord on your report by clicking the relevant checkbox. You can of course select all. In the screenshot below I have excluded Website and WhatsApp leads. The Enquires section will appear below the Viewing section. Click Update Preview
.png)
The values populated in the Portals field above are the combined totals of email leads received from the portals as well as the number of Telephone (P24 and PP) and SMS leads (P24 only).
The WhatsApp enquiries is the total count of the number of times the WhatsApp button has been clicked on your Prop Data listing form, the WhatsApp button can be seen in the image below under each agents name:
The Telephone enquiries is a total count of all Show My Number leads from your Prop Data website and the portals.
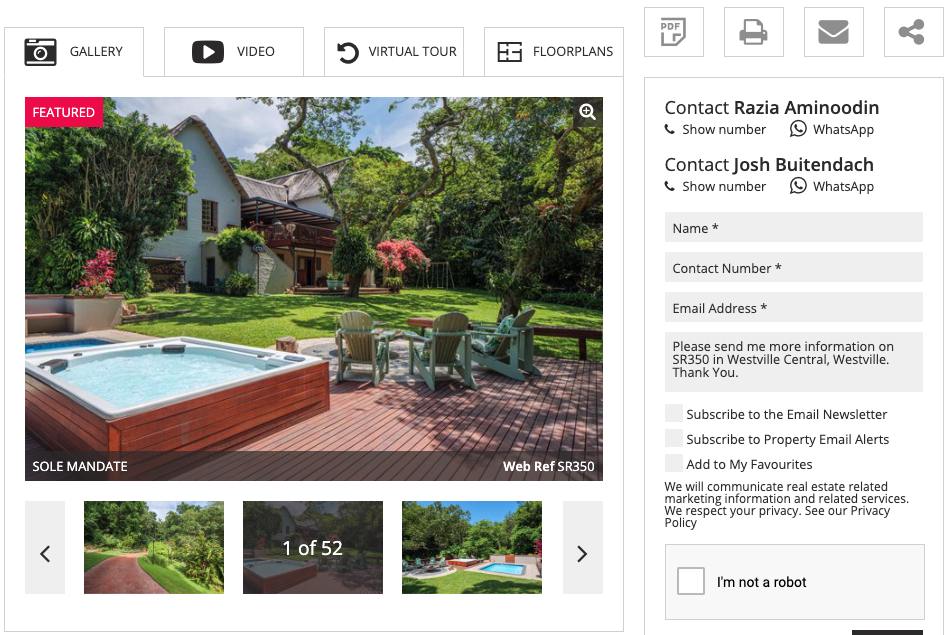
Now click the Section down arrow again and select Matches and Alerts. This section allows you to display the number of buyer/tenant matches on your Prop Data Manage system and the number of automated new listing Alerts that were sent from your Prop Data website. Make your selection and click on Update Preview.
.png)
A new section is added to the report displaying Buyer Matches and the number of alerts sent, bear in mind these are your Prop Data matches and alerts.

Click the Section down arrow again and select Viewing Feedback. This section will import the feedback that you have added when managing your viewings under the specific listings Leads section. Select which client's feedback you would like to include in your report and click on Update Preview.
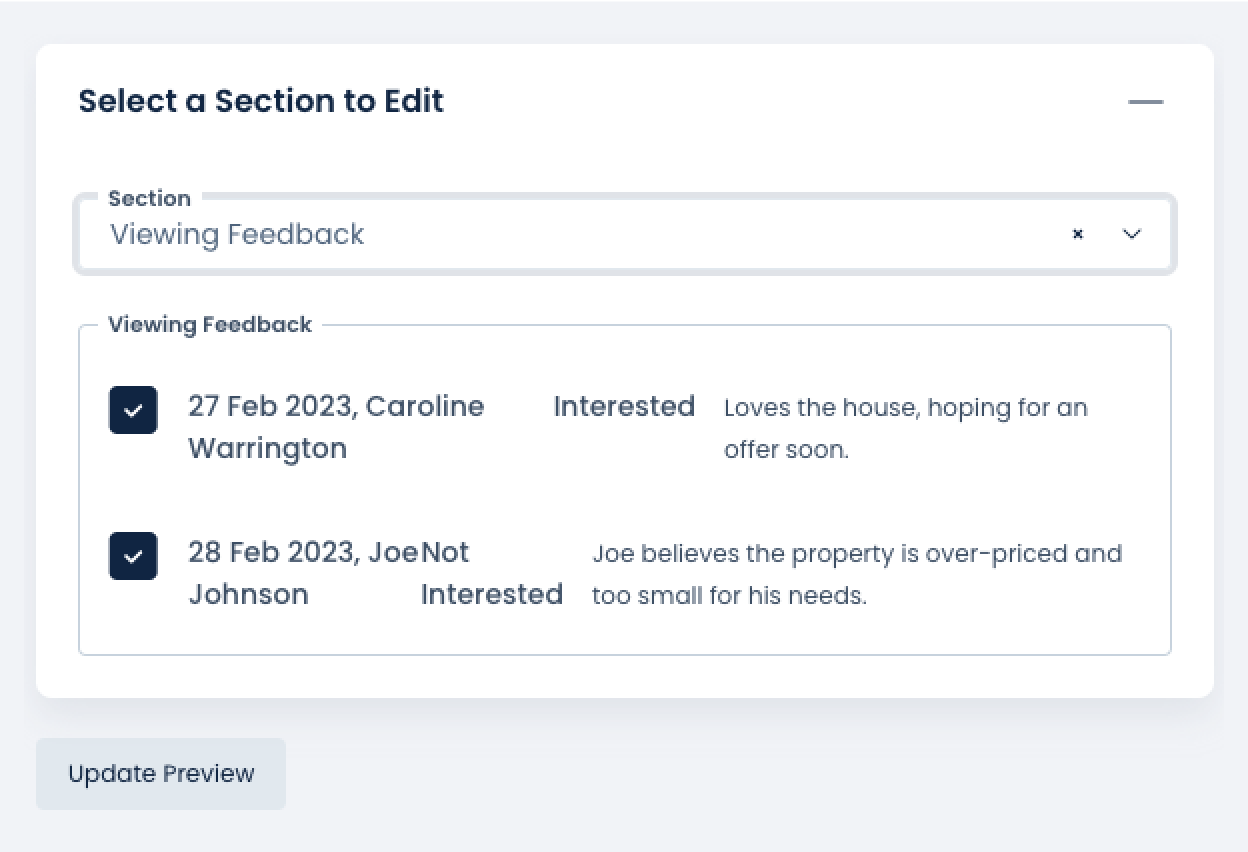
The Viewing Feedback section will now be populated with the comments you added when you logged the viewing. The report will also include their concerns, if any.

The last section available to complete is the Marketing section. Here you can specify how and where you have marketed the property. Once done, click on Update Preview. See some examples below:
.png)
Sharing your Feedback Report
Once you have completed the report setup as above you can now share your report, Prop Data Manage allows you to share the report in four ways.

Download PDF: Download the report in a PDF format and email to your client/s.
Email Report: If you have added a Seller/Landlord contact to your listing, this button will be available. If not this button will be hidden from view. On selecting this button the system will send the report to the added contacts.
Copy Report Link: This option will provide you with a link you can share with your client/s.
WhatsApp: If you have added a cell number to the Seller or Landlord contact, this button will be available for selection.
Below is a video to demonstrate the process to setup your Feedback report, in this instance we have selected all available options, you can however exclude fields you do not wish to display.
Listing Sheet
If you wish to generate a blank, editable PDF listing sheet. From the Listing Summary page, select Listing Sheet, then the type of listing sheet you require, For Sale or To Let Listing Sheet.
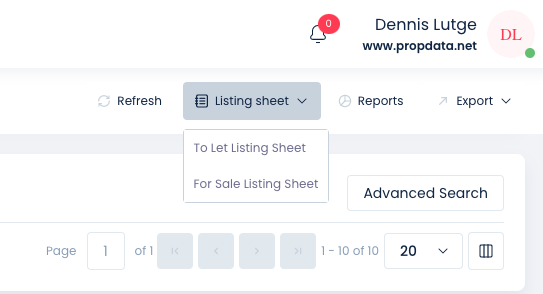
To generate the completed PDF listing sheet for an existing listing, select the listing, then click on View > Listing Sheet.

Copyright © 2023 Prop Data (Pty) Ltd Privacy Policy