

Referrals
When it comes to referrals, never miss a beat. Prop Data Manage empowers your team to share lead data with a few clicks. That’s less time for admin and more time to seal deals. Backed by comprehensive reporting and notification communication, your network will be sure to take advantage of every possible transaction opportunity, read more about this great add-on service below.
How to get the most out of our Referrals module
Below we will go through some of the initial steps required for this module to function at its best and some of the options you have when enabling this module for your site.
Referrals Introduction
A fundamental principle of referrals is trust — by passing on a customer lead an agent is handing over a customer who they know and who trusts them. They are trusting the receiving agent will deal with the customer in the same way they would deal with the client i.e. service and value beyond their expectations.
The referrals module takes care of the admin of recording and providing feedback on these leads.
Based on the agency set-up details, the referrals module will be enabled at a firm, branch, and user level. User groups will need to be updated to allow relevant user permissions at each level.
Referrals will be captured by the Sending agent via the quick link on the dashboard OR from the Contact in the Contacts module.
Initial Setup
Upon requesting this module to be added to your site, your Prop Data account manager will need you to specify a few initial parameters:
Allow Match Referral Requests: This option allows referrals to be created via listing matches. By default, Prop Data Manage will show profiles that match the listing regardless if the agent "owns" that profile. So, the system will display matching profiles and allow the listing agent to request a referral from the profile agent.
Allow intra-branch referrals: This option allows agents to collaborate outside of their own branch. In other words, request referrals and send referrals to agents that don't belong to their specific branch.
Auto-accept referrals (working days): This option tells the system to accept any referrals that have not been manually accepted by the agent automatically. Some of the available options are shown in the screenshot below and include 7 Days, 2 Weeks, 3 Weeks, and 4 Weeks.

Serviced Locations (Site Settings)
Service Locations check: Service locations must be enabled on your site, however, the serviced locations do not need to be enforced. Your Prop Data account manager can enable this for you or it can be done via your site settings > Listings (access dependent).
Enforce Serviced Locations: Your agents and admins will not be able to list properties that aren't specified as serviced areas/suburbs for that branch. Do not select this option unless you wish to stop agents from listing outside of their branches' "catchment area". The enforcement will apply to all that work within the branch.
User Group Setup (Access Dependent)
You are able to specify what access a user should have to referrals. Adding a new user group or editing an existing user group can be done from the Company > User Group Menu. The permissions follow our basic structure which is as follows:
Checkboxes: A checked checkbox means you want the users assigned to this group to have access to the selected data. Some checkboxes are reliant on other checkboxes and will turn on and off automatically while you allocate access.
View: If you prefer your users to see all referrals, regardless of 'ownership', you would use this checkbox.
View Own: If you would prefer that members of this user group should only be able to view referrals that belong to them, select the View own checkbox.
Edit: If you prefer your users to be able to edit all referrals, you would use this checkbox.
Edit Own: If you would prefer that members of this user group should only be able to edit referrals that belong to them, select the Edit Own checkbox.
Notes Add/View: Allow users to add notes to referrals or allow users to add and view notes added to referrals. Selecting only the View Notes checkbox will allow members of this group to view notes but not add any notes of their own.
The screenshot below shows the relevant permissions for referrals.

Branch Setup
There are a few steps that need to be completed to get the most out of the referrals module functionality. Below is outlined what should be done at a branch level. Edit your branch/es and add the additional information. Company > Branches > Select Branch > Edit. Remember that these details can be changed at any time, for example, branches may increase their 'catchment' areas or a branch may split into two branches and have a rentals branch and a sales branch.
Referrals Manager
Add the person/s that will manage referrals within the branch. Select the persons from the supplied dropdown.
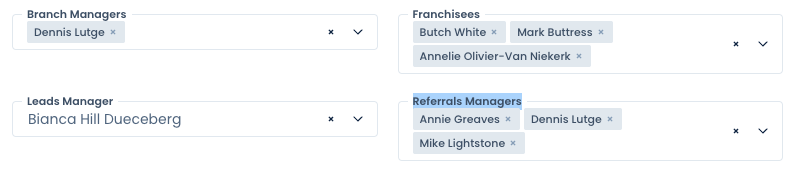
NB* You must add at least one Branch Manager and one Referrals Manager per branch.
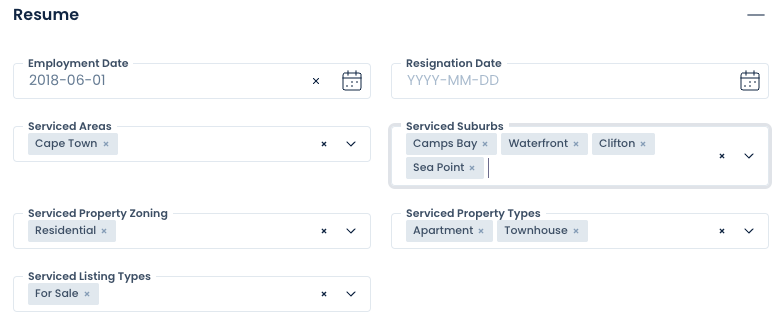
Serviced Area Allocation (Serviced Areas and Suburbs)
While not absolutely necessary for a single branch setup, adding the serviced areas and suburbs to your branch will allow the referral logic we have added to function at its optimum. Below is a screenshot of the fields that should ideally be completed at a branch level:

Service Listing Types: Does the branch manage sales and rentals or only one listing type?
Serviced Areas: Add the Areas (towns and cities) that the branch operates within.
Service Suburbs: Which suburbs does the branch operate in? Here you will need to specify each suburb. You will only be able to select suburbs that fall within the areas you have already selected. The system will alert you should you have made an invalid selection (suburb added but no area).
If you have elected to enforce serviced locations, the branch will not be able to list a property outside of the serviced areas and suburbs you have specified above.
Overlapping locations: These fields will be automatically populated when more than one branch services the same area/suburb.
Agent/User Setup
As with the branch setup, adding additional data for your agents will assist in getting the new referral quickly into the correct agent's 'hands'. The fields can be seen in the screenshot below and are discussed in more detail.
Serviced Areas: Add the Areas (towns and cities) that the agent operates within.
Service Suburbs: Which suburbs does the agent operate in? Of course, multiple agents can work within the same suburb but they may service different zones and/or property types.
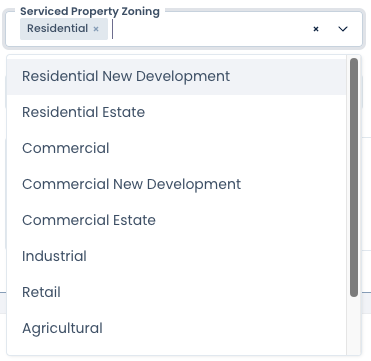
Serviced Property Zoning: Select one or more of the property zones from the supplied dropdown.
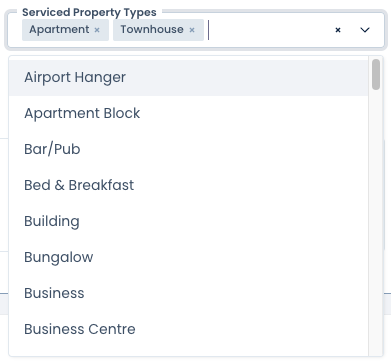
Serviced Property Types: Select one or more Property Types that the agent is allowed to sell/lease.
Serviced Listing Types: Will the agent deal with sales and rentals or just one of the Listing Types?
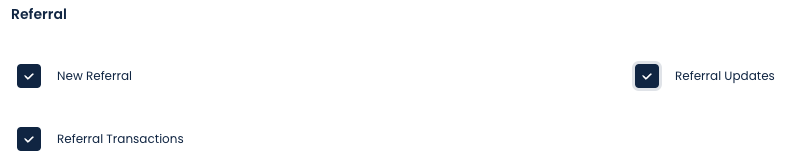
User Notification Setup (Access Dependent)
You are able to specify which notifications a user should receive for referrals. To edit the notifications, navigate to Company > Users > Edit user. Notifications are set to OFF by default. However, we do suggest that notifications be set to ON for referrals so that agents receive the relevant emails.
Below is a screenshot of the notification settings as you would see them when adding/editing a single user.
Notifications can be set for multiple agents at a time by using the Bulk Edit function after selecting the required agents.
Below is a screenshot of the Notification settings when bulk-editing multiple users

How to Add a Referral
There are two ways to add a referral, either from the quick link on the main dashboard or from the Contact.
From the main dashboard as seen in the screenshot below:

Adding a new Referral - Step by Step Guide
When clicking on + Add a New Referral, the relevant form will open. The form is seen in the screenshot below with an explanation of the available fields:

Schedule Date: The Referral can be scheduled for a future date. The date will default to the current date.
Referral Reference: This is a free text field should you want to add your own referral reference.
Tags: Add your relevant tag/s here. Read more about Tags Here.
Referring Branch: Select the branch that will be creating the referral (this will default to your branch and user if you are only a member of a single branch). Once the branch has been selected a new field will appear, as seen below:

Referring Agent: A referrals manager or user with relevant permissions will be able to select a particular agent. However, this field will default to your own name if you are adding a referral as an agent.
Referred To: has two options;
1. Sending user/agent can search for the correct recipient user/agent based on serviced listing areas and suburbs, serviced listing types, serviced property zoning, and serviced property types (this information needs to be captured in the system per agent for this option to be useful). See the screenshot below:
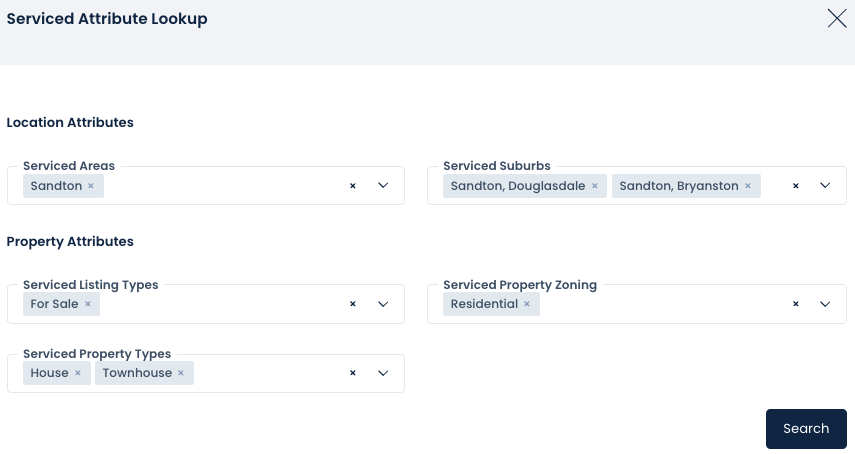
The search options are multiple select fields.
Click Search
The results will give the sending agent/user a list of agents/users who match the Serviced Attributes selected.
This feature is dependent on these Serviced Attributes being captured at a Branch and user/agent level.
INSERT VIDEO HERE
2. The second option is to Add a Recipient Branch and Agent if you, the sending user/agent, know which Branch and which agent you want to send this referral to.
Multiple recipient agents can be selected using the + Add recipient or x Remove recipient buttons.

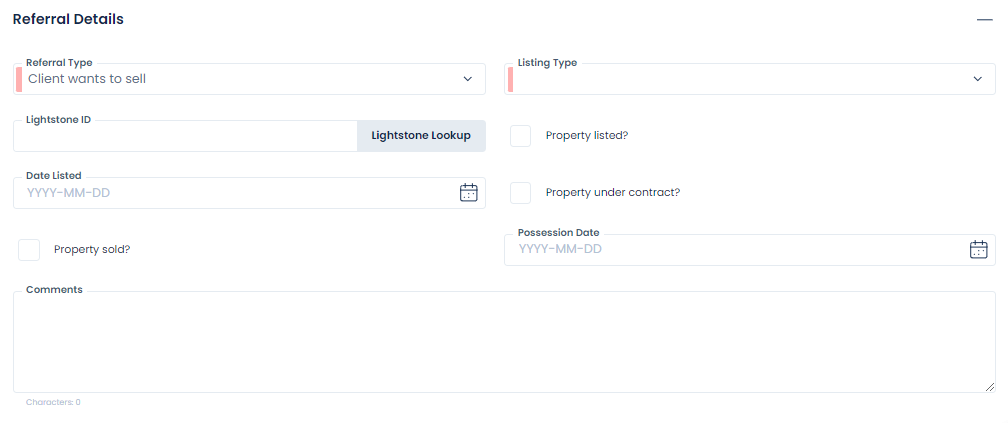
The next required field is the Referral Type. The drop-down box allows for six referral types. Please see the screenshot below.

Depending on the Referral Type selected, the relevant further fields open, for example:
If this referral is a Seller (Client wants to sell), further fields to capture include Listing Type + Property Type (the Lightstone lookup feature is available to enhance referral data). Sending user also has the option to further augment referral data by including the following info:
Does the Seller currently have a property to sell?
Is this property listed?
Is this property already sold?
The next step is to link this referral to one or more contacts. Sending agent/user can search the database for an existing contact and link this referral to that contact, or a new contact record can be created (refer to the Contacts module on how to create a contact).
Final field in the referral capture form allows documents to be loaded, should the sending agent/user have useful documents relevant to the referral.
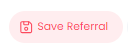
When the compulsory fields in the referral capture form are complete, click theSave Referral button — top right.
When sending agent/user clicks Save Referral the following chain of notifications is activated:
The recipient agent/user + branch + referral manager is notified via email of an incoming referral.
The sending agent/user is also copied in this email chain.
This notification chain is dependent on the notification setup per user.
When notified of a new incoming referral, the recipient agent/user will see all the details of the referral, except the contact details.
This information is hidden until the referral is accepted. The Contact provided will have a green tick or red cross next to the Client Details.
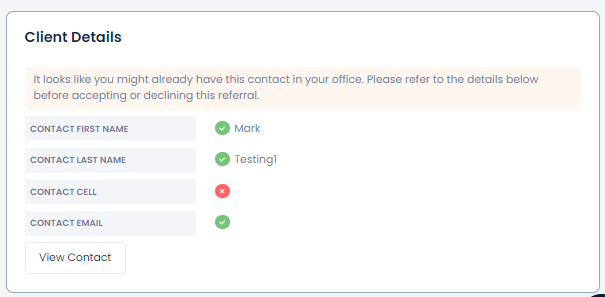
Green tick indicates the Contact information (first name/last name/cell number/email address) already exists in the recipient agent/user office database.
Red Cross indicates the Contact information (first name/last name/cell number/email address) does not exist in the recipient agent/user office database.
It is worth noting that even if the contact information already exists in your database, this particular referral could still be accepted. For example, the contact could exist in your database as Buyer, however, the incoming referral is a Seller. Depending on the User/Branch settings (View all/ View Own Contacts), the recipient agent/user can click on the View Contact button and via the Contact Dashboard view the various associations of the Contact record i.e. is the contact linked to listings, leads, profiles, valuations or other referrals in the office database?
The recipient agent/user will accept or decline the referral.
add image when available - screenshot of email recd is rqd
Once a response (accepted or declined) is recorded, this cannot be changed. If accepted the referral contact record is copied into the recipient agent/users database.
Referrals can be accepted by a user other than the recipient agent/user in the office (for example, the referral or branch manager) — this is linked to user group permissions.
The agency will have set an auto-accept time frame setup in the system — see the referrals setup at the beginning of this module. This auto-accept date means that if the referral is not responded to by the recipient agent/user, the system will AUTO ACCEPT the referral after 1/2/3 days / 1/2/3 weeks (the agency can set this time frame).
When the referral is accepted or declined, the sending agent/user, the recipient agent/user, and the branch + referral manager are notified via an email chain. Receiving these notifications is dependent on User notification settings.
The following reminder emails are also programmed:
1. A response reminder will be sent to all parties the day after a referral is sent.
2. A response reminder will be sent to all parties the day before the auto-accept date.
Further programmed email notifications are:
If a Seller referral is sent and is accepted — when the contact record is linked to a listing in the recipient agent/users office, all parties associated to the referral will be notified. If this listing status changes, all parties will be notified (sold/pending/archived).
Referrals inbound & outbound collate on the referrals summary page in the contacts module.
The Referrals module summary page defaults to Status Pending. A drop-down box is available to change the referral status on the summary page to other options.
A Keyword Search option is available on the summary page.
Summary page default columns are:

This can be customised using the column generator available on all summary pages.
Referral status remains as accepted/declined forever.
If accepted, the agency internal referral structures will apply – buyer/seller validity periods.
It is recommended a Referral Outcome is recorded (final step) in the referral workflow.
The referral transaction outcome is updated by the recipient agent/user or users in their office with relevant permission.
There are two outcome options:
1. The referral resulted in a financial transaction.
2. The referral did not result in a financial transaction (this outcome should be selected if the referral was accepted by mistake, as currently once accepted or declined the status cannot be changed).
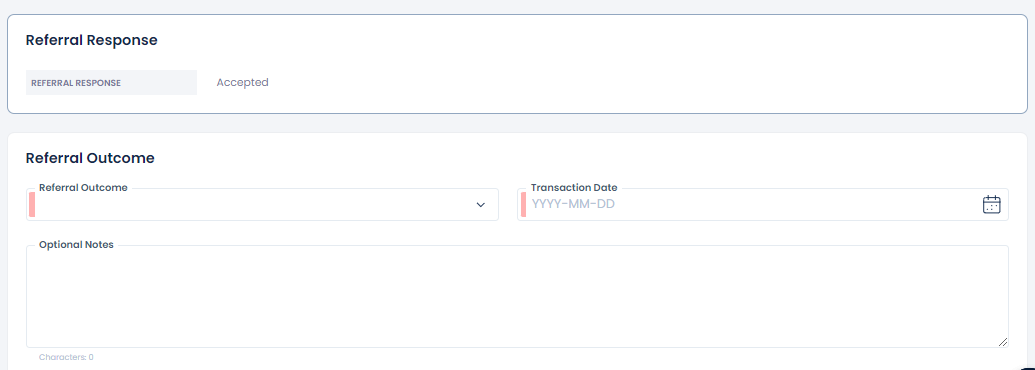
When a referral outcome is selected, all parties associated with the referral will be notified via email.
It is recommended the agency/office referrals department review the referral summary page regularly:
1. To keep a check on referrals not responded to (before the auto-accept date).
2. To close the transaction of referrals that have “expired” in line with the agency's internal regulations/guidelines.
3. To close the transaction for successful referrals.
The agency/office conveyancing manager will be able to check the office contacts database to check if a referral is linked to parties involved in a successful sale they are processing.
Quick View of Referral Logic:
Direction: Internal
Sending branch = Recipient branch OR currently logged in agent is assigned to both the sending and recipient branches.
Direction: Incoming
Recipient agent = Currently logged in agent OR currently logged in agent is assigned to the recipient branch and not assigned to the sending branch.
Direction: External
Sending agent = Currently logged in agent OR currently logged in agent is assigned to the sending branch and not assigned to the recipient branch.
Copyright © 2026 Prop Data (Pty) Ltd Privacy Policy