

Users
A User is anyone who has access to the management system. However, not everyone will have access to this part of the system. Only admins, principals, owners and directors will have access. If a User is within a particular branch, they will only have access to Users in their branch. If the User is part of Head Office, they will be able to see all Users regardless of the branch they are assigned to. In this chapter we will discover the User overview, how to edit and add a new User.
Users Overview
When you click on the Company module and select the Users section, you will see the User summary page, shown below, which shows all users allocated to a specific Franchise or branch. You can also use the Advanced Search button on the far right, to search for a particular user by name, surname, tag, email address etc. You can also filter your search by User status (Active or Inactive).
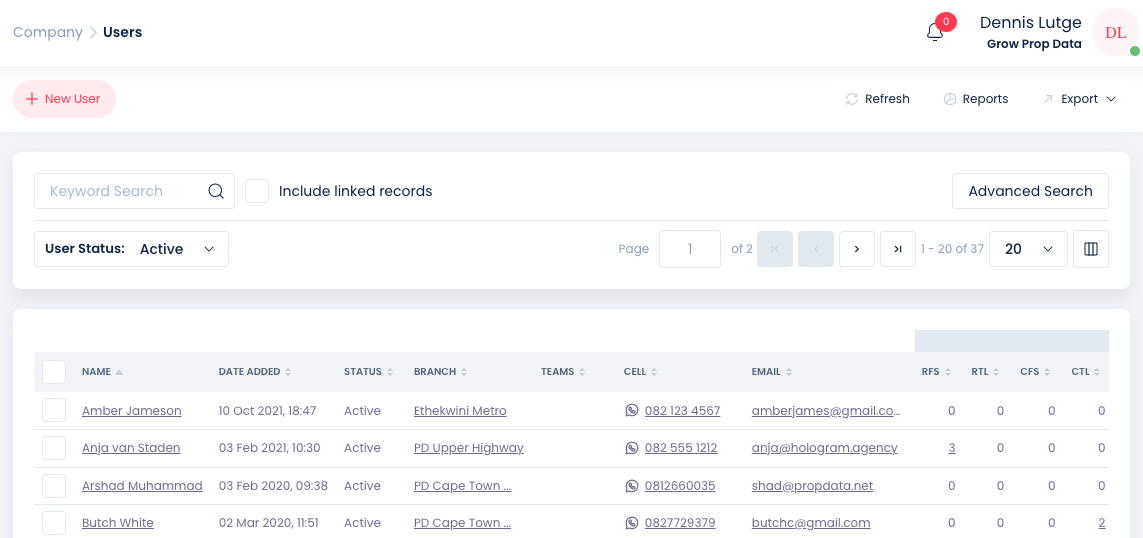
Keyword search
If you want to find a particular user, simply search for the user using the Keyword Search bar on the left, you can search for any information that may have been added to a user, however, using the agents first or last name or first and last name together would be the easiest way.
Activity tabs
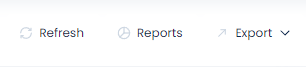
On the top right of the User summary page, you will see two activity tabs, shown below. These are Refresh and Reports. Let’s run through these icons and what they allow you to do.
Refresh
Clicking Refresh will refresh the summary page with any new User entries.
Reports
By clicking Reports, you will be provided with two options, an activity report and a user directory report, see which report works best for you.
Export
The Export function allows you to download an Excel or PDF version of selected listings/fields or all fields you have selected or you can download a complete summary of all the records on the system. The export tab will open a drop-down, showing the options available as shown below. Read more about the Export function here.
How to add a new User
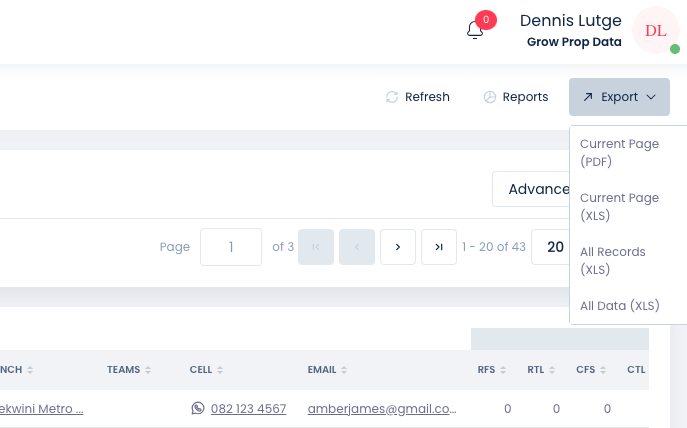
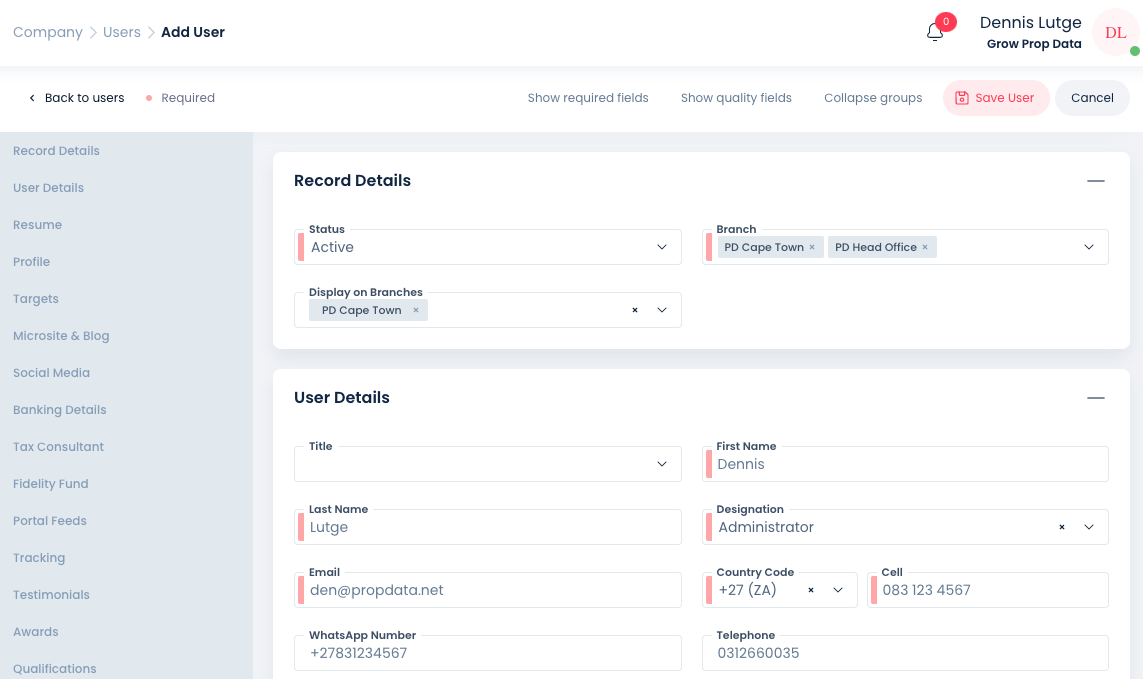
Adding a New User will likely be done should a new employee join an Agency. New Users will likely be added by Head Office/Branch Management as this function is User Group access dependant. To add a New User simply click on the New User button the top left of the User summary page and fill out the form that follows (see below example). When you have completed all the required fields and any additional information you wish to add into the non-required fields, Click on the Save New User button on the top right. Below we will explain the required fields and provide information on other fields you may use when adding a new user.
Status: Users can either be Active or Inactive, adding a user in an Active status tells the system that the person being added is an active agent/admin/manager within the company. The Inactive status is used when a person is no longer employed by the agency/branch. We will discuss the process of making a user Inactive below in its own section.
Branch: Specify the branches or branches (this is a multiple select field, more than one branch may be added) that this user will belong to and crucially, which branches data the user will have access to. Remember that this access is User Group dependant.
Display on Branches: This is a critical field used to create a profile for the agent on your website and the portals. The Display on Branches field tells the system that you want this agent's profile to be displayed on your website as well as the portals. The branch options will only be displayed if they have been added to the required Branch field already. If no Display Branch has been added, this user will not appear on your website and the portals.
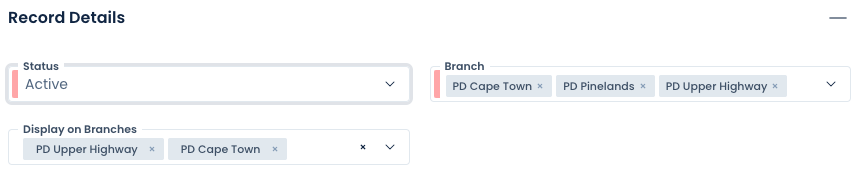
In the example above, our new user will have access to PD Cape Town, PD Pinelands and PD Upper Highway's data, but will only display on PD Upper Highway and PD Cape Town's branch on your Prop Data website and on the portals.
First/Last Name: Enter the first and last name of the new user.
Preferred Name: If for example the agents name is Sibongile but prefers to be called S'bo you would add this here.
Designation: Use the dropdown menu to select the designation of the agent.
Important Note for Designations: Designations have a direct impact on your website and how the FFC certificate and number is displayed. Only the following designations will display the FFC number and allow the public to view the certificate on your Prop Data website:
Candidate Property Practitioner
Non-Principal Property Practitioner
Principal Property Practitioner
Email: Add a valid email address for the agent
Country Code: For South Africa this should be +27 (ZA)

Cell: When adding an agents cell number add only as shown in the image above, 083 123 4567 or 0831234567, do not add +27 and/or ( ) or have less than the required 10 digits to constitute a cell number eg. 831234567. The same errors as above would be displayed if the agent cell number has been added incorrectly.
Various non-required Fields: There are many fields that are for internal use only. Birth Date, ID/Passport number
Giving a User Access to Prop Data Manage
While there may be some instances where a user will be added only to display on your website as a part of your team, most users will need access to your companies data, be it only to conduct reporting or to have full access as would be the case for a head office user.
Access is provide under the Profile section of the user add/edit form.
Users that do not have a Profile Email and User Group added will not have access to your data.

The Login Email should be added in all lowercase and should be exactly the same as the users email address. Add the required User Group, the User Group assigns what data and permissions the user will have.
Fidelity Fund
It is a requirement that agents who hold a FFC, make that certificate available for the public to view. The system is designed in a way that conforms with the legislation. Candidate Property Practitioner, Non-Principal Property Practitioner and Principal Property Practitioner designations need to be added to the agent under the Designation section for the FFC to display on your website frontend.
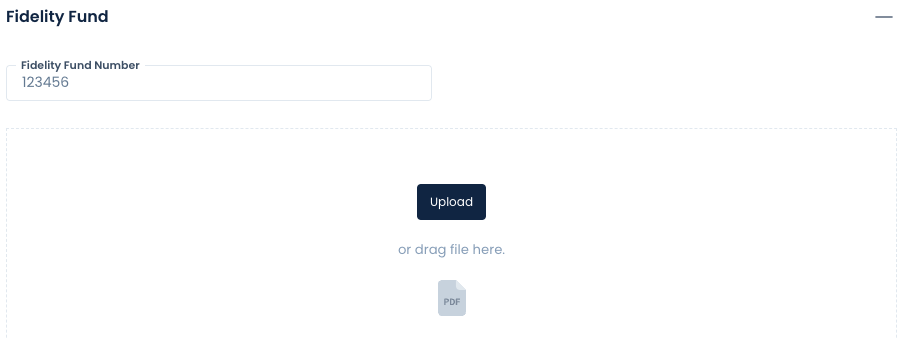
Add the required Fidelity Fund Number into the provided field.
Click on Upload and select the certificate from your computer.
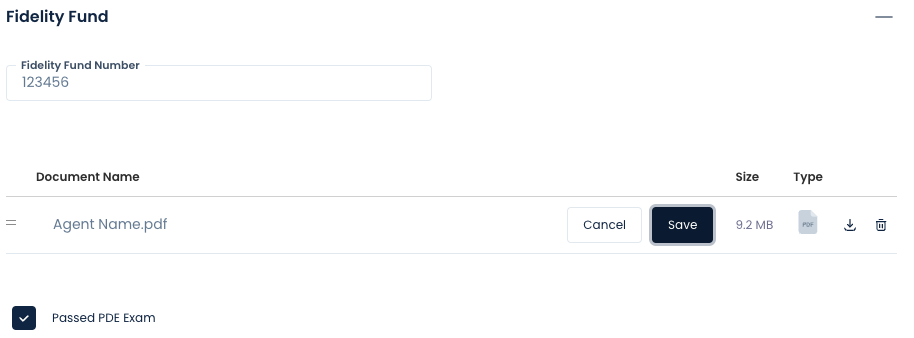
You can rename the file by clicking on the Pen icon. Clicking on the Bin icon will remove the file.
Only .PDF documents can be uploaded.
Indicate whether the agent has passed their PDE exam by using the Passed PDE Exam checkbox.
Testimonials, Awards and Qualifications
If your Prop Data website accommodates the above user/agent fields adding information here will push to the relevant section on your website.
Testimonials
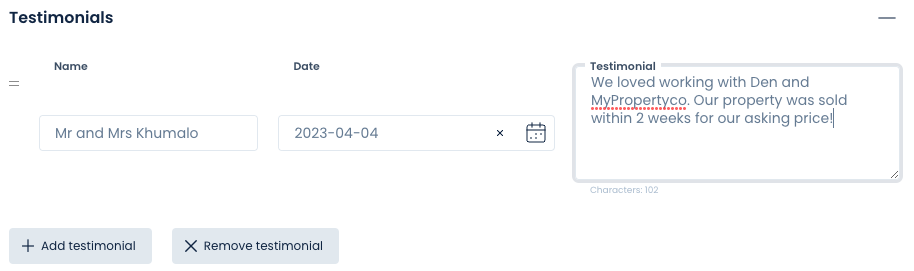
Add any testimonials that you have received from past or current clients here. Click on + Add Testimonial and complete the fields as seen in the below screenshot. To add another testimonial, click on the + Add Testimonial again. To remove any unwanted testimonials use the X Remove Testimonial button.
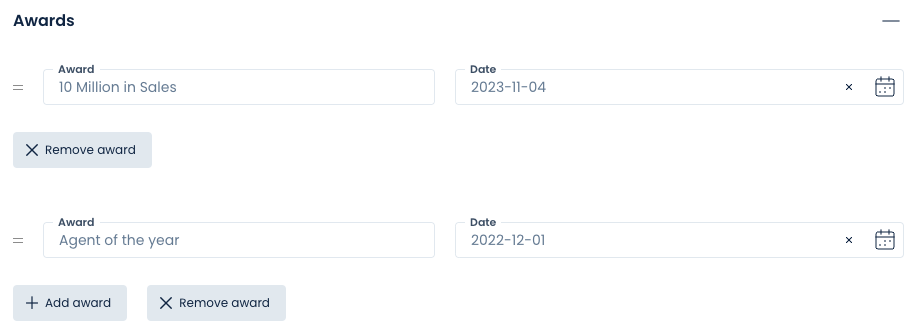
Awards
Add any awards that you have received from your current company here, Click on + Add Award and complete the fields as seen in the below screenshot.
To remove any unwanted testimonials use the X Remove Award button.
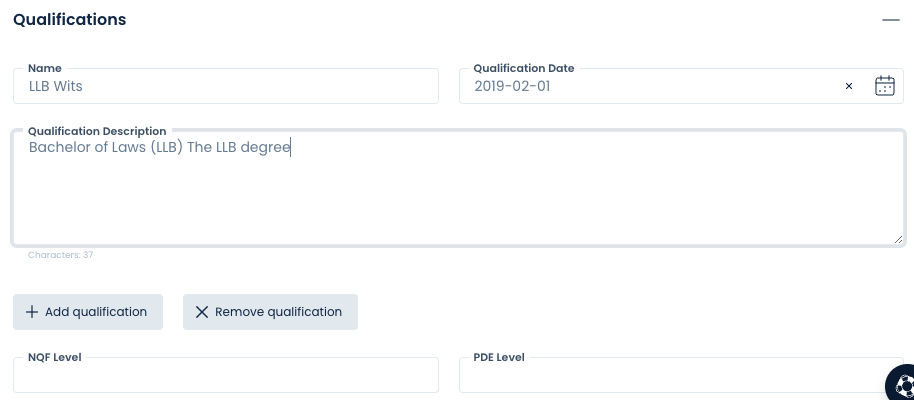
Qualifications
Here you can include any qualifications that you have received over your career. Click on + Add Qualification and complete the fields as seen in the below screenshot.
To remove any unwanted testimonials use the X Remove Qualification button.
Profile Picture
An important part of your client facing front. Ideally all agent Profile Pictures should be uniform (shot with the same background and in the same style), a mishmash of agent photographs looks messy and disorganised on your website as well as the portals.
While a Profile Picture is not absolutely required, when adding agent photos, remember to ensure that they are in a .jpg file format and in a portrait orientation. Image dimensions should be 480 (Wide) X 640 (High). A large image size and/or if the image is in a .png format are common reasons why an agents profile image does not update on Private Property.
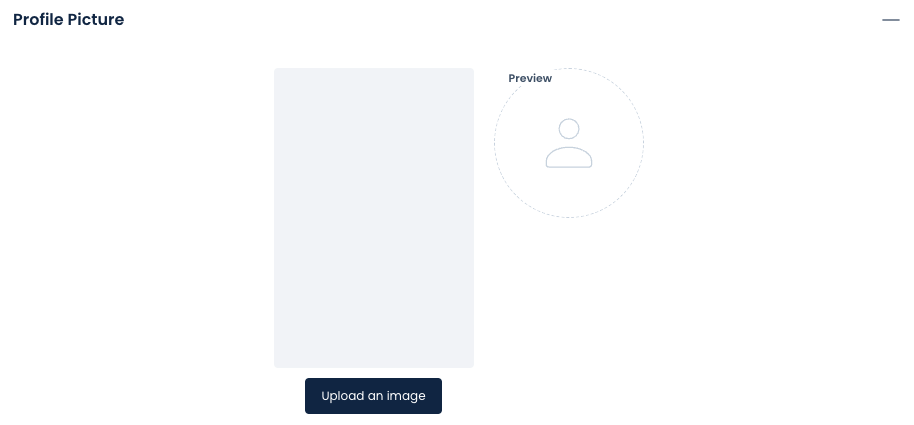
Click on Upload an image and select the already edited image (correct size and format as described above) from your computer.
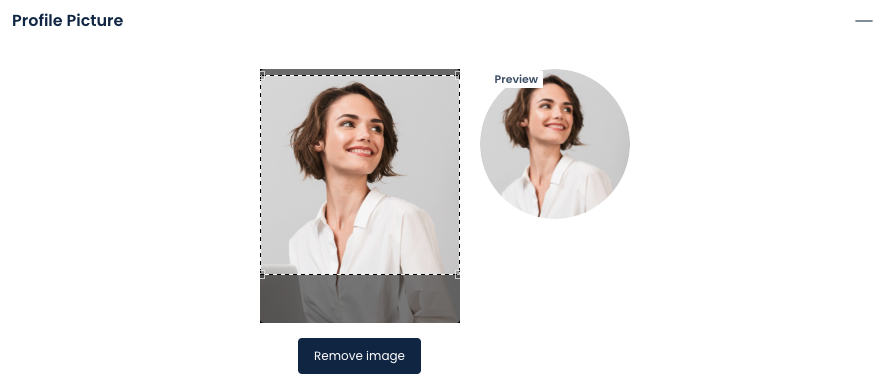
Drag the dotted block to include the agents head and shoulders up to the mid-torso.. The part of the image selected inside the dotted block is what will be displayed on your brochures, reports etc. See our example above to get an idea of how this should be set.
If your images are too square in shape, too far from the persons face or the image is too close to the person face, you will not be able to drag the dotted line out enough to get the agents head and torso into the image, this is why adding the correct size image is crucial.
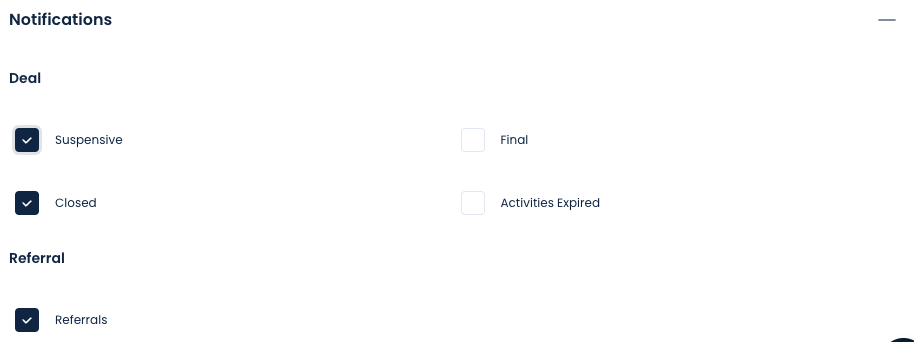
Notifications
The Notifications section allows you to include or exclude the selected agent from certain communication types. Select the checkbox under the required notification for the agent to receive those types of notifications via email.
Saving Users
Once all the required fields have been completed and your photograph has been added. Click on Save User at the top right of screen. A successful save will return your screen to the User Details page. If any required fields have been missed, the system will alert you to the specific field/s that need completion.
How to edit an existing User
If you want to edit a User profile, first find the User you would like to edit. You can do this by first searching for the User in the Keyword Search bar. Once you have found the User, select it by placing a tick in the check box to the left of the User name, shown below.
When you have selected the User, a new menu will appear on the top right corner that looks like this:

The Edit button is where you will go should you want to edit any Franchise information.
When selecting Edit, a new form will appear, shown below. From here, you are able to edit all information on the User. When you are done, remember to click the Save Franchise button on the top right of the form.
Note: all of our add and edit forms are exactly the same to keep things simple
View
When clicking on the View drop-down, you will be able to choose to view either the Details or the Activity on the specific User you have selected

The user Dashboard
On selecting a User, the following additional options can then be selected from the menu, shown below. First of which, is the Dashboard.
.png)
The Dashboard will give you an overview of the specific Franchise you have selected, as shown here:

On the User Dashboard, the following can be observed:
Contact details
of the User, including their address, profile photos, email and ID number.
Listings summary
A summary of their total number of Listings, Leads and Profiles (specific to them only).
Listings breakdown
A further breakdown of their listings, broken down by listing type (Residential for sale, to let etc) and the amount of their listings compared with the company average (see graph)
Lead source breakdown
This shows where the Users leads have come from i.e Facebook, canvassing, website etc. They will show here, in the circle and be represented by different colours.
.png)
User Record Tabs
If we look to the top left of the User dashboard, you will see a new menu pop up that looks like this:
.png)
Dashboard - Shows the section you are currently on - highlighted in dark blue.
Details - Clicking on Details will take you to a page where you can view all the details on this specific User. This will include their contact details, resume, social media profiles, tax consultant information, fidelity fund information and the portals to which their listings and information feed.
Syndication - Use this section to sync User/Agent information to the portals. Perhaps you have recently updated their contact number - you can sync the update with the portals in this section.
Media - Here you will be able to view and update the Agent profile picture and store any relevant documents such as their resume, references, qualifications or any other important documents.
Note: any documents in the Private Documents section will not be viewed publicly.
Notes - This section can be used to add any notes relevant to the Agent. There is also a search function in this section to use if you wish to locate a specific Note.
Activity - This section is a log of all changes made to this particular User. It provides a record of all changes and updates made, when they were made and by whom.
Now lets continue going over the buttons we looked at in the beginning. We began with Dashboard. Lets continue..

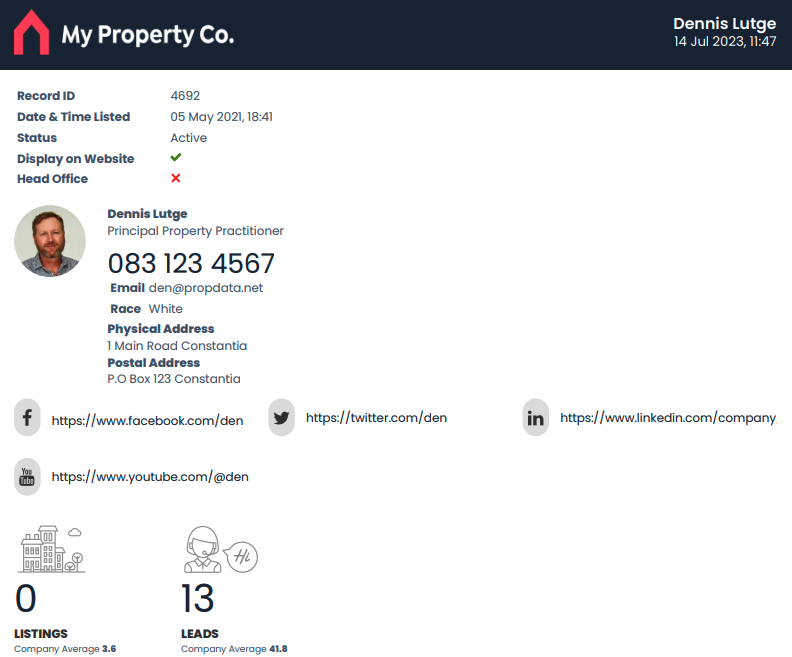
Profile
This is a handy feature whereby you may download a 2 page PDF profile of a particular User. On the PDF you will see all the User contact information, total number of listings and leads, with a lead breakdown. Here is what your download will look like:
Add Note/Action
Using the Add Note function allows you to add a note relating to the specific User you've selected. When you click this button, a form will appear - see below example. You will be able to write your note and categorise it. You can also associate a specific agent or contact to that note by clicking on Link an Association. You can also attach a file to the note you are adding by clicking on the attachment link. See example of a user Note/Action below. Read about more about adding Notes HERE

Copyright © 2023 Prop Data (Pty) Ltd Privacy Policy