

Deals
This chapter covers the Prop Data Manage Deals module, it contains important information on how to create a deal, how to move your deal between the deal stages, how to edit your deal and how to create deal reports.
The Deals add-on module allows real estate agencies to document and monitor sales transactions (sales only). This feature tracks a sale's progression through the conveyancing stage until final registration and commission payout.
Before proceeding with adding a new deal, read our important note on creating Attorney Contact records. Click Here
Key Guidelines:
- Initiation: Agencies can create a deal as soon as an "offer to purchase" is signed.
- Flexibility: Agencies maintain full discretion over when to open a digital deal file, similar to opening a traditional physical sales jacket.
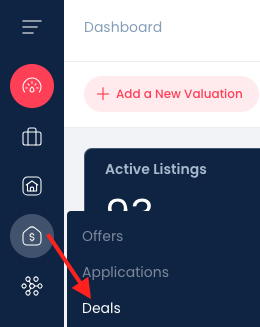
- Location: Access this module under the Transactions tab.
- Security: Information visibility and module permissions are determined by the assigned User Groups.
There are 3 Ways to create a new deal:
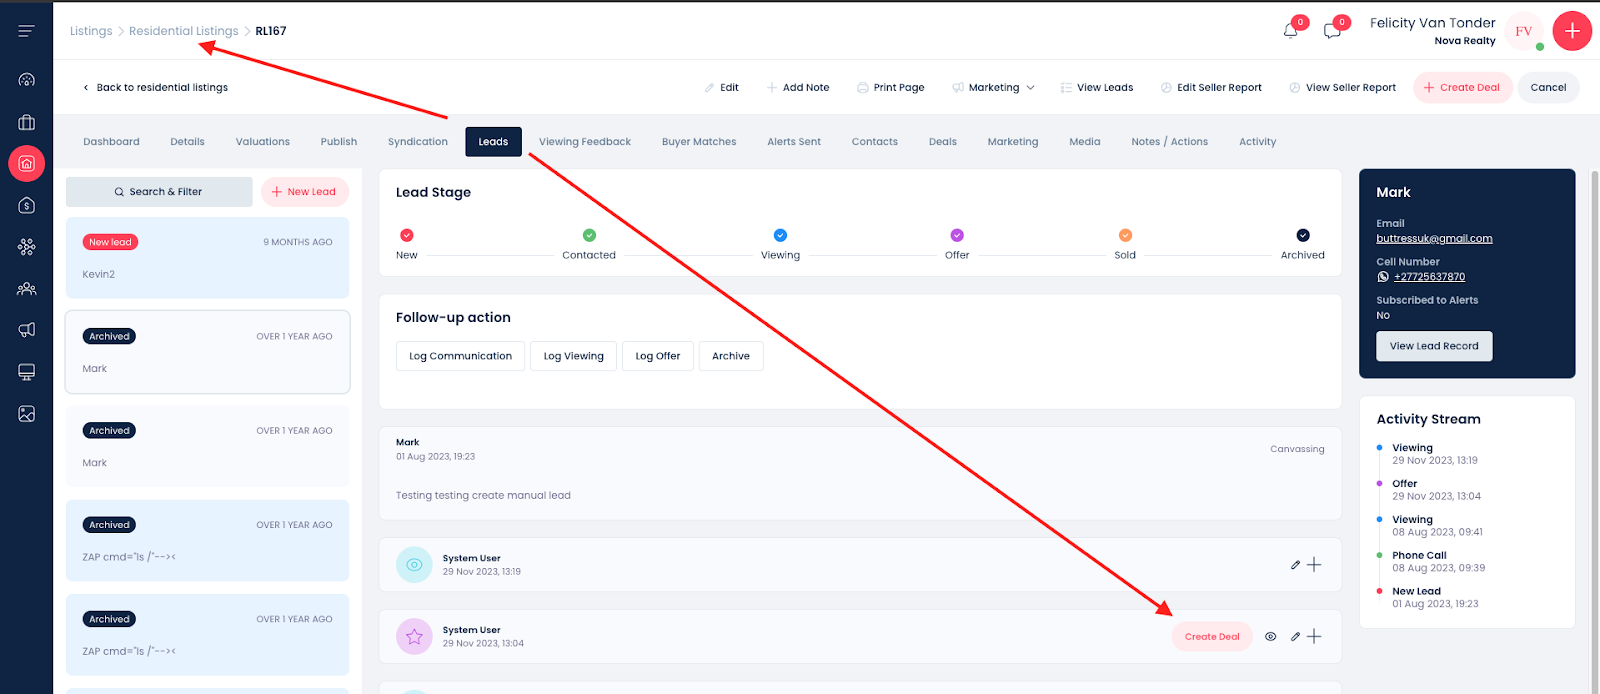
Method 1: Generating a Deal from a Listing Lead
- Navigate to the desired listing and select Dashboard, then the Leads tab.
- Review the lead stage flow and inquiries.
- Select Create Deal - This is only available if the agent has used the lead stage flow to record an accepted offer (Lead Stage 4). The lead stage will be Sold (orange stage indicator).
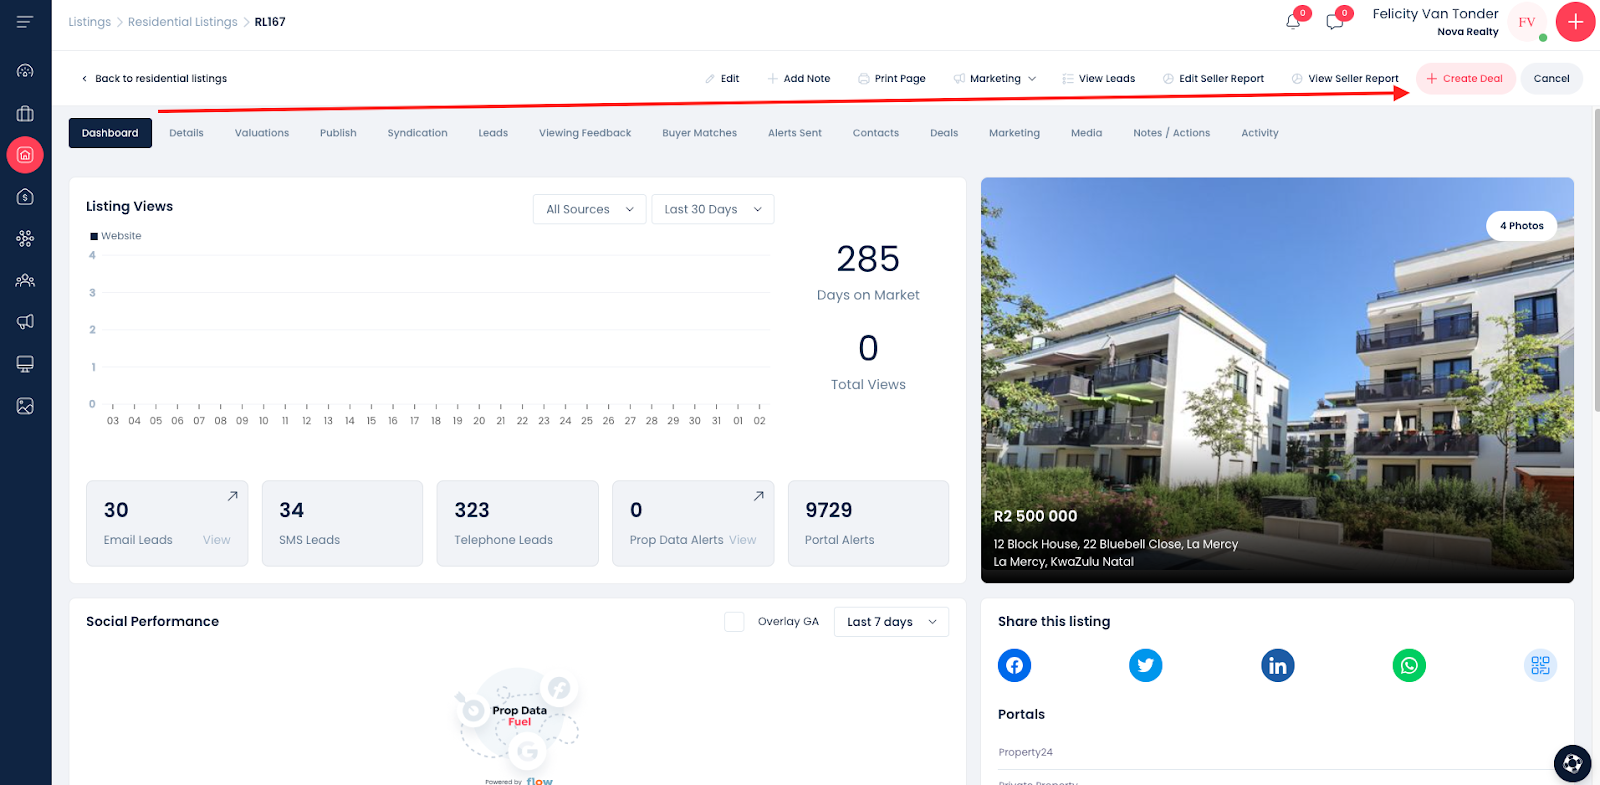
Method 2: Creating a Deal from a Listing (recommended)
- Update the listing status to Sold.
- Input the Sold Price (required field) and the Date Sold.
- Assign the Selling Agent and select SAVE.
Method 3: Creating a Deal manually
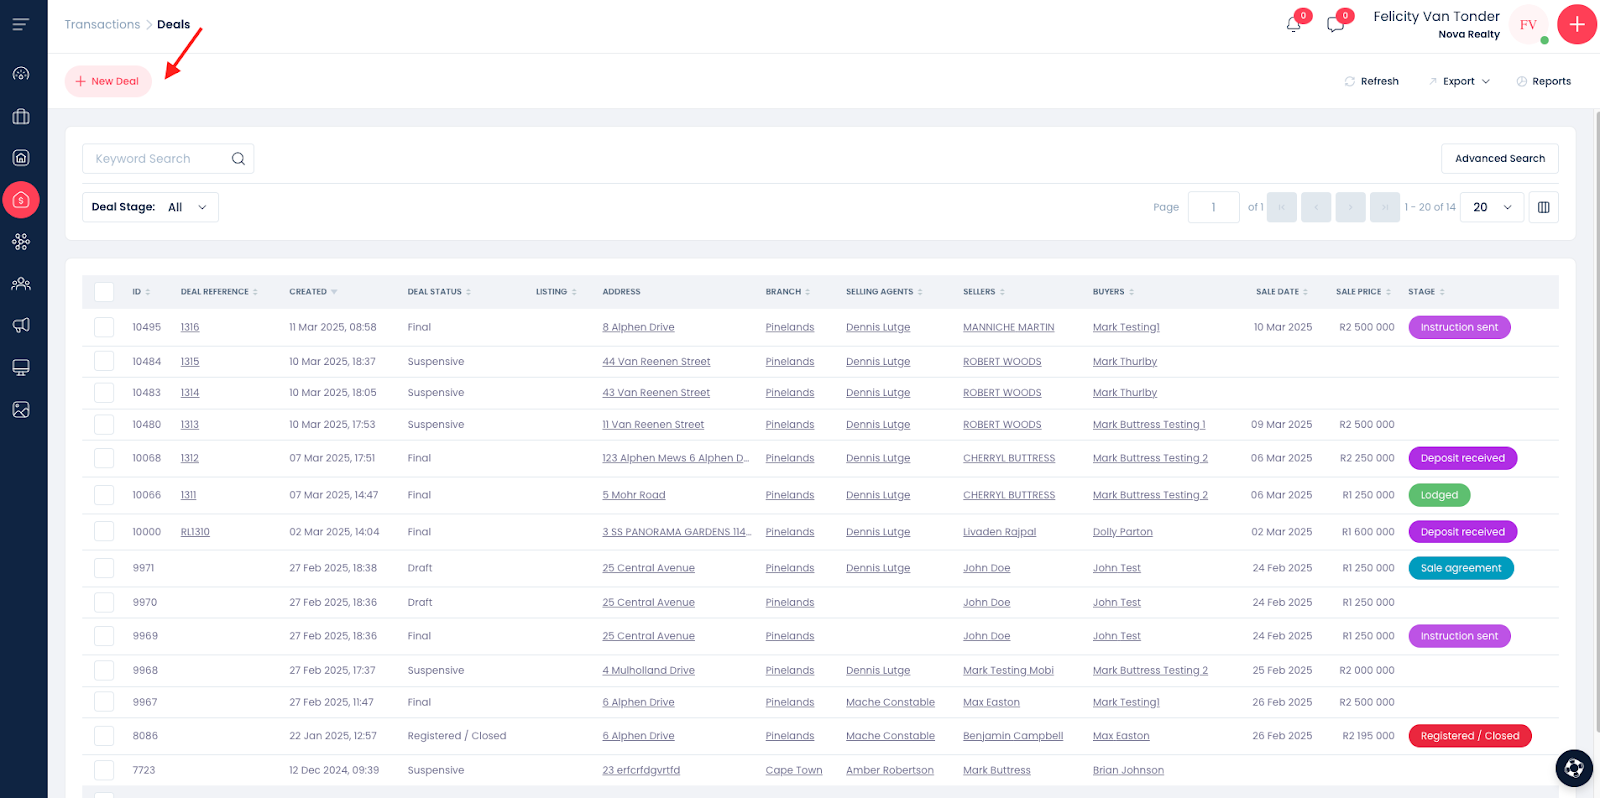
Navigate to the deals module, click +New Deal in top left corner
Listing check Before Creating a Deal (recommended but not mandatory)
It is best practice to check the SOLD listing details before initiating a deal, as the system pulls this data only once upon creation. Any subsequent listing updates must be manually adjusted within the deal.
- Lightstone Lookup: You must use this tool to pull legal property descriptions (ERF/Sectional Title info); a deal cannot be created without this.
- Commission Details: Ensure the listing mandate commission (rand value or percentage) is captured to auto-populate the commission slip.
- Seller Information: Verify that the seller’s contact record is captured & linked to the listing, also confirm that the contact record includes the Sellers full first name, last name, and ID number.
Deal Data Entry Requirements
When adding a deal, aim to capture as much information as possible initially to ensure accurate tracking.
- Required Fields: All mandatory fields have a pink highlight on the left of the field.
- Deal Ref: A free-text field for your internal reference.
- Deal Name: This is automatically generated by the system using the buyer and seller's names, and a system generated deal ID
- Status: Every new deal begins in the Draft stage.
- Agents: The branch and primary selling agent are pulled from the listing, you can change this info and add additional agents if needed. Agents linked to the deal in this section will receive deal-related notifications.
Contact & Property Information
- Attorneys: You must create the attorney firm as a contact first. Contact records are unique to each branch; if multiple branches use the same firm, the contact must be captured for each branch. Please note there is a unique & specific method to adding attorney contact records.
- Property Details: These will auto-populate from the listing or Lightstone ID. The Lightstone ID is a required field in the deals module. If the linked listing does not have the Lightstone ID the Lightstone lookup tool is available – search using the Sellers ID number.
- Ensure the "Business Type" is set to Sales.
- Seller/Buyer Info: Must include full names, surnames, and ID numbers for all owners. If Seller contacts are not linked to the listing, use the "add new contact" option.
Financial & Legal Details
- Sale Details: Include the final Sales Price (if not already pulled from the Sold listing).
- Deposits: Enter the deposit amount and the deposit due date. System reminders for these dates are sent to the linked users, not the attorneys.
- Conditions: Add any suspensive conditions
- Expected transfer date is optional
- Compliance: Select who is responsible for obtaining compliance certificates (Yes/No/Owner/Other Agency).
Documentation
Ensure you upload all relevant files, including:
- Seller and Buyer documents
- The signed Sale Agreement.
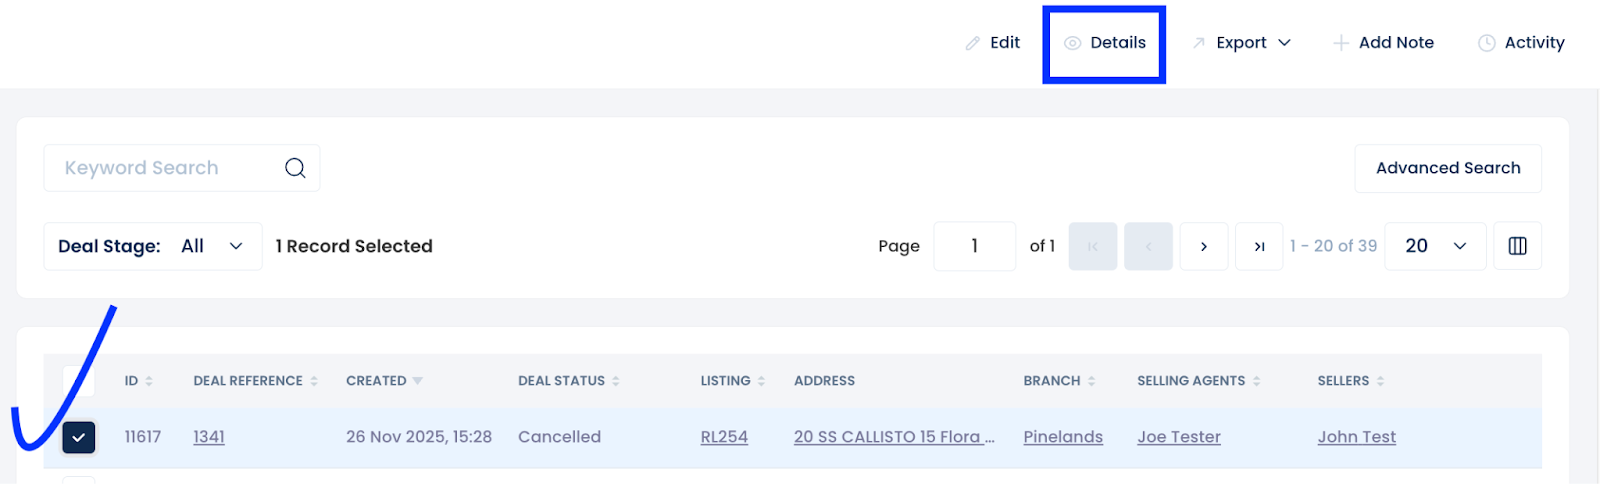
DEALS: Summary Page Overview
Like all other summary pages within the management system, the Deals Summary defaults to showing the most recently captured deal at the top of the list.
Default Column View
The summary table is organized into the following columns by default to provide a quick snapshot of each transaction:
- Deal ID & Reference: Displays the unique system ID and the internal deal reference (if one was captured).
- Date Created: The timestamp of when the deal was first initiated in the system.
- Deal STATUS: Indicates the current administrative standing of the file.
- Linked Listing: Shows the reference number for the associated property listing.
- Address: The physical location of the property involved in the deal.
- Agency Details: Lists the specific branch and the primary selling agent assigned to the transaction.
- Parties Involved: Displays the names of both the Seller and the Buyer.
- Financials: Shows the official sale date and the final sale price.
- STAGE: A colour-coded indicator representing the deal's current progress through the conveyancing workflow (STAGES)

Search and Export Capabilities
- Customization: A custom column view option is available, allowing you to tailor the display to your preferences.
- Search Tools: Quickly find specific transactions using either keyword searches or the advanced search feature.
- Reporting: All data captured within the summary page can be exported for reporting and auditing purposes.
Navigating and Modifying Deals
When managing your transactions, use the following steps to access deal information:
- To View a Deal: Locate the deal on the summary page and select it using the checkbox on the left-hand side, then click Details.
- When to Use "Edit": Only select Edit if you need to modify the foundational information captured during the initial deal setup.
- Note: The system pulls listing information into the deal only once. Any subsequent listing updates must be manually corrected in the deal via the Edit function.
Fields Managed Under "Edit":
- Entity Details: Branch, Selling Agent, and Attorneys.
- Property & Parties: Property details, Sellers, and Buyers.
- Transaction Specifics: Sale details and Suspensive Conditions.
- Requirements: Compliance Certificates and uploaded Documents.
Understanding the Deal Interface
Once a deal is selected, you can navigate through several tabs to manage the transaction:
- Dashboard: Provides a high-level summary of all essential deal information.
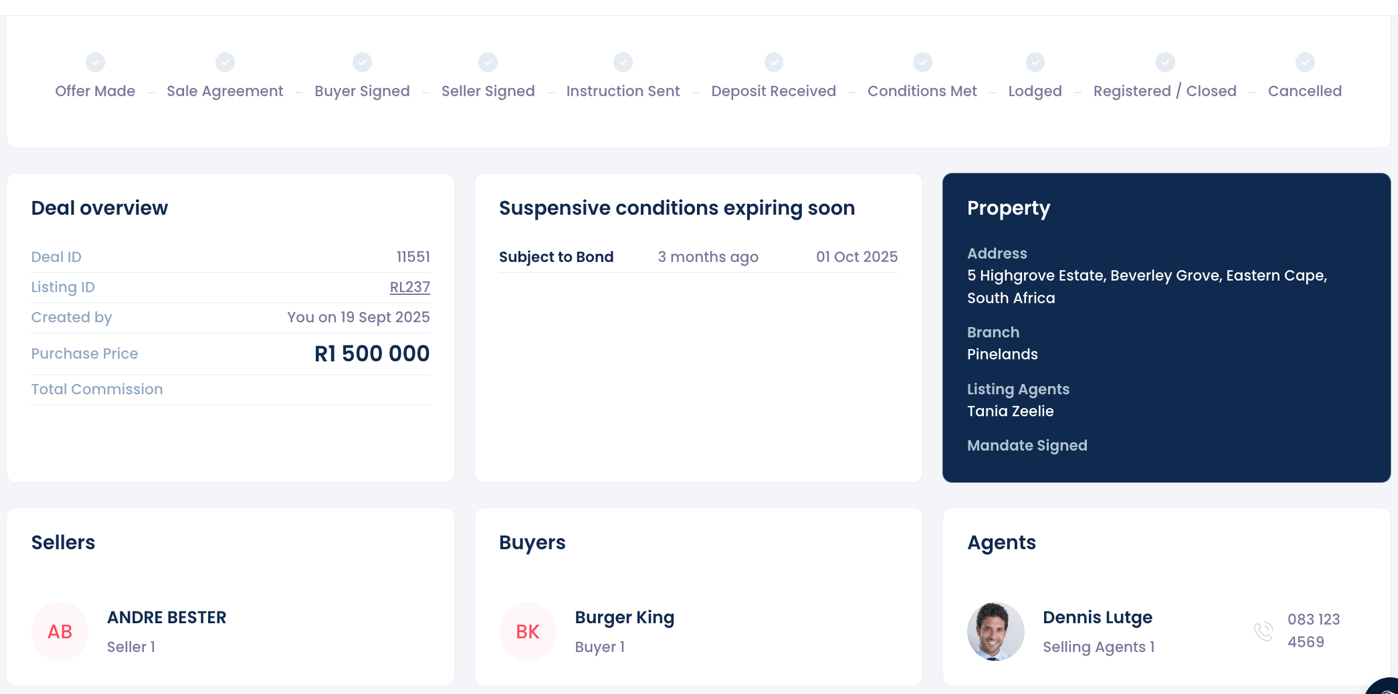
- Details: Displays the full deal data. Note: This is an encrypted page that will be shared with the transferring attorney if the "Send Transfer Instruction" stage is used.
- Stage: This is the primary workspace for administrators to update the progress of the transaction. Stages are color-coded for easy tracking.
- Letter of Undertaking: Within the "Sale Agreement" stage, you can generate a Letter of Undertaking. This pulls in deal info and features two editable sections, similar to the brochure functionality.
- Commission Slip: Used to capture and manage all financial data related to the sale, including amounts due to various parties. This information can be edited as needed.
- Documents: A central repository for all uploaded deal-related documentation.
- Notes/Actions: Displays existing notes and provides a space to record attorney feedback or internal updates.
- Activity: Provides a full audit trail showing which users created or edited the deal.
Pro Tip: If you make any changes, ensure you Save as you go to prevent data loss.
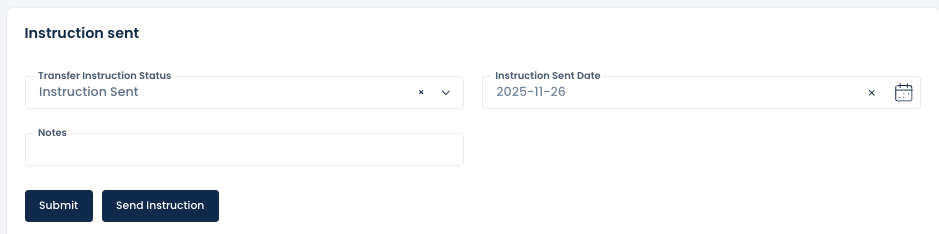
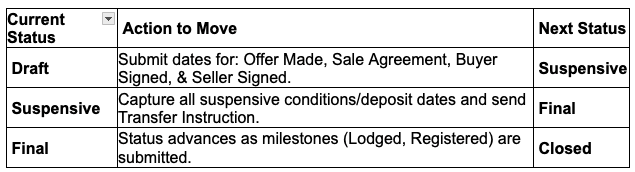
Deal Status & Automation Workflow
The system is designed to automatically advance the Deal STATUS based on the dates submitted in the STAGE tab.
1. The Automation Flow
- Draft to Suspensive: When you submit dates for Offer Made, Sale Agreement, Buyer Signed, and Seller Signed, the status moves from Draft to Suspensive.
- Suspensive to Final:
- If there are no suspensive conditions or a deposit required, the deal moves to Final once the Transfer Instruction is sent.
- If there are suspensive conditions or a deposit required, the status remains Suspensive until those specific Stage dates are captured.
- Post-Final Stages: After reaching Final, the status will continue to advance to Lodged, then Registered/Closed, or Cancelled as the corresponding stage dates are submitted.
2. Important Status Rules
- No Reversals: Deal status cannot move backward. For example, once a deal reaches Final, it cannot be returned to Suspensive.
***Manual Overrides: Users with the specific permission "Edit Final/Closed" (found under the Deals section in User Groups) have the authority to manually adjust the deal status.
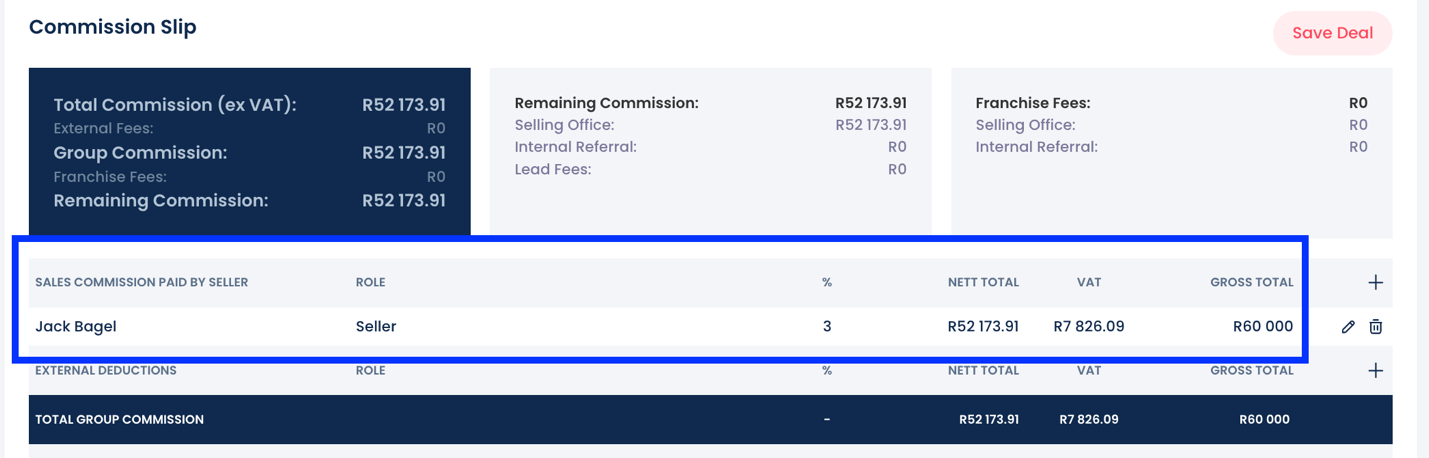
Understanding the Commission Slip
The Commission Slip captures all financial details related to the transaction. Much of this data is automatically pulled from the information provided when the deal was first created, including the financial structure, seller details, and linked agents/branches.
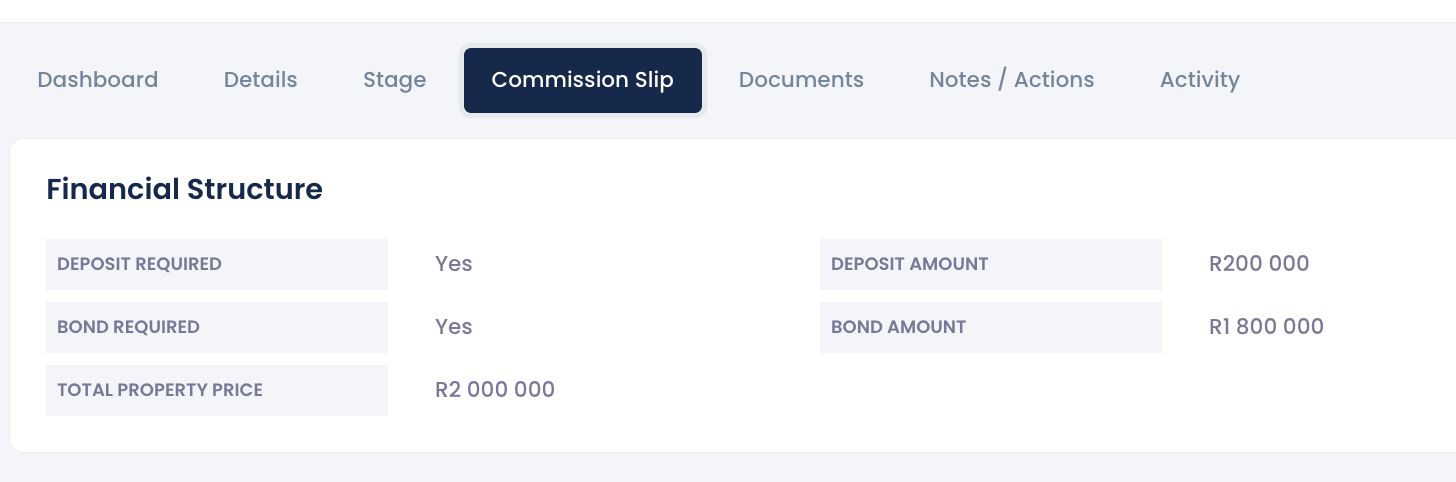
1. Recording Sales Commission
- Auto-Population: If the commission (percentage or Rand value) was recorded in the original listing mandate fields and the deal was created from that listing, the seller’s commission will pre-populate automatically.
- Manual Entry: If the commission was not included in the listing, you can add it manually by clicking the "+" icon in the final column of the "SALES COMMISSION PAID BY SELLER" line item.
- Data Entry (Lock Icon): Use the field marked with the closed lock icon to enter either the commission percentage or the Rand value.
- VAT & Calculations: Ensure the VAT checkbox is selected if applicable. Percentages entered here are calculated based on the property’s captured selling price.
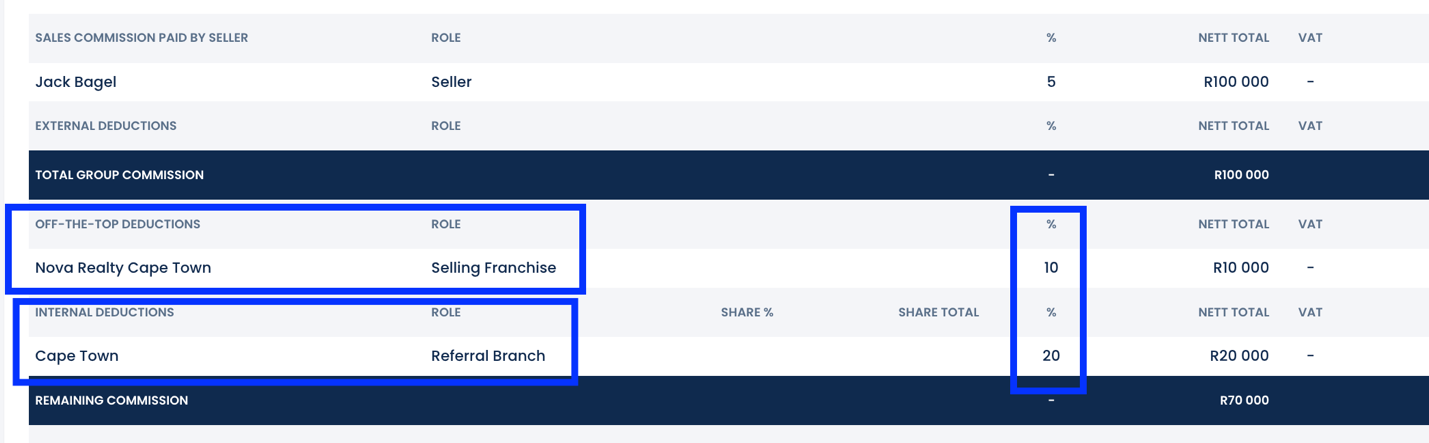
2. Off-the-Top Deductions
The middle section of the slip is used to record deductions such as referrals or franchise fees, which are subtracted from the total commission paid by the seller.
- Adding Deductions: Use the fields with the closed lock icon to enter the Rand value or percentage for these items.
- Franchise Fees: These will auto-populate if they are configured in the Franchise record and set as "due" for that branch.
- Adjustments: Even if fees are pre-populated, you can modify them by clicking the pencil icon in the far-right column.
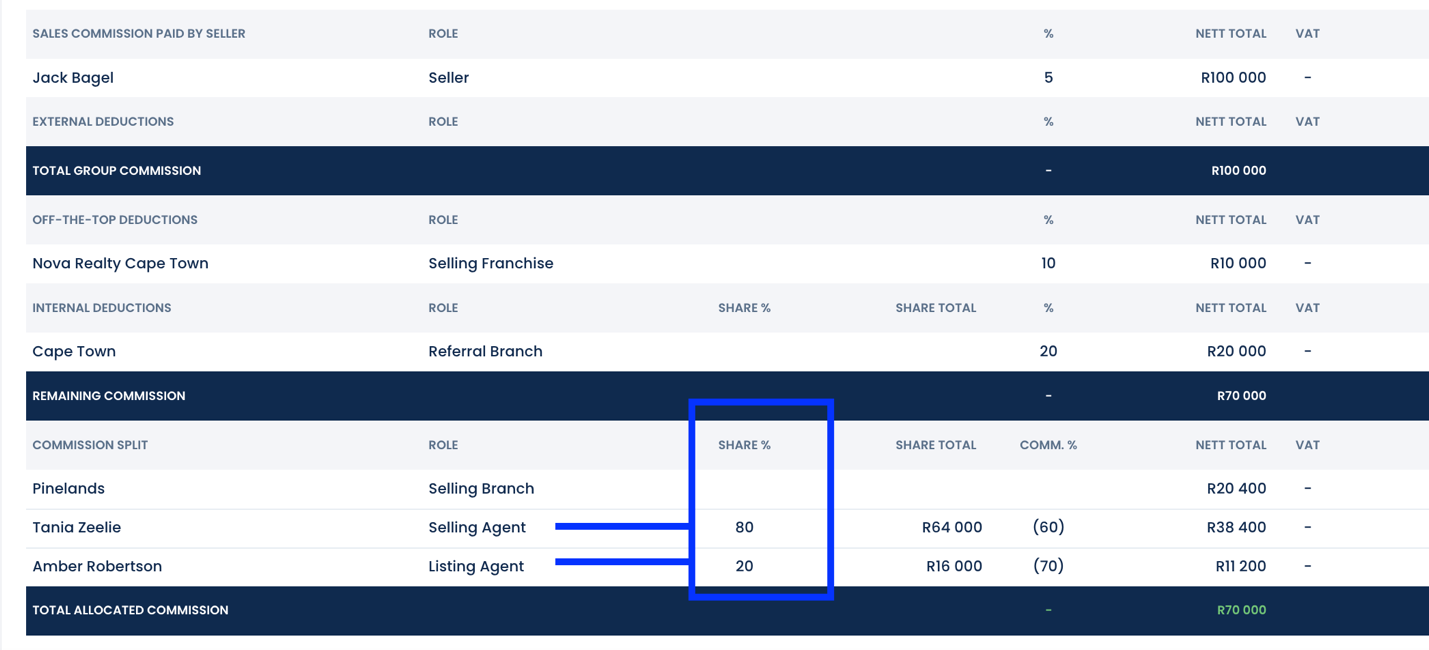
3. Agent & Branch Commission Splits
Once all deductions are calculated, the remaining commission is divided between the selling branch and the agents involved.
- Defining the Split: Use the "Share %" column to specify how agents are splitting their portion of the commission.
- Examples:
- If two agents are sharing the commission, you might enter a split like 20/80.
- If only one agent is involved, the Share % must be set to 100%.
- Agent-Agency Commission Splits
The Share Total column (the second column in the split section) defines the specific commission split between the individual agent and the agency.
1. Automated Population & Manual Editing
- User Record Integration: These split percentages can be pre-set within each agent's User Record, allowing them to populate automatically when a deal is created.
- Manual Adjustments: Even if the information is pre-populated, you can modify the split for a specific deal by clicking the pencil icon in the far-right column.
2. Understanding the Distribution
- Agent Examples: In practice, an agent might be on a 60/40 split (receiving 60% of their share) or a 70/30 split (receiving 70% of their share) with the agency.
- Branch Portion: The selling branch automatically receives the remaining balance of the commission after all agent splits have been calculated.
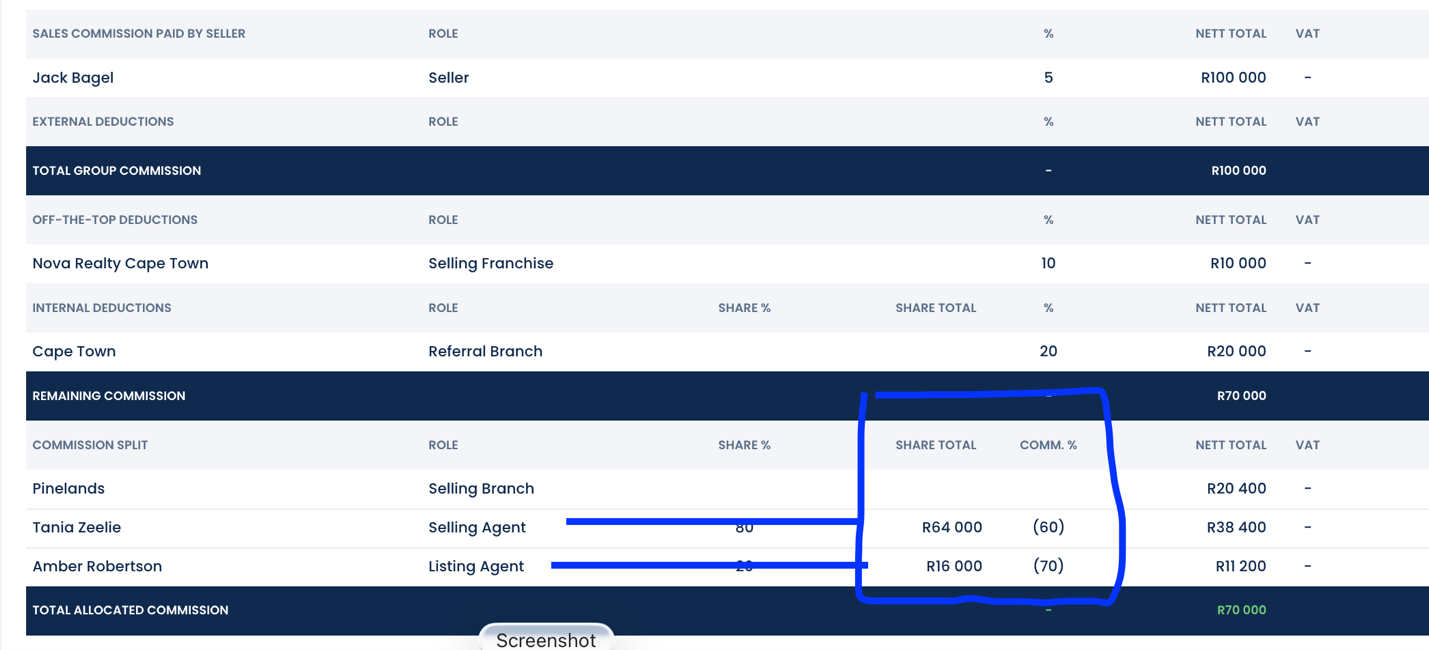
- Franchise Contributions: If agents are required to contribute toward franchise fees, ensure the franchise fee checkbox is selected

3. Importance of Accuracy
Reporting Integrity: It is vital to capture this information accurately, as all financial and performance reports generated by the system rely directly on the data recorded in this section.
When generating reports within the Deals module, select the template that matches your required level of oversight:
- Branch Level: Use the Branch Sales template.
- Individual Level: Use the Agent Sales template.
- Network Level: Use the Franchise Sales template.
(AM - reminder to ask engineering to add deal reports & when adding the deals module)
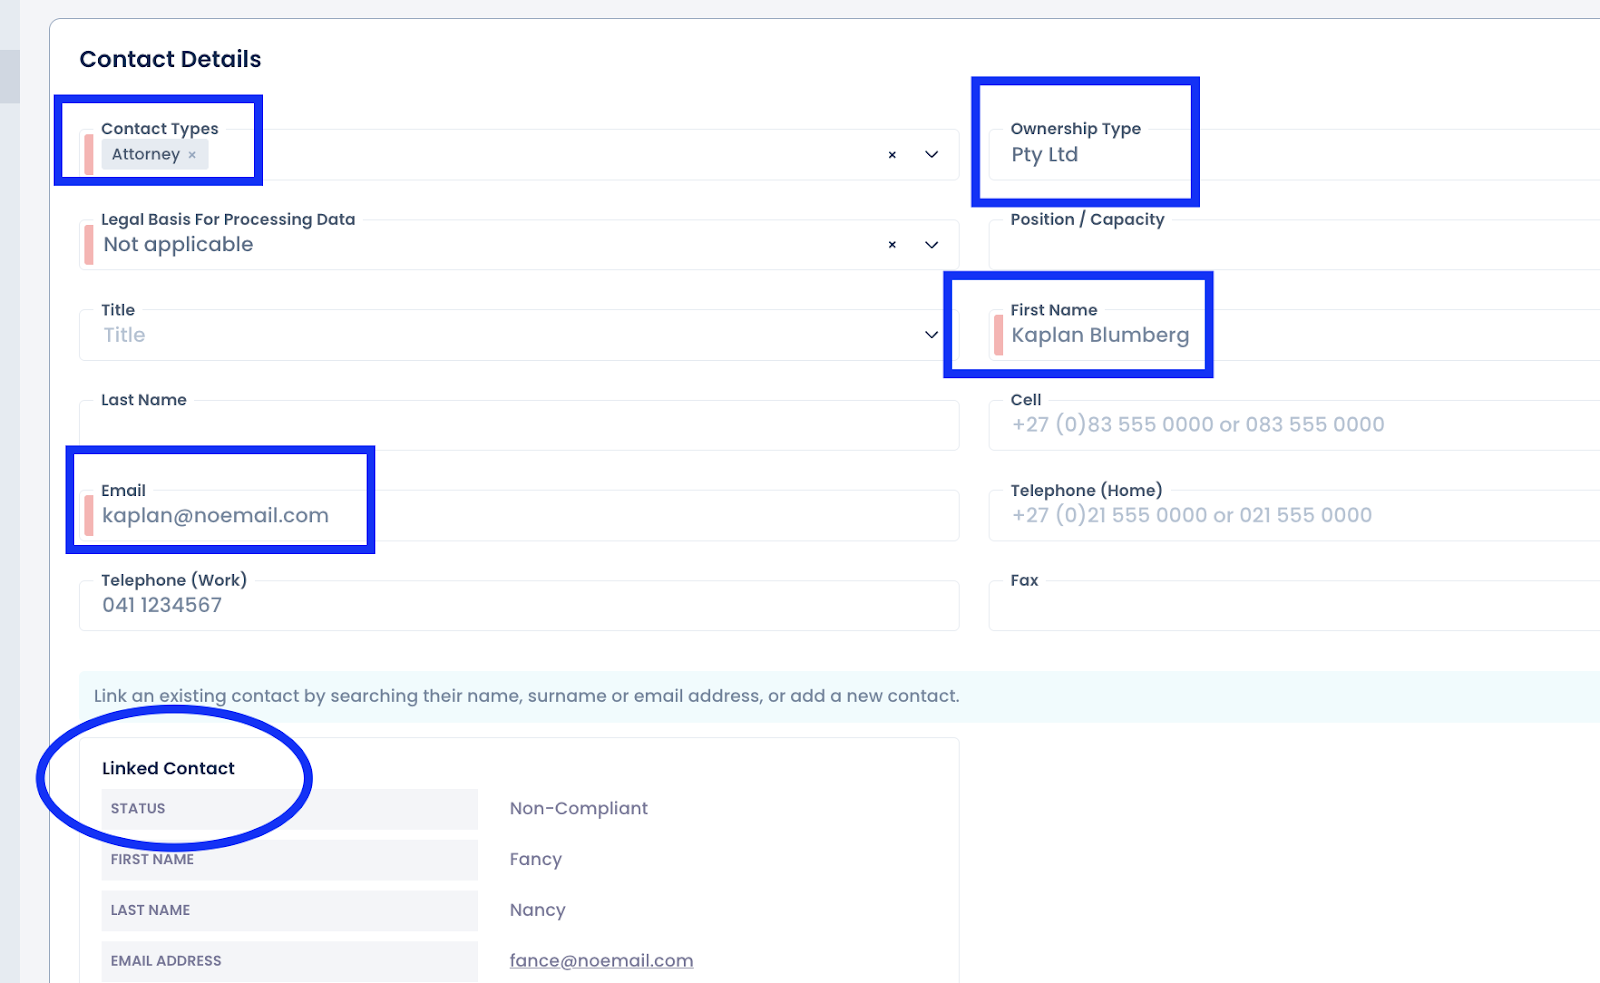
ADDING ATTORNEY CONTACT RECORDS
Attorneys must be created as contact records before they can be linked to a deal.
Creating the Attorney Firm
- Initiation: To begin, click the New Contact button located in either the top-left corner of the Contact Summary page or directly on the Main Dashboard.
- Interface: A form will open featuring three primary tabs: Record Details, Contact Details, and Contact Management.
- Data Entry: Complete as many fields as possible, ensuring all required fields highlighted in Red are filled.
- Categorization: For these specific records, set the Contact Type to Attorney.
Critical Step: Defining Ownership & Entity
- Ownership Type: While not marked as a mandatory field, it is essential to select an Ownership Type when capturing an attorney firm.
- Business Details: Once the Ownership Type is selected, a Business Details section will appear further down the page. You are required to enter the Entity Name (the name of the firm) here.
To ensure instructions are sent correctly from the system, use the following format for the Firm's record:
- First Name: Enter the Firm Name (e.g., STBB).
- Surname: na
- Email: Use the person’s direct email address (e.g., george@stbb.co.za). Note: This is the address where the system will send automated instructions.
- Finalizing: Once all details are verified, click Save Contact in the top-right corner.
Linking Individual Contacts to the Firm
- Individual Records: If the specific attorney or conveyancing secretary does not already exist in your branch database, create a separate contact record for them.
- Note: Since the system only allows one record per email address, you may need to use a reception or dummy email if the primary email is already assigned to the Firm record.
- The Link: Return to the Attorney FIRM contact record and link the individual to it. Requirement: Every attorney firm record must have at least one person linked to it.
5. Permissions and Implementation
- Access Levels: Always verify your User Group permissions, as these determine whether you can view all, unassigned, associated, or only your own contacts.
- Loading a Deal: When creating a new deal, you can search for or select the Attorney FIRM from the dropdown menu to link it to the transaction. NB!! The attorney firms will only be available to select from the dropdown box if captured correctly.
- Email Verification: Before finalizing the link, the system will display the email address that is set to receive the deal instructions.
- Branch-Specific Records: Contact records are unique to each branch. If you work across two different offices using the same attorney, the contact record must be captured in both branches.
Reporting Integrity: It is vital to capture this information accurately, as all financial and performance reports generated by the system rely directly on the data recorded in this section.
When generating reports within the Deals module, select the template that matches your required level of oversight:
- Branch Level: Use the Branch Sales template.
- Individual Level: Use the Agent Sales template.
- Network Level: Use the Franchise Sales template.
Saving and Reusing Report Criteria
If you run the same reports on a monthly basis, you can save significant time by storing your report criteria. Rather than rebuilding the report from scratch, you can save the specific content filters and simply update the date range before each generation.
Example: Generating Monthly Concluded Branch Sales
- Select Template: Choose the Branch Sales template.
- Define Criteria: Set the "Date Type" to Conclusive Date and enter your desired date range.
- Save: Click Save to add this specific configuration to your Reports Summary page for future use.
How to Update and Generate Saved Reports
When you are ready to run a saved report for a new period:
- Edit: Click the pencil icon on the far right on the reports summary page.
- Update: Adjust the dates to the current month and click Save.
- Generate: Click the eyeball icon to view the report on your screen.
Advanced Report Features
- Commission Data: By default, generated reports automatically include all relevant commission figures.
- Detailed Drill-Downs: Reports are initially generated at a summary level. To view the specific details behind the numbers, click the branch name hyperlink on your screen. This will open a granular report containing the individual transaction data for that branch. Customization: On these drilled down reports You can add additional data columns to your view using the Custom Column Generator tool

REMINDERS
To ensure your financial data is accurate and your reports are accurate, watch out for these common errors:
- Forgetting the "Lock" Field: Agents often try to type in the wrong boxes. Always remember that the closed lock icon is the only place to enter a commission percentage or Rand value.
- Incorrect Share % Totals: When multiple agents are involved, their Share % (the split between themselves) must always equal 100%. If only one agent is listed, this must be set to 100%.
- Missing VAT: Double-check the VAT checkbox. If it’s missed or incorrectly applied, the final payouts will not balance with your accounting records.
- Outdated Listing Data: If you updated the commission on the listing after creating the deal, it will not sync automatically. You must manually update the commission slip using the "+" icon or the pencil icon.
- The Deal Status advances automatically as dates are submitted in the Stage tab.
Deductions & Splits
- Off-the-Top: Use the middle section for franchise fees or referrals. These are deducted before agent splits.
- Share % (Agent vs. Agent): Defines how agents split their portion (e.g., 20/80 or 100% if only one agent).
- Share Total (Agent vs. Agency): This is the agent’s split with the company (e.g., 60/40). This pulls from the User Record but can be edited via the pencil icon.
- Franchise Fee Checkbox: Use this if agents are contributing to franchise fees.